Imagine stepping onto your beautiful hardwood floors on a frosty morning and feeling gentle, consistent warmth radiating upward instead of icy cold boards. That’s the promise of modern radiant heat retrofit kits—sophisticated systems designed to slip beneath your existing hardwood without the nightmare of a full floor replacement. While once considered a luxury reserved for new construction, today’s low-profile DIY solutions have revolutionized home comfort, making heated hardwood accessible to determined homeowners willing to tackle a strategic weekend project.
But here’s the reality: retrofitting radiant heat under existing hardwood isn’t as simple as rolling out a mat and flipping a switch. Hardwood’s natural sensitivity to temperature swings and moisture creates a unique set of engineering challenges that demand careful planning, precise product selection, and methodical installation. This guide walks you through everything you need to know before investing in a DIY radiant heat retrofit kit, from assessing your floor’s compatibility to navigating electrical requirements and avoiding costly mistakes that could damage your precious hardwood investment.
Top 10 Radiant Heat Retrofit Kits for Existing Hardwood Floors
Detailed Product Reviews
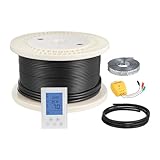
1. LuxHeat 30sqft Floor Heating Cable Kit - 120v Heated Floor Kit for Tile - Heated Flooring System Includes UDG4 Programmable Thermostat w/GFCI, Electric Heating Cable, Strapping, Sensor & Alarm

Overview: The LuxHeat 30sqft kit delivers targeted warmth for small spaces like bathrooms or kitchens. This complete package includes a 120-volt heating cable, programmable touchscreen thermostat with GFCI protection, installation alarm, floor sensor, and strapping guides. With 360 watts of output at 12 watts per square foot, it provides efficient supplemental heating for up to 30 square feet of tile, laminate, or other approved flooring.
What Makes It Stand Out: The inclusion of OJ Microline’s UDG4-4999 thermostat sets this apart, featuring dual sensing, power logging, child lock, and self-learning capabilities. The 7-day programmable schedule optimizes comfort while reducing energy costs. The dual-wire technology with aluminum shielding minimizes EMF exposure to ultra-low levels, and the integrated installation alarm prevents costly damage during setup, providing real-time continuity monitoring.
Value for Money: At $269, this kit offers excellent value for small-scale projects. Comparable systems often cost $300+ without a premium thermostat. The 25-year limited warranty on heating cables and 3-year thermostat warranty provide long-term protection. The UL certification for wet locations ensures safety in bathrooms, eliminating the need for separate GFCI circuits and reducing installation complexity.
Strengths and Weaknesses: Strengths:
- Complete kit with premium programmable thermostat
- Low EMF dual-wire technology
- Real-time installation alarm prevents wire damage
- 25-year warranty provides peace of mind
- UL certified for wet locations
Weaknesses:
- 120V limits coverage for larger rooms
- Cable installation requires more skill than mat systems
- Must be embedded in mortar/self-leveler, adding installation time
Bottom Line: Ideal for DIYers and contractors tackling small bathroom or kitchen renovations. The comprehensive kit, premium thermostat, and installation safeguards make it a smart investment for targeted radiant heating. The 30sqft coverage perfectly suits powder rooms or small entryways, delivering luxury comfort with professional-grade components.
2. LuxHeat 200sqft Floor Heating Cable Kit - 240v Infloor Heat Kit for Tile - Heated Flooring System Includes UDG4 Programmable Thermostat w/GFCI, Heating Cable, Strapping, Floor Sensor & Alarm

Overview: Designed for substantial spaces, the LuxHeat 200sqft kit provides whole-room radiant heating for large living areas, basements, or open-plan kitchens. This robust 240-volt system delivers 2,400 watts across 200 square feet at 12 watts per square foot. The package includes an 800-foot heating cable, UDG4 programmable thermostat, installation alarm, floor sensor, and strapping guides for custom layouts.
What Makes It Stand Out: The 240-volt configuration enables efficient heating of large areas without overloading circuits. The free-form cable design allows complete customization around fixtures and irregular room shapes. The UDG4 thermostat’s power logging feature tracks energy consumption, helping optimize operating costs. The dual-wire EMF-reduction technology and Class A GFCI protection maintain safety standards across the extensive coverage area, making it suitable for primary heating.
Value for Money: At $844, this kit costs approximately $4.22 per square foot—competitive for 240V systems with premium controls. Professional installation of a comparable system could exceed $2,000. The 25-year cable warranty and UL wet-location listing ensure durability. For large renovations, the ability to heat 200sqft with a single thermostat and circuit represents significant savings over multiple smaller systems.
Strengths and Weaknesses: Strengths:
- 240V efficiency for large-scale heating
- Customizable cable layout maximizes coverage
- Comprehensive power logging for cost management
- 25-year warranty on heating elements
- UL certified for wet locations
Weaknesses:
- Requires dedicated 240V circuit (professional wiring likely needed)
- Cable installation is labor-intensive
- Higher upfront cost may exceed small-project budgets
- 200sqft may be insufficient for very large rooms
Bottom Line: Perfect for major renovations where radiant heating serves as a primary heat source. The 240-volt efficiency and customizable layout justify the investment for large spaces. While installation demands electrical expertise, the long-term energy savings and premium components make this a worthwhile choice for substantial flooring projects.
3. LuxHeat 100sqft Floor Heating Mat Kit - 120v Under Floor Heater Mat - Electric Radiant Heated Flooring System for Tile & Laminate - Includes UWG4 WiFi Programmable Thermostat w/GFCI, Alarm & Sensor

Overview: The LuxHeat 100sqft mat kit simplifies radiant heating installation with a pre-spaced, self-adhesive design. This 120-volt system covers substantial areas like master bathrooms or kitchens without the complexity of loose cable layouts. The kit includes a 100-square-foot mat (20" x 61’), UWG4 WiFi programmable thermostat, installation alarm, and floor sensor. With 1,200 watts output, it delivers consistent warmth at 12 watts per square foot.
What Makes It Stand Out: WiFi connectivity via the UWG4 thermostat enables remote control and monitoring through iOS and Android devices, a significant upgrade from basic programmable models. The self-adhesive mesh adheres securely to subfloors and allows cutting/turning (except heater wire) for custom shapes. Power logging delivers detailed energy reports directly to mobile devices. The mat’s flat profile ensures minimal floor height increase while maintaining the same low-EMF dual-wire technology as cable systems.
Value for Money: Priced at $649 ($6.49/sqft), this kit commands a premium over cable systems but saves significant installation time and labor costs. DIY-friendly installation eliminates professional fees that can add $500-800. The WiFi thermostat alone retails for $150-200. For 100sqft projects, the convenience and smart features justify the price, especially when considering the 25-year warranty and UL wet-location certification.
Strengths and Weaknesses: Strengths:
- WiFi-enabled thermostat with mobile control
- Self-adhesive mat reduces installation time by 50%
- Pre-spaced wires ensure consistent heat distribution
- Detailed power logging and energy reports
- 25-year warranty and UL wet-location approval
Weaknesses:
- Higher cost per square foot than cable kits
- Mat width fixed at 20" limits layout flexibility
- WiFi setup may challenge less tech-savvy users
- 120V configuration less efficient for very large areas
Bottom Line: Excellent choice for tech-savvy homeowners seeking convenience without sacrificing quality. The WiFi controls and simplified installation make it worth the premium for medium-sized projects. Ideal for master suites or kitchens where smart home integration and quick installation are priorities.
4. LuxHeat 70sqft Floor Heating Cable Kit - 120v Radiant Floor Heat System for Tile, Vinyl, Laminate - Electric Radiant Heated Flooring System Includes Electric Heating Cable, Strapping, Sensor & Alarm

Overview: The LuxHeat 70sqft cable kit offers flexible radiant heating for medium-sized spaces without the premium price of thermostat-inclusive packages. This 120-volt system provides 840 watts of heating power across 70 square feet, suitable for standard bathrooms, laundry rooms, or entryways. The kit includes a 280-foot heating cable, installation alarm, floor sensor, and strapping guides, but notably excludes a thermostat, allowing buyers to select their preferred control system.
What Makes It Stand Out: This kit’s modular approach lets customers pair it with existing thermostats or upgrade to WiFi models without paying for included components they don’t need. The free-form cable design accommodates irregular layouts and obstacles like toilets and vanities. The dual-wire EMF-reduction technology and UL wet-location certification maintain safety standards. The installation alarm provides the same peace-of-mind monitoring as premium kits, preventing wire damage during placement.
Value for Money: At $299 ($4.27/sqft), this represents solid value for those who already own compatible thermostats or want specific control features. Comparable cable-only systems range from $250-350, but often lack UL certification or installation alarms. The 25-year warranty matches premium kits. However, adding a quality thermostat ($120-180) brings total cost to $419-479, approaching all-in-one kit pricing. Best value for contractors or multi-room projects using centralized controls.
Strengths and Weaknesses: Strengths:
- Lower upfront cost without bundled thermostat
- Flexible cable layout for custom installations
- Installation alarm prevents costly wire damage
- 25-year warranty and UL wet-location certified
- Low EMF dual-wire technology
Weaknesses:
- Thermostat not included (additional $120-180 cost)
- 120V limits efficiency for primary heating
- Cable installation more time-consuming than mats
- No WiFi or advanced features out-of-the-box
Bottom Line: Smart option for experienced DIYers or contractors with specific thermostat preferences. The quality components and safety features justify the cost, but factor in thermostat expenses when budgeting. Ideal for those upgrading existing systems or planning multi-zone installations with centralized controls.
5. LuxHeat 20sqft Electric Radiant Floor Heating System - 120v Heated Tile Floor Kit - Includes UDG4 Programmable Thermostat w/GFCI, Heating Cable, Uncoupling Membrane, Flooring Sensor & Alarm

Overview: The LuxHeat 20sqft kit combines radiant heating with crack isolation technology for tile installations. This specialized 120-volt system includes an 80-foot heating cable, 30sqft of Prova Flex-Heat uncoupling membrane, UDG4 programmable thermostat, installation alarm, floor sensor, and wood float for membrane installation. Delivering 240 watts across 20 square feet, it’s engineered for small tile projects where substrate movement could cause cracking.
What Makes It Stand Out: The 3-in-1 solution integrates heating, waterproofing, and crack prevention in a single system. The uncoupling membrane absorbs stress from subfloor movement, protecting tile investment. Prova’s membrane achieves an “Extra Heavy” rating per ASTM C627, indicating superior load-bearing capacity. The included wood float ensures proper membrane installation. This kit addresses the primary failure point of tile floors while providing luxury warmth, making it ideal for bathroom renovations on concrete or wood substrates.
Value for Money: At $379 ($18.95/sqft of heating coverage), this kit appears expensive but includes $100+ worth of uncoupling membrane and specialized tools. Purchasing components separately would cost $450-500. For tile installations, the crack prevention alone justifies the premium, potentially saving thousands in future repairs. The 25-year warranty on heating elements and 50-year warranty on Prova membrane provide exceptional long-term protection, making it cost-effective for quality-focused renovations.
Strengths and Weaknesses: Strengths:
- Integrated uncoupling membrane prevents tile cracks
- 50-year membrane warranty plus 25-year heating warranty
- Complete kit with specialized installation tools
- Premium UDG4 thermostat with GFCI included
- UL certified for wet locations
Weaknesses:
- Highest cost per square foot in the lineup
- Only covers 20sqft (smallest coverage area)
- Membrane installation adds complexity for beginners
- Excess membrane coverage (30sqft) may be wasted on tiny projects
Bottom Line: Essential for tile installations on challenging substrates where crack prevention is critical. The combined warranties and specialized design make it worth the premium for bathroom renos. While overkill for non-tile applications, it’s the smartest choice for small tile projects demanding maximum durability and warmth.
6. ALL IN ONE Underfloor Electric Floor Heating Kit with 64 sq ft Heat Cable, 103 sq ft Uncoupling Membrane, SMART WiFi Programmable Thermostat (120V) Adaptable to Any Layout for Tile/Stone/Wood Flooring

Overview: The Schluter D-HEAT KIT represents the premium tier of electric floor heating, bundling authentic Schluter components for a 64-square-foot heating area. This comprehensive package includes the DHEHK12064 heating cable, a sophisticated DHERT105/BW WiFi-enabled touchscreen thermostat, and notably, 12 sheets of D-HEAT uncoupling membrane covering 103 square feet—providing crack isolation for your tile or stone installation.
What Makes It Stand Out: This kit’s primary distinction is its inclusion of Schluter’s proprietary uncoupling membrane, which prevents tile cracking while supporting the heating cable. The WiFi programmable thermostat offers remote control and scheduling via smartphone, while the system’s adaptability to any layout makes it ideal for irregular spaces. Every component is genuine Schluter, ensuring seamless integration and warranty support.
Value for Money: At $1,272.98, this premium kit costs significantly more than competitors, but justifies the price through brand reputation, the $300+ value of included membrane, and proven long-term reliability. For tile/stone projects requiring crack isolation, buying these components separately would cost 15-20% more.
Strengths and Weaknesses: Strengths include unmatched brand trust, integrated uncoupling protection, WiFi connectivity, and professional-grade components. Weaknesses are the high upfront cost, limited 120V configuration, and heating coverage (64 sq ft) that doesn’t match the membrane area (103 sq ft), potentially requiring additional cable purchases.
Bottom Line: Ideal for homeowners prioritizing quality over cost and those installing tile/stone flooring requiring crack isolation. The premium investment delivers peace of mind through proven performance and comprehensive warranty support.
7. VEVOR 200 sqft Underfloor Heating Cable Kit, 240V Electric Radiant Heated Floor System, with Smart Control Thermostat & Alarm, Easy Installation for Tile, Stone, Vinyl, Home Improvement
Overview: The VEVOR 200 sq ft Underfloor Heating Cable Kit delivers impressive coverage at a budget-conscious price point. This 240V system features free-form heating cables compatible with tile, stone, vinyl, and laminate flooring, paired with a smart programmable thermostat and integrated installation monitor.
What Makes It Stand Out: The system’s 200-square-foot coverage dwarfs most competitors in this price range, while the free-form cable design offers ultimate layout flexibility. The included installation monitor is a standout feature, alerting installers to damage before concrete is poured, preventing costly rework. Dual-layer aluminum shielding ensures even heat distribution and eliminates electromagnetic interference.
Value for Money: At $319.99, this kit offers exceptional value—costing less than $1.60 per square foot. Comparable systems from premium brands cost 2-3 times more for similar coverage. The 240V configuration improves energy efficiency for larger spaces, reducing long-term operating costs.
Strengths and Weaknesses: Strengths include expansive coverage, unbeatable price, installation monitoring, and versatile voltage. Weaknesses involve VEVOR’s limited brand recognition in floor heating, potentially shorter warranty support, and the more complex installation of free-form cables versus mat systems. The kit lacks uncoupling membrane, requiring separate purchase for tile projects.
Bottom Line: A smart choice for budget-savvy DIYers and contractors covering large areas. While lacking premium brand prestige, the features and coverage make it a practical, cost-effective heating solution for substantial spaces.
8. LuxHeat 70sqft Floor Heating Cable Kit - 240v Laminate, Vinyl, Tile Floor Heating Kit - Heated Flooring System - Includes UDG4 Programmable Thermostat w/GFCI, Heater Cable, Alarm & Flooring Sensor

Overview: LuxHeat’s 70 sq ft Cable Kit combines decades of industry expertise with modern technology in a 240V loose-lay system. Designed for custom installations under tile, laminate, or vinyl, this package includes 280 feet of heating cable, the sophisticated OJ Microline UDG4 touchscreen thermostat with GFCI, installation alarm, and floor sensor.
What Makes It Stand Out: The dual-wire technology with aluminum shielding reduces electromagnetic fields to ultra-low levels, addressing health concerns. With 50 years of industry experience backing a 25-year limited warranty, LuxHeat demonstrates confidence in durability. The free-form cable layout accommodates irregular room shapes and obstacles with 3-inch spacing precision.
Value for Money: Priced at $404 for 70 square feet, this mid-tier kit balances premium features with reasonable cost. The 240V configuration delivers more efficient heating than 120V alternatives, while the included alarm prevents installation errors that could void warranties in other systems.
Strengths and Weaknesses: Strengths include EMF reduction technology, extensive warranty, flexible cable design, and professional-grade thermostat. Weaknesses are the cable system’s more complex installation compared to mats, lack of included uncoupling membrane, and requirement for self-leveling underlayment embedding. The 240V requirement may necessitate electrical upgrades.
Bottom Line: Perfect for custom projects where layout flexibility is paramount. The EMF reduction and warranty make it ideal for health-conscious homeowners seeking a reliable, long-term heating solution.
9. LuxHeat 50sqft Floor Heating Mat Kit - 120v Electric Heating Mat System - Complete Electric Radiant Heated Flooring System Includes Alarm, UDG4 Programmable Thermostat w/GFCI & Floor Sensor

Overview: LuxHeat’s 50 sq ft Mat Kit streamlines electric floor heating with a pre-spaced, self-adhesive design operating on 120V. This complete system includes a 20-inch wide by 30.9-foot long mat, OJ Microline UDG4 touchscreen thermostat, installation alarm, and floor sensor—everything needed for straightforward installation under tile or laminate.
What Makes It Stand Out: The mat’s self-adhesive mesh and double-sided tape ensure flat, secure placement even when flipped or rotated around obstacles. Unlike cable systems, the pre-spaced 3-inch heating wire spacing eliminates layout guesswork while maintaining flexibility for custom room shapes. The same premium UDG4 thermostat from LuxHeat’s cable kits provides professional control.
Value for Money: At $369 for 50 square feet, this kit offers premium features at a competitive price point. The 120V configuration suits smaller spaces without requiring electrical panel upgrades, making it practical for bathrooms and kitchens. The included alarm safeguards against installation damage.
Strengths and Weaknesses: Strengths include easy mat installation, premium thermostat, 25-year warranty, and UL wet-location certification. Weaknesses are limited 50 sq ft coverage, 120V inefficiency for larger areas, and the mat’s fixed width restricting some layouts. Cannot cut the heating wire, only the mesh.
Bottom Line: An excellent choice for DIYers seeking professional results without cable installation complexity. Ideal for small to medium rooms where straightforward installation and reliable performance outweigh maximum flexibility.
10. LuxHeat 20sqft Floor Heating Mat Kit - 120v in Floor Heating System - Complete Electric Radiant Heated Flooring System Includes Alarm, UDG Programmable Thermostat w/GFCI & Flooring Sensor

Overview: LuxHeat’s entry-level 20 sq ft Mat Kit makes radiant floor heating accessible for small spaces. This 120V system includes a 20-inch by 12.2-foot self-adhesive heating mat, OJ Microline UDG-4999 programmable thermostat with GFCI, installation alarm, and floor sensor—packaging premium features into a compact, affordable bundle.
What Makes It Stand Out: Despite its modest size, this kit includes the same professional-grade components as larger LuxHeat systems: dual-wire EMF reduction technology, Class A GFCI protection, and a sophisticated programmable thermostat. The ultra-thin 1/8-inch heating wires minimize floor height impact, while the self-adhesive design simplifies installation.
Value for Money: At $189, this kit delivers exceptional value for small projects, costing under $10 per square foot while including premium features typically found in more expensive systems. It’s an ideal entry point for those wanting to test radiant heating or heat a single small area without major investment.
Strengths and Weaknesses: Strengths include unbeatable price, easy mat installation, premium thermostat features, and 25-year warranty. Weaknesses are the very limited 20 sq ft coverage, 120V inefficiency for scaling up, and potential need for multiple kits in slightly larger spaces. The fixed mat dimensions offer minimal layout flexibility.
Bottom Line: Perfect for powder rooms, small entryways, or spot heating. This kit proves that premium features aren’t exclusive to premium prices, making it an intelligent choice for targeted heating applications.
Understanding Radiant Heat Retrofit Systems for Hardwood
What Is Radiant Floor Heating?
Radiant floor heating delivers warmth by transferring heat directly from a surface to the people and objects in a room through infrared radiation. Unlike forced-air systems that blast hot air from vents, radiant heat creates an even thermal field that rises naturally from the floor upward. For hardwood applications, this means gentle, consistent temperatures that eliminate cold spots without creating the drafts and dust circulation associated with traditional HVAC systems.
How Retrofit Kits Differ from New Construction Systems
Retrofit kits are engineered specifically for installation beneath existing flooring, prioritizing ultra-thin profiles and minimal floor height impact. While new construction systems might embed thick hydronic tubing in 1.5 inches of concrete, retrofit solutions typically measure less than 3/8-inch thick and use advanced materials to maximize heat transfer while protecting your wood from thermal stress. These systems operate at lower temperatures—usually between 75°F and 85°F at the floor surface—to prevent wood damage while still delivering comfortable warmth.
Why Hardwood Floors Present Unique Challenges
Moisture Content Concerns
Wood is hygroscopic, meaning it constantly exchanges moisture with the surrounding air. Introducing heat from below accelerates moisture movement, potentially causing boards to dry too quickly and shrink, creating gaps between planks. Quality retrofit kits address this by incorporating moisture barriers and operating at gentle temperature ramps that allow the wood to acclimate gradually.
Thermal Expansion and Contraction
Every wood species expands when warmed and contracts when cooled, but the rate varies dramatically. Oak might move 0.0015 inches per inch per degree Fahrenheit, while exotic species like Brazilian cherry can move twice as much. This micromovement, multiplied across an entire floor, can stress fasteners, crack glue bonds, or cause cupping if the heating system delivers heat unevenly or too aggressively.
Wood Species Compatibility
Not all hardwood plays nice with radiant heat. Dense, stable species like white oak, ash, and quarter-sawn woods perform exceptionally well. Conversely, softer species like pine or highly reactive exotics require extra caution. Your retrofit kit’s temperature controls must offer precise regulation to accommodate your specific wood species’ thermal characteristics.
Types of DIY Radiant Heat Retrofit Technologies
Electric Mat Systems
These factory-assembled mats feature heating cables pre-attached to fiberglass mesh in standardized layouts. You simply roll them out, cut the mesh (never the cable) to navigate obstacles, and connect to power. Mats excel in rectangular rooms with minimal obstructions and typically add only 1/8-inch to floor height, making them ideal for retrofit applications where ceiling clearance is tight.
Electric Cable Systems
Loose cable systems offer maximum flexibility for irregular rooms, allowing you to customize spacing for optimal heat distribution. Installation involves securing cables to the subfloor with clips or tracks at precise intervals—usually 3-inch spacing for hardwood applications. While more labor-intensive, cables let you work around curved walls, plumbing, and existing floor vents with surgical precision.
Hydronic Low-Profile Solutions
Though less common for DIY projects, thin-profile hydronic systems using flexible PEX-AL-PEX tubing embedded in lightweight panels can work beneath hardwood. These connect to a boiler or water heater and shine in whole-house applications where electricity costs are prohibitive. The complexity of connecting to plumbing and the need for pressure testing make them more suitable for experienced DIYers comfortable with hydronic principles.
Infrared Film Technologies
Emerging carbon film systems consist of thin, flexible heating elements sandwiched between polymer layers. These ultra-slim solutions—some measuring just 0.5mm thick—install directly under underlayment and promise even heat distribution. However, their long-term durability under hardwood remains less proven than traditional cable systems, making manufacturer reputation critical.
Key Features to Evaluate Before Buying
Wattage Density and Heat Output
For hardwood applications, target 12-15 watts per square foot. Higher densities risk overheating wood, while lower densities won’t overcome heat loss in poorly insulated spaces. Look for systems with self-regulating cables that automatically reduce power as they approach target temperatures, providing an extra layer of wood protection.
Thermostat Compatibility and Smart Controls
Your thermostat is the brain protecting your floor investment. Required features include floor temperature sensors (not just air sensors), programmable temperature ramps that limit heating to 5°F per hour, and hardwood-specific settings that cap maximum floor temperature at 85°F. Smart thermostats with remote monitoring let you check floor conditions from your phone and receive alerts if temperatures drift outside safe ranges.
Installation Profile and Floor Height Impact
Measure your current floor-to-ceiling height and subtract door clearance before selecting a system. Most quality retrofit kits add 3/16-inch to 5/16-inch total height when combined with required underlayment. This includes the heating element, vapor barrier, and any leveling layers. Don’t forget to account for transition strips between heated rooms and unheated spaces.
Moisture Barrier Integration
The best kits include integrated vapor barriers or require specific underlayment with built-in moisture protection. This prevents subfloor moisture from migrating upward into your hardwood while also stopping wood treatments and finishes from off-gassing downward onto heating elements. Look for perm ratings below 1.0 for optimal protection.
Assessing Your Hardwood Floor’s Suitability
Determining Wood Thickness and Subfloor Type
Use a small drill bit to create an inconspicuous test hole in a closet corner to measure your hardwood thickness. Ideal candidates are 3/4-inch solid or 5/8-inch engineered hardwood over plywood or OSB subfloors. Thinner engineered floors with click-lock profiles may not provide enough insulation above the heating element, leading to hot spots and potential damage.
Checking for Existing Floor Damage
Heating a compromised floor accelerates failure. Inspect for loose boards, squeaks, water stains, or finish deterioration. Secure loose planks with finish nails and address any subfloor moisture issues before proceeding. Floors with significant cupping or gapping need stabilization before adding heat—otherwise, you’ll lock in the defects permanently.
Moisture Content Testing Protocols
Invest in a pin-type wood moisture meter and test at least 20 locations across the floor, including perimeter and center areas. Hardwood should read between 6-9% moisture content before installation. If readings exceed 12%, postpone your project and investigate humidity sources. Installing heat over wet wood guarantees cracking, cupping, and warranty voidance.
Subfloor Preparation Essentials
Cleaning and Leveling Requirements
Remove all baseboards and thoroughly vacuum the subfloor, paying special attention to construction debris and protruding fasteners. Use a long level to identify high and low spots—any variation over 3/16-inch in 10 feet requires leveling compound. For minor imperfections, specialized self-leveling underlayment designed for radiant heat fills gaps without impeding thermal transfer.
Insulation Strategies for Retrofit Applications
While you can’t install traditional under-slab insulation in a retrofit, you can improve efficiency by addressing perimeter heat loss. Apply closed-cell spray foam or rigid foam board to rim joists and foundation walls in basements or crawl spaces below. This redirects heat upward rather than allowing it to escape laterally, improving system responsiveness by up to 30%.
Vapor Barrier Installation
Lay 6-mil polyethylene sheeting across the entire subfloor, overlapping seams by 12 inches and sealing with contractor-grade tape. Run the barrier 2-3 inches up perimeter walls, trimming after installation. Some advanced retrofit kits feature pre-attached vapor barriers—if yours doesn’t, this step is non-negotiable for hardwood protection.
Installation Methods for Different Hardwood Configurations
Floating Floor Applications
If your hardwood is a floating engineered floor, you’re in luck—these are the easiest retrofit candidates. Simply install the heating system over your vapor barrier, add the manufacturer’s recommended underlayment, and lay your floor back down. The floating system accommodates thermal movement naturally, reducing stress on boards.
Nail-Down Hardwood Considerations
For nail-down floors, you must avoid puncturing heating cables during reinstallation. Mark cable locations with chalk lines and use shorter fasteners (1-inch instead of standard 1.5-inch) to prevent hitting elements. Some installers prefer to convert nail-down floors to floating by adding a plywood overlay, though this raises floor height significantly.
Glue-Down Installation Strategies
Glue-down floors require complete adhesive removal from the subfloor before installing heating elements. Use a floor scraper and adhesive remover, then sand any residue. When reinstalling, select adhesives rated for radiant heat applications—these remain flexible at elevated temperatures and prevent bond failure. Never use water-based adhesives over electric heating elements.
Electrical Requirements and Safety Protocols
Circuit Capacity and Load Calculations
Calculate total wattage (square footage × watts per square foot) and divide by voltage to determine amperage draw. Most systems require a dedicated 120V or 240V circuit. A 150-square-foot bathroom at 15 watts per square foot draws 18.75 amps—requiring a 20-amp circuit with 12-gauge wire. Undersized circuits cause nuisance tripping and potential fire hazards.
GFCI Protection Requirements
The National Electrical Code mandates GFCI protection for all radiant heating in bathrooms, kitchens, and any location within 6 feet of water sources. Some local jurisdictions require AFCI/GFCI combination breakers for bedroom installations. Don’t rely on standard breakers—install the required protection to ensure safety and code compliance.
Professional Electrical Inspection Recommendations
Even the most confident DIYer should hire a licensed electrician for the final connection to the panel and thermostat wiring. Many manufacturers require professional electrical certification to validate warranties. Schedule an inspection after installation but before covering the system to verify connections and resistance readings match manufacturer specifications.
Performance Expectations and Energy Efficiency
Realistic Warm-Up Times
Unlike tile that heats in 30 minutes, hardwood’s insulating properties mean 2-4 hour warm-up periods from cold start to comfortable temperature. Expect 30-60 minutes to feel initial warmth and plan accordingly. Smart thermostats with learning algorithms can pre-heat floors based on your schedule, eliminating wait times.
Zone Control Strategies
Heating your entire home uniformly wastes energy. Design your retrofit into zones based on usage patterns—bedrooms on separate thermostats from living areas, bathrooms programmed for morning warm-up only. Each zone requires its own thermostat and power feed, increasing upfront costs but delivering 20-40% energy savings through targeted heating.
Operating Cost Calculations
Estimate costs using this formula: (Total Watts ÷ 1000) × Hours Used × Electricity Rate. A 300-square-foot living room at 15 watts per square foot uses 4.5 kW. Running 8 hours daily at $0.12 per kWh costs $1.30 per day or $39 monthly. Actual costs run lower since thermostats cycle power on and off once target temperature is reached.
Potential Risks and How to Mitigate Them
Preventing Wood Cupping and Gapping
Control temperature ramp rates through thermostat programming, limiting increases to 5°F per hour. Maintain indoor humidity between 30-50% year-round using humidifiers in winter and dehumidifiers in summer. This stabilizes the wood’s moisture content, preventing the differential movement that causes cupping (edges higher than center) or gapping between boards.
Avoiding Adhesive Failure
If your floor is glue-down or you’re using adhesive during reinstallation, verify the adhesive’s maximum temperature rating exceeds your system’s peak operating temperature by at least 20°F. Apply adhesive evenly using the manufacturer’s recommended trowel notch size—inconsistent application creates air pockets that insulate locally, causing hot spots and eventual bond failure.
Managing Subfloor Moisture
Install a secondary moisture meter probe in the subfloor itself, connected to your thermostat. This “moisture sentry” feature shuts down the heating system if subfloor moisture rises above safe levels, preventing catastrophic wood damage. In basements, consider a dehumidistat that activates the system only when humidity stays below 60%.
Cost Analysis: Budgeting Your Retrofit Project
Material Costs Breakdown
Expect $8-15 per square foot for quality electric retrofit kits, including heating elements, thermostat, and sensors. Underlayment adds $1-3 per square foot, while electrical supplies (wire, conduit, breakers) run $100-300 depending on proximity to the panel. A typical 200-square-foot project costs $1,800-3,600 in materials.
Hidden Expenses to Anticipate
Factor in baseboard replacement ($2-5 per linear foot), transition strips between rooms ($30-60 each), and potential floor leveling compound ($30 per bag covering 50 square feet). If your electrical panel lacks capacity, a subpanel installation adds $500-1,500. Always budget 15% contingency for unexpected subfloor repairs.
ROI and Long-Term Value
While retrofit radiant heat rarely increases home value dollar-for-dollar, it significantly boosts marketability and buyer appeal in cold climates. Energy savings average 15-30% compared to forced-air systems due to lower thermostat setpoints (warm feet allow you to reduce air temperature by 3-4°F). Most homeowners recoup costs through comfort and energy savings within 7-12 years.
Maintenance and Troubleshooting
Routine Care Procedures
Annually check thermostat floor sensor readings against an infrared thermometer to verify accuracy. Test GFCI/AFCI breakers monthly using the test button. Vacuum floor registers and baseboard gaps to prevent debris from filtering down onto heating elements. These simple steps prevent 90% of common failures.
Common Issues and DIY Solutions
Uneven heating often indicates air gaps between the heating element and subfloor. Inject low-viscosity thermal compound through small access holes to fill voids. If boards develop squeaks after heating season, the wood may be too dry—increase humidity and reduce maximum temperature by 5°F. Thermostat display errors typically mean a loose sensor wire connection; check terminals and ensure no nails pierced the sensor cable.
When to Call a Professional
Contact a certified technician if you measure resistance values more than 10% outside manufacturer specifications, indicating cable damage. Professional intervention is also necessary for any electrical work beyond thermostat mounting, persistent circuit breaker tripping, or if your floor shows signs of cupping despite correct thermostat settings. Don’t risk your safety or flooring investment.
Warranty Considerations and Manufacturer Support
Understanding Coverage Limitations
Most manufacturers warranty heating cables for 25 years but limit coverage to 10 years when installed under hardwood due to its challenging nature. Read the fine print—many warranties require professional installation certification, specific underlayment products, and documented moisture testing. Failure to follow these requirements voids coverage, leaving you with a $2,000+ repair bill.
Documentation Requirements
Photograph every step of your installation, especially cable layout, sensor placement, and electrical connections. Keep all receipts, moisture meter readings with dates and locations, and thermostat programming logs. Manufacturers often require this documentation for warranty claims, and it’s invaluable if you sell your home and need to prove proper installation to buyers.
Technical Support Availability
Prioritize manufacturers offering 24/7 technical support and detailed installation videos specific to hardwood applications. Some provide layout design services where you email your floor plan and receive a customized cable placement map. This support is worth paying a premium for—one prevented mistake saves more than the cost difference between budget and premium kits.
Design and Layout Planning Strategies
Heat Loss Calculations and Coverage Mapping
Don’t assume you need 100% floor coverage. Calculate heat loss through windows, walls, and ceilings using online calculators, then map heating elements to high-loss areas like exterior walls and large windows. Typically, cover 70-80% of floor area, leaving 6-inch perimeters along walls and avoiding permanent fixtures. This targeted approach reduces costs and prevents overheating in low-loss interior zones.
Furniture Placement Considerations
Permanent fixtures like kitchen islands, built-in bookcases, and heavy beds trap heat underneath, creating dangerous hot spots. Design your layout to leave these areas unheated. For furniture that might move (sofas, tables), it’s safe to heat underneath—just ensure pieces have legs at least 3 inches high to allow heat dissipation.
Transition Zones Between Heated and Unheated Areas
Doorways between heated and unheated rooms require special planning. Extend heating elements 12-18 inches into unheated spaces to create a gradual temperature transition, preventing abrupt wood movement at thresholds. Use expansion joint molding at these boundaries to accommodate differential movement between heated and unheated floor sections.
Frequently Asked Questions
Can I install radiant heat under my 100-year-old hardwood floors?
Yes, but with significant caution. Historic floors often lack modern moisture barriers and may have unpredictable nail patterns. Have a flooring specialist assess board thickness and stability first. Consider using lower wattage density (10-12 watts per square foot) and stricter temperature controls to accommodate the wood’s age and potential brittleness.
Will radiant heat cause my hardwood to fade or dry out?
Properly installed systems won’t cause fading—that’s UV exposure. However, heat can accelerate drying if indoor humidity drops below 30%. Combat this with whole-home humidification and thermostats that limit floor temperature to 85°F. Engineered hardwood with aluminum oxide finishes shows the best resistance to heat-related color changes.
How much does floor height increase with a retrofit system?
Most quality systems add 3/16-inch to 5/16-inch total height, including underlayment. This typically doesn’t affect door clearance or require baseboard adjustments. Low-profile systems using carbon film can be as thin as 1/8-inch, while hydronic solutions may add 1/2-inch or more.
Can I heat just my bathroom floor while leaving the connected hallway unheated?
Absolutely. Design your layout with a cold lead (non-heated cable section) extending to the thermostat location. The hallway remains unheated, but install an expansion transition strip at the bathroom threshold to accommodate movement differences. This zone approach is actually recommended for energy efficiency.
What’s the difference between a floor sensor and an air sensor thermostat?
Floor sensors measure the actual temperature of your wood, providing precise control and wood protection. Air sensors measure ambient room temperature and guess at floor conditions—insufficient for hardwood applications. Always choose thermostats with both sensors, using floor temperature as the primary control and air temperature for reference.
How do I know if my electrical panel can handle the additional load?
Calculate total amperage draw and compare to your panel’s spare capacity. Most homes have 100-amp or 200-amp service. If you’re unsure, a licensed electrician can perform a load calculation for $100-150. Many jurisdictions require this assessment before issuing permits for radiant heat installation.
Can I install radiant heat under hardwood on a concrete slab?
Yes, but moisture is your primary enemy. Concrete slabs must test below 3 pounds per 1000 square feet per 24 hours using a calcium chloride test. Install a robust vapor barrier (15-mil polyethylene) and consider a thermal break insulation board before adding heating elements. Engineered hardwood performs better than solid wood in this application.
What happens if I damage a heating cable during installation?
Stop immediately and test the cable with a multimeter. Minor nicks in the outer jacket can be repaired with manufacturer-approved splice kits, but damaged heating conductors require replacing the entire cable section. Most kits include a loud alarm that sounds if cables are cut, alerting you before covering the system. Always purchase 10% extra cable for repairs.
How long do radiant heat retrofit systems typically last?
Quality electric systems last 30-50 years when properly installed. The weak link is usually the thermostat (10-15 year lifespan) or floor sensor. Hydronic systems can last 50+ years with proper maintenance. Hardwood itself may show wear at a faster rate when heated continuously, but proper humidity control minimizes this effect.
Is it better to heat the entire house or just specific rooms?
For most homeowners, zoned heating of high-use areas (bathrooms, kitchens, primary bedrooms) delivers the best return on investment. Whole-house radiant heat under hardwood is wonderful but expensive—often $15,000-30,000 for a typical home. Start with one or two priority rooms to evaluate performance before committing to a whole-house approach.