As a landlord or property manager, you know that protecting your investment goes far beyond collecting rent on time. The silent anxiety of wondering whether your property is secure—especially during tenant turnover or extended vacancies—can keep you up at night. Traditional door and window sensors alert you when someone opens an entry point, but what about the determined intruder who tries to bypass them entirely? That’s where vibration tamper alerts change the game entirely.
These sophisticated sensors don’t just monitor when a door or window opens; they detect the subtle vibrations caused by someone attempting to force, pry, or manipulate the entry point before a breach even occurs. For rental properties, where you can’t always control who has keys or whether locks have been changed, this early warning system provides an invaluable layer of protection that standard sensors simply can’t match. Whether you’re managing a single-family rental or a portfolio of multi-unit buildings, understanding how to select, install, and leverage these advanced security devices will transform how you safeguard your properties—without violating tenant privacy or lease agreements.
Top 10 Door & Window Sensors for Rentals
Detailed Product Reviews
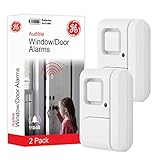
1. GE Personal Security Window and Door Alarm, 6 Pack, DIY Protection, Burglar Alert, Wireless Chime/Alarm, Easy Installation, Home Security, Ideal for Home, Garage, Apartment and More,White, 49721

Overview: The GE Personal Security Window and Door Alarm 6-pack delivers a comprehensive DIY security solution for homeowners seeking reliable intrusion detection. These wireless magnetic sensors trigger a piercing 120-decibel alarm or subtle chime when entry points are breached, providing flexible protection for homes, garages, and apartments. The set of six ensures extensive coverage without complex wiring or professional installation.
What Makes It Stand Out: GE’s reputation for quality shines through with an intuitive OFF/chime/alarm switch that lets you customize alerts based on time of day or security needs. The included battery test button and low battery LED eliminate guesswork, while the high-quality magnetic sensor ensures consistent performance. The 120dB alarm ranks among the loudest in this category, creating an effective deterrent.
Value for Money: At $23.50 for six units ($3.92 each), this pack offers exceptional value for whole-home protection. Competing brands charge similar prices for fewer units or inferior features. The inclusion of LR44 batteries and double-sided tape means no hidden costs, making it a cost-effective alternative to monitored security systems.
Strengths and Weaknesses: Strengths include impressive volume, versatile alert modes, trusted brand reliability, and straightforward installation. The battery test function is a practical bonus. Weaknesses involve reliance on button batteries (less convenient than AAAs), indoor-only limitation, and adhesive that may fail in extreme temperatures. The chime mode could be louder for larger homes.
Bottom Line: The GE 6-pack is an outstanding choice for budget-conscious homeowners wanting comprehensive, reliable security without monthly fees. It balances performance, features, and value better than most competitors.
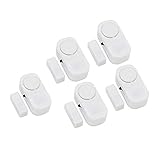
2. Sanjie Door Window Alarms - 5 Pack,125dB,Volume Control,Window Door Open Alarm Sensors for Kids Safety/Dementia/Pool,Wireless Sensors Keep Your Home Security,Easy to Install,Long Battery Life

Overview: Sanjie’s Door Window Alarms 5-pack prioritizes customizable security with impressive volume control and extended battery life. Designed for diverse safety applications—from pool access monitoring to dementia patient supervision—these sensors deliver 125-decibel protection when magnetic contact breaks. The three-mode system adapts to various security scenarios, making it versatile for families with specific safety concerns.
What Makes It Stand Out: The standout feature is granular volume control offering 125dB alarm, 100dB alarm, and 100dB chime modes—uncommon in this price range. The 12-month battery life on LR44 cells outlasts most competitors, while the low-battery flashing indicator provides proactive maintenance alerts. The 30-second continuous alarm ensures persistent notification until the entry point is secured.
Value for Money: At $27.19 for five units ($5.44 each), this sits at the premium end of DIY alarms. However, the advanced features—volume control, extended battery life, and multi-scene versatility—justify the higher cost. For caregivers or parents needing tailored alerts, the investment translates to meaningful peace of mind that cheaper alternatives can’t match.
Strengths and Weaknesses: Strengths include market-leading loudness, three volume settings, exceptional battery longevity, and suitability for child/elderly safety. The installation is straightforward with 3M tape. Weaknesses involve the highest price per unit, potential overkill for basic burglary deterrence, and the 30-second alarm duration that might be excessive for some users. The chime mode’s two-ding pattern could be more distinct.
Bottom Line: Sanjie’s alarms excel for users needing more than basic intrusion alerts. The volume customization and extended battery make it ideal for safety-conscious families, though casual users may find simpler, cheaper options sufficient.
3. HIIXHC Personal Security Window & Door Alarm Bell | Wireless Sensor Door Window Burglar Alarm | Pack of 10

Overview: The HIIXHC 10-pack offers maximum coverage at minimal cost, targeting budget-minded buyers who prioritize quantity over advanced features. These no-frills magnetic sensors emit a 90-decibel alarm when doors or windows open beyond 0.59 inches, providing basic deterrent capability for homes, apartments, and offices. The straightforward three-step installation makes it accessible for non-technical users.
What Makes It Stand Out: The sheer value of ten units under $15 is unmatched, making whole-property coverage possible for less than a single smart sensor costs. Using AAA batteries (not included) instead of button cells simplifies replacement and reduces long-term operating costs. The dustproof design suggests durability, while the compact size allows discreet placement on various entry points.
Value for Money: At $14.99 for ten ($1.50 each), this is the most economical option available. While lacking premium features, the per-unit cost enables securing every window and door without financial strain. The AAA battery compatibility is a hidden cost-saver over time. For renters or temporary security needs, the low investment risk is compelling.
Strengths and Weaknesses: Strengths include unbeatable price, bulk quantity, AAA battery flexibility, and simple operation. Weaknesses involve the weaker 90dB alarm (less deterrent effect), no included batteries, absence of chime mode or battery indicator, and vague “high quality” claims without certification. The alarm may not stop automatically until contact is restored.
Bottom Line: The HIIXHC 10-pack serves those needing basic, widespread coverage on the tightest budget. Accept its limitations and lack of features, and you get functional security for pennies on the dollar compared to alternatives.
4. GE Personal Security Window and Door Alarm, 2 Pack, DIY Protection, Burglar Alert, Wireless Chime/Alarm, Easy Installation, Home Security, Ideal for Home, Garage, Apartment and More, White, 45115
Overview: The GE Personal Security 2-pack delivers the same trusted protection as its larger sibling but scales down for smaller living spaces or targeted security needs. These 120-decibel alarms provide the same magnetic sensor reliability and dual-mode functionality in a more compact package. Ideal for apartments, dorm rooms, or as supplemental protection for specific vulnerable entry points.
What Makes It Stand Out: GE’s engineering excellence appears in the convenient OFF/chime/alarm toggle switch, allowing instant mode changes without reprogramming. The battery test button and low-battery LED provide professional-grade maintenance features rarely seen in two-pack offerings. The robust 120dB siren matches premium standalone units, ensuring no compromise on volume despite the smaller quantity.
Value for Money: At $19.99 for two units ($10 each), the per-unit cost is significantly higher than the 6-pack version. While expensive relative to bulk alternatives, you’re paying for GE’s reliability, customer support, and proven design. For those needing only two sensors, it’s still cheaper than buying a six-pack and wasting units, but the value proposition is weaker overall.
Strengths and Weaknesses: Strengths include the powerful alarm, versatile alert modes, trusted brand backing, and user-friendly battery management. Installation remains tool-free with included tape. Weaknesses center on poor economy compared to larger packs, limited coverage for whole homes, and the same indoor-only, button-battery constraints as other GE models. The chime volume may be insufficient for noisy environments.
Bottom Line: Choose the GE 2-pack if you need premium quality for a small space or specific vulnerability. For whole-home protection, the 6-pack offers far better value, but this serves niche needs with GE’s signature reliability.
5. Hiistar Wireless Entry Home Door Window Burglar Alarm-Safety Security Alarm System Magnetic Sensor (Pack of 5) 1
Overview: The Hiistar 5-pack positions itself as the entry-level gateway to DIY home security, stripping away complexity to deliver barebones protection at an impulse-buy price point. These magnetic sensor alarms emit a 95-decibel warning when entry points are breached, serving basic deterrence needs for homes, RVs, and offices. The minimalist design focuses on essential functionality without premium features.
What Makes It Stand Out: The sub-$10 price tag for five units is the primary differentiator, making this the most affordable pack overall. The straightforward adhesive mounting and simple on/off operation eliminate any learning curve. While specifications are sparse, the 95dB output hits a middle ground—louder than budget 90dB units but without the ear-piercing intensity of 120dB+ models.
Value for Money: At $9.95 for five ($1.99 each), the value is undeniable for cost-conscious consumers. While lacking batteries and advanced features, the low financial barrier allows experimenting with DIY security or protecting low-risk areas without significant investment. However, unknown battery type and absence of low-battery warnings create potential hidden costs and reliability concerns.
Strengths and Weaknesses: Strengths include rock-bottom pricing, simplicity, adequate loudness, and decent quantity. The “high environmental suitability” claim suggests weather resistance. Weaknesses involve vague specifications, no battery information, absence of chime mode or battery indicator, questionable long-term durability, and minimal brand recognition. Customer support responsiveness is untested.
Bottom Line: The Hiistar 5-pack suits those seeking the absolute cheapest functional door/window alarms. Accept its mysteries and limitations, and you get workable security for the price of a fast-food meal—ideal for temporary or low-risk applications.
6. Universal Door Window Sensor Compatible with VIVINT and 2GIG Security Systems – Surface Mount Wireless Contact
Overview: This Universal Door Window Sensor offers seamless integration with VIVINT and 2GIG security systems, providing a cost-effective alternative to brand-name replacements. Designed for homeowners with existing professional monitoring setups, this surface-mount contact sensor delivers reliable wireless communication and straightforward installation without requiring specialized tools.
What Makes It Stand Out: The sensor’s primary advantage lies in its cross-compatibility with both VIVINT DW1 and 2GIG DW10 models, filling a niche for users seeking affordable add-ons or replacements. The built-in tamper protection adds a critical security layer that many budget sensors lack, immediately alerting your system if someone attempts to remove the device. Its versatile design works on doors, windows, and even cabinets, expanding beyond typical entry point monitoring.
Value for Money: At $26.95, this sensor costs significantly less than official VIVINT or 2GIG replacements while maintaining core functionality. For system owners needing to expand coverage, it eliminates expensive service calls and proprietary markup. However, the value is contingent on already owning a compatible system—standalone users will find zero utility here.
Strengths and Weaknesses: Pros: Broad compatibility with major security brands; tool-free surface mounting; tamper detection; reliable signal transmission; versatile application. Cons: Useless without VIVINT/2GIG systems; higher per-unit cost than basic DIY alarms; limited smart features; may void certain service warranties.
Bottom Line: This sensor is an excellent choice for existing VIVINT or 2GIG customers wanting to expand their monitored security footprint without paying premium proprietary prices. Avoid if you don’t have a compatible system.
7. GE Personal Security Window and Door Alarm, 5 Pack, DIY Protection, Burglar Alert, Wireless Chime/Alarm, Easy Installation, Home Security, Ideal for Home, Garage, Apartment and More,White, 45987

Overview: GE’s five-pack alarm set provides straightforward, no-frills security for budget-conscious homeowners and renters. These standalone units operate independently without requiring a central hub or monitoring service, making them ideal for apartments, dorm rooms, or as a temporary security layer. Each sensor triggers a 120-decibel siren or pleasant chime when magnetic contact breaks.
What Makes It Stand Out: The dual-mode functionality sets this apart from basic alarms—switch between a deafening 120dB burglar deterrent and a gentle chime for notifying you of family members or guests. The inclusion of a battery test button and low-battery LED demonstrates GE’s attention to user experience, preventing unexpected failures. Double-sided tape enables truly tool-free installation in minutes.
Value for Money: At $22.02 for five units ($4.40 each), this package delivers exceptional value for whole-room coverage. The included LR44 batteries and mounting hardware eliminate hidden costs. Compared to single smart sensors costing $30-50, this provides immediate, effective deterrence for a fraction of the price.
Strengths and Weaknesses: Pros: Extremely affordable; powerful 120dB alarm; convenient chime mode; battery status indicators; simple peel-and-stick installation. Cons: No smart notifications; adhesive may weaken over time; limited to indoor use; basic design lacks tamper protection; cannot integrate with larger systems.
Bottom Line: Perfect for renters and homeowners seeking immediate, affordable security without complexity. The 5-pack offers flexibility for multiple entry points, though those wanting smartphone alerts should look elsewhere.
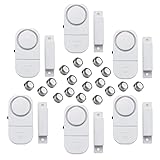
8. GE Personal Security Window and Door Alarm, 12 Pack, DIY Protection, Burglar Alert, Wireless Chime/Alarm, Easy Installation, Home Security, Ideal for Home, Garage, Apartment and More, White, 45989

Overview: This twelve-pack from GE scales up their popular DIY alarm system for comprehensive whole-home coverage. Identical in function to the smaller packs, each unit delivers a 120-decibel alarm or chime mode through magnetic sensor technology. Designed for larger homes or those wanting to secure every potential entry point, this bulk option maintains the same simplicity and standalone operation.
What Makes It Stand Out: The sheer quantity at this price point is the headline feature—securing a dozen windows and doors costs less than a single smart sensor. The consistent OFF/CHIME/ALARM switch across all units allows uniform operation throughout your property. Like its smaller sibling, the battery test function and low-battery indicator provide practical maintenance alerts that budget competitors often omit.
Value for Money: At $49.99 for twelve units ($4.17 each), this represents the best per-unit value in the GE lineup. For homes with numerous ground-floor windows or multiple access points, the cost savings are substantial. The included batteries for all twelve devices add significant value, making this a one-time investment for comprehensive coverage.
Strengths and Weaknesses: Pros: Outstanding bulk pricing; loud 120dB siren; flexible chime option; battery monitoring features; rapid installation. Cons: Overkill for small apartments; adhesive mounting may not suit all surfaces; no connectivity or smart features; lacks tamper detection; indoor-only limitation.
Bottom Line: Ideal for large homes, properties with many windows, or landlords equipping multiple units. The 12-pack delivers unmatched coverage-per-dollar, though the lack of smart integration limits its appeal for tech-savvy users.
9. ecobee Smart Sensor for Doors & Windows 2 Pack - Wifi Contact Sensor for Home Security, Energy Savings - Compatible with Smart Thermostats - Temperature sensor, white

Overview: ecobee’s Smart Sensor elevates the traditional door/window sensor into the connected home era. These WiFi-enabled devices integrate seamlessly with ecobee’s ecosystem, offering real-time smartphone notifications and unique energy-saving capabilities when paired with compatible thermostats. The two-pack targets smart home enthusiasts wanting more than just noise-based deterrence.
What Makes It Stand Out: Unlike standalone alarms, these sensors communicate through your home’s WiFi, sending instant alerts wherever you are. When paired with an ecobee Smart Thermostat Premium, they can trigger chimes and contribute to intelligent climate control by detecting open windows. The three-year battery life is exceptional, reducing maintenance hassles. No mandatory subscription for basic notifications is a refreshing approach.
Value for Money: At $79.99 for two ($40 per sensor), this is a premium investment. However, the value multiplies if you already own ecobee products, as the integration creates a cohesive smart home experience. Compared to basic alarms, you’re paying for connectivity, app control, and dual-function temperature sensing—features that justify the cost for tech-forward users.
Strengths and Weaknesses: Pros: WiFi-enabled remote monitoring; thermostat integration; long 3-year battery; no subscription required; temperature sensing; motion detection with subscription. Cons: Requires ecobee ecosystem for full benefits; high upfront cost; limited to two sensors per pack; advanced features locked behind subscription.
Bottom Line: A compelling choice for ecobee thermostat owners wanting to expand their smart home capabilities. The security and energy-saving features create unique value, but those without ecobee products should consider more universal smart sensors.
10. 6 Pack Wireless Security Window/Door Alarm, Magnetic Sensor Door Window Burglar Alert Alarm Pool Alarms Super Loud for Home, Garage, Apartment, Dorm, RV and Office(Include Batteries)…
Overview: This no-name six-pack represents the entry-level extreme of DIY security, prioritizing absolute affordability over features. These bare-bones magnetic sensors emit a 90+ decibel alarm when contact breaks beyond 10mm, offering basic deterrence for cost-sensitive buyers. The included batteries and peel-and-stick installation target renters and temporary housing situations.
What Makes It Stand Out: The sub-$13 price point for six functional alarms is remarkable—less than the cost of a pizza. The alarm continues sounding until manually turned off or the door/window closes, ensuring persistent alertness. The compact 2.52" x 1.67" design allows discreet placement, while the simple ON/OFF switch eliminates confusion.
Value for Money: At $12.99 for six ($2.17 each), this is the cheapest per-unit option available. For RVs, dorm rooms, or as a temporary security layer while traveling, the financial risk is minimal. However, the value diminishes if you need reliability—build quality and adhesive longevity are questionable at this price.
Strengths and Weaknesses: Pros: Unbeatable price; loud enough alarm; batteries included; extremely easy installation; good for temporary use. Cons: No chime mode; inferior build quality; adhesive likely to fail; requires perfectly flush installation; no smart features; questionable long-term durability.
Bottom Line: Suitable for scenarios where any alarm is better than none—temporary housing, RVs, or as a stopgap solution. Serious homeowners should invest in more reliable options, but the price makes it worth considering for specific low-stakes applications.
Why Vibration Tamper Alerts Are Essential for Rental Properties
The Growing Need for Enhanced Security in Rentals
Rental properties face unique security challenges that owner-occupied homes rarely encounter. You’ve got master keys floating between maintenance staff, previous tenants who may have made unauthorized copies, and the constant turnover that makes it nearly impossible to maintain key control. Unlike homeowners who can install permanent, hardwired security systems, you need flexible solutions that work across multiple properties and respect tenant rights. Vibration tamper alerts address these specific pain points by detecting attempted break-ins before damage occurs, giving you precious minutes to respond—whether that’s calling law enforcement or contacting your property manager.
How Vibration Detection Works
At its core, vibration tamper technology uses micro-electromechanical systems (MEMS) or piezoelectric sensors that convert mechanical stress into electrical signals. When someone attempts to jimmy a lock, pry a window frame, or even kick a door, the sensor detects the specific frequency patterns of these malicious actions versus normal environmental vibrations like passing traffic or thunderstorms. Advanced algorithms analyze the amplitude, duration, and frequency signature to distinguish between a delivery person knocking and a crowbar attack. This intelligence is crucial in rental settings where false alarms could strain landlord-tenant relationships and potentially violate lease terms regarding nuisance provisions.
The Difference Between Standard and Tamper-Proof Sensors
Standard magnetic contact sensors create a simple circuit that breaks when a door or window opens, triggering an alert. They’re effective for detecting entry but completely blind to pre-entry attacks. Tamper-proof sensors with vibration detection add a second layer of monitoring—these devices continuously analyze the structural integrity of the entry point itself. Think of it as the difference between knowing someone entered your house versus knowing someone is actively trying to break in. For rental properties, this distinction matters enormously; a tamper alert can prevent thousands in damage from a forced entry, while a standard sensor only tells you after the damage is done.
Key Features to Look for in Door and Window Sensors
Wireless vs. Wired: Which is Better for Rentals?
Wireless sensors dominate the rental market for compelling reasons. They install in minutes with adhesive strips or small screws, making them ideal for properties where you can’t run new wiring or drill extensively into frames. Most operate on long-life lithium batteries lasting 2-5 years, minimizing maintenance visits. However, wireless sensors depend on signal strength—something to consider in older buildings with thick plaster walls or metal door frames that can block transmissions. Wired sensors, while more reliable and never needing battery changes, require professional installation and permanent modifications that most lease agreements prohibit. For multi-unit properties, wireless systems offer the added benefit of scalability; you can start with a single unit and expand across your entire portfolio without infrastructure overhauls.
Battery Life Considerations
Nothing undermines security like a dead sensor. When evaluating options, look beyond the advertised battery life and examine the battery type and replacement process. Coin cell batteries might last two years but require a service call to replace, while AA lithium batteries can stretch to five years and be changed by tenants with your remote guidance. Some advanced models feature solar-assisted charging or energy harvesting from door movement, though these remain rare in the consumer market. Consider sensors with low-battery alerts sent directly to your phone rather than relying on tenants to report chirping devices—because they won’t. For high-turnover rentals, rechargeable sensors that can be quickly swapped between move-outs might offer better long-term value despite higher upfront costs.
Connectivity Protocols: Z-Wave, Zigbee, Wi-Fi, and Proprietary
Your sensor’s communication protocol determines everything from range to compatibility to ongoing costs. Wi-Fi sensors connect directly to your router, offering straightforward setup and no hub requirement, but they can strain network bandwidth in properties with dozens of devices and may fail during internet outages. Z-Wave and Zigbee create mesh networks where each device strengthens the overall signal—perfect for multi-unit buildings where sensors can relay messages to a central hub. These protocols also operate on separate frequencies, reducing interference and maintaining security even if Wi-Fi goes down. Proprietary systems often offer tighter security and optimized performance but lock you into a single manufacturer’s ecosystem, which can limit flexibility as your portfolio grows. For rental properties, Z-Wave typically provides the best balance of range, interoperability, and professional monitoring options.
Sensitivity Levels and Customization
The ability to fine-tune sensitivity separates professional-grade sensors from basic consumer models. Look for devices offering at least three sensitivity levels—low for ground-floor windows near busy streets, medium for standard doors, and high for vulnerable basement windows. Advanced models let you create custom sensitivity schedules; you might want maximum sensitivity during vacancy periods but dial it back during tenancy to avoid false alarms from enthusiastic door closings. Some sensors allow you to adjust sensitivity remotely through the app, which is invaluable when you can’t physically access the property. The best systems even learn normal vibration patterns over time, automatically adjusting thresholds based on environmental factors like nearby construction or weather events.
Mobile App Integration and Real-Time Notifications
Your sensor is only as good as its ability to alert you instantly. Evaluate the companion app’s notification system carefully—does it differentiate between entry alerts, tamper alerts, and low-battery warnings? Can you set up escalation rules, like texting a property manager first, then you if there’s no response within five minutes? Look for apps that provide detailed event logs with timestamps, which can be crucial for insurance claims or tenant disputes. Geofencing capabilities are particularly useful for rentals; the system can automatically arm sensors when you leave the property and disarm when you approach, eliminating the need to share access codes with tenants or maintenance staff.
Installation Considerations for Rental Properties
Landlord vs. Tenant Installation Rights
Before drilling a single hole, understand your legal standing. Most state laws allow landlords to install security devices in common areas and exteriors without tenant consent, but interior sensors often require explicit lease provisions. Some jurisdictions consider unauthorized security devices an invasion of privacy, potentially violating the implied covenant of quiet enjoyment. The safest approach is to include a security addendum in your lease that outlines what sensors are installed, what data is collected, and who has access to alerts. For tenants who want to install their own sensors, require written approval and specifications about installation methods to prevent property damage. Consider offering a pre-installed, landlord-controlled system as an amenity—this maintains control while providing tenants the security they crave.
Damage-Free Mounting Options
The security deposit dispute you avoid may be your own. Modern sensors offer several renter-friendly installation methods. Industrial-strength 3M VHB tape can support sensors weighing up to several pounds and removes cleanly with heat application. Magnetic mounting plates let you attach sensors to metal door frames without any adhesive. For windows, suction-cup mounts work surprisingly well on smooth glass surfaces, though they may need occasional resealing. Some innovative sensors clip onto the door/window track itself, requiring zero surface adhesion. Always test mounting methods in inconspicuous areas first, and keep detailed photos of pre-installation conditions. Pro tip: provide tenants with replacement adhesive strips upon move-in so they can temporarily remove sensors for painting or cleaning without damaging the devices.
Placement Strategies for Maximum Effectiveness
Proper placement dramatically improves detection accuracy while minimizing false alarms. For doors, mount the sensor on the interior frame near the lock mechanism—this captures vibrations from lock picking or kicking while ignoring normal door usage. Windows require sensors on the lower sash near the locking point, as this is where intruders typically apply force. Avoid placing sensors near HVAC vents, which can trigger false alarms when systems cycle on. In multi-story properties, prioritize ground-floor and accessible second-floor windows (near trees or balconies). For sliding glass doors, place sensors on both the fixed and moving panels; tamper attempts often involve lifting the door off its track, which creates distinct vibrations. Remember to angle sensors slightly toward the expected force direction—most have a detection cone that works best when vibrations approach head-on.
Integration with Existing Security Systems
If you’re adding tamper sensors to a property with an existing alarm system, compatibility is crucial. Many modern sensors work as standalone devices that simply send alerts to your phone, but integrating them with a central panel provides professional monitoring and emergency dispatch. Check whether your current system supports third-party Z-Wave or Zigbee devices—most modern panels from companies like Qolsys, 2GIG, or Honeywell do. For properties with legacy hardwired systems, you can often add a wireless receiver module that bridges new sensors to the old panel. This hybrid approach lets you enhance security without replacing expensive infrastructure. Some landlords maintain a separate “overlay” system for their own monitoring while leaving the tenant-controlled system intact, creating redundant protection that satisfies everyone.
Understanding Vibration Tamper Alert Technology
Piezoelectric vs. Accelerometer Sensors
The underlying sensor technology affects both performance and price. Piezoelectric sensors use crystals that generate voltage when mechanically stressed—they’re incredibly sensitive to high-frequency vibrations like glass cutting or lock picking but can be oversensitive to environmental noise. Accelerometer-based sensors (MEMS devices) measure changes in velocity across multiple axes, making them better at detecting sustained force like prying or kicking. For rental properties, dual-technology sensors that combine both offer the best of both worlds: piezoelectric detection for sophisticated attacks and accelerometer data for brute-force attempts. These hybrid sensors typically cost 20-30% more but dramatically reduce false positives while catching genuine threats.
False Alarm Prevention Features
Nothing will get your sensors removed faster than a string of 3 AM false alarms. Quality tamper sensors include several layers of false alarm prevention. Time-domain analysis requires vibrations to persist for a set duration (usually 2-5 seconds) before triggering, filtering out single impacts like a slammed car door. Frequency filtering ignores vibrations outside the typical range of break-in attempts (usually 50-500 Hz). Some advanced models use machine learning to build a “vibration profile” of normal activity, automatically flagging anomalies. Look for sensors with built-in temperature and humidity compensation—extreme weather can cause frames to expand and contract, creating vibrations that mimic tampering. The ability to temporarily mute alerts during known events (like scheduled maintenance) prevents unnecessary panic while maintaining security.
Adjustable Threshold Settings
One-size-fits-all sensitivity leads to either missed threats or constant false alarms. Professional-grade sensors allow you to set independent thresholds for different types of vibrations. You might configure a low threshold for high-frequency vibrations (lock picking) but a higher threshold for low-frequency impacts (kicking), reflecting the different threat levels. Some systems let you create location-based profiles—a ground-floor street-facing window might need higher thresholds than a third-bedroom window facing a quiet courtyard. The best interfaces visualize vibration levels in real-time, letting you test settings by gently tapping the sensor and seeing exactly where your thresholds sit. This granular control is particularly valuable in mixed-use buildings where commercial tenants downstairs might generate vibrations that could trigger residential sensors upstairs.
Smart Home Integration and Automation
Compatibility with Alexa, Google Home, and Apple HomeKit
Voice assistant integration transforms your sensors from passive alerts into active security tools. Alexa and Google Home can announce tamper attempts through smart speakers, potentially deterring intruders who hear “Warning, front door tamper detected” broadcast inside the property. Apple HomeKit offers more sophisticated automation—if a tamper alert triggers, HomeKit can simultaneously turn on all lights, start recording from security cameras, and send encrypted notifications to multiple devices. However, be cautious about tenant privacy; voice announcements inside occupied units could violate privacy expectations. For vacant properties or common areas, these integrations provide powerful deterrence. Check for Matter certification—the new universal smart home standard ensures your sensors will work with future devices and platforms, protecting your investment as technology evolves.
Creating Custom Automation Rules
The real power of smart sensors emerges when you chain them with other devices. Create an automation that triggers when a tamper alert activates between 10 PM and 6 AM: it turns on exterior floodlights, starts recording from nearby cameras, sends an alert to your phone, and unlocks the smart lock for emergency responders (if you have one). During vacancy periods, you might set all sensors to maximum sensitivity and create a rule that automatically contacts your property manager if any two sensors trigger within five minutes—suggesting a coordinated attack. For tenant-occupied units, respect privacy by limiting automation to exterior sensors only and providing tenants with a physical override switch that temporarily disables interior monitoring during their approved activities.
Professional Monitoring vs. Self-Monitoring
Self-monitoring through smartphone apps saves money but requires you to be available 24/7—a tall order when managing multiple properties. Professional monitoring services receive tamper alerts and follow predetermined response protocols, typically calling you first, then dispatching police if they can’t reach you. For rental properties, professional monitoring offers liability protection; if a break-in occurs and you missed a self-monitored alert, you could face negligence claims. However, many jurisdictions require alarm permits for professionally monitored systems, with fines for false dispatches. A hybrid approach works well: self-monitor during business hours when you can respond quickly, then enable professional monitoring automatically during nights and weekends. Some services offer “vacancy monitoring” plans at reduced rates, perfect for between-tenant periods when properties are most vulnerable.
Legal and Privacy Considerations
Landlord-Tenant Laws and Sensor Installation
Security camera laws get most of the attention, but door and window sensors occupy a legal gray area that varies dramatically by jurisdiction. In most states, exterior sensors on entry doors are considered permissible security improvements, similar to reinforced locks. Interior sensors, however, can be construed as surveillance if they monitor when tenants come and go. California’s Civil Code Section 1954.05 specifically prohibits electronic surveillance that monitors tenant activities, while Texas property code is more lenient about security devices in common areas. The key distinction is data collection—sensors that only alert during tamper attempts (not normal opening/closing) are generally safer legally than those that log every entry and exit. Always consult a local real estate attorney before installing interior sensors in occupied units, and never place sensors on bedroom or bathroom doors.
Privacy Implications for Multi-Unit Properties
In duplexes or apartment buildings, your sensor on one unit’s front door might detect vibrations from the neighboring unit’s door slamming, effectively monitoring activity you’re not authorized to watch. This creates potential liability under wiretapping laws in two-party consent states. To mitigate risk, configure sensors to ignore vibrations originating from shared walls or floors. Some advanced systems use directional microphones (for vibration analysis only, not audio recording) to determine the source of vibrations. Be transparent with all tenants about what sensors monitor and provide them access to their own unit’s data upon request—many privacy laws grant tenants the right to see any data collected about their residence. Consider installing sensors only on exterior doors and ground-floor windows, leaving interior unit doors unmonitored to respect tenant privacy while still protecting the building envelope.
Disclosure Requirements
Transparency isn’t just ethical—it’s legally protective. Your lease should include a specific clause about security sensors that answers: what devices are installed, where they’re located, what triggers them, who receives alerts, how long data is stored, and whether tenants can request temporary disconnection for privacy reasons. Provide a separate move-in document with photos of each sensor and written confirmation that tenants acknowledge and accept the security system. For properties with existing tenants, adding sensors typically requires written consent or waiting until lease renewal. Some landlords offer a small rent credit ($5-10/month) in exchange for accepting interior sensors, turning a potential conflict into a mutually beneficial arrangement. Document everything—emails, signed acknowledgments, and even text message approvals can protect you if a tenant later claims unauthorized surveillance.
Cost Analysis and Budget Planning
Upfront Costs vs. Long-Term Value
Entry-level tamper sensors start around $25-35 per unit, while professional-grade devices with advanced analytics run $60-80. For a typical 3-bedroom rental, you’re looking at $200-400 in hardware for comprehensive coverage. Compare this to the average cost of a forced entry: $2,500 in door/window replacement, potential tenant displacement, and insurance deductibles. If a sensor prevents even one break-in over its 5-year lifespan, you’ve achieved a 500% return on investment. Factor in reduced insurance premiums—many carriers offer 5-10% discounts for monitored security systems—and the sensors often pay for themselves within 18 months. Don’t forget installation costs; while DIY saves money, professional installation ($50-75 per sensor) ensures optimal placement and can be written off as a property improvement for tax purposes.
Subscription Fees and Hidden Costs
The sticker price is just the beginning. Most smart sensors require a hub ($50-150) if you don’t already have one. Cloud storage for event history typically costs $3-10 per month per property, though some systems offer free local storage with limited remote access. Professional monitoring adds $15-30 monthly, while cellular backup (essential for properties where internet is tenant-controlled) runs another $5-15. Watch for API access fees if you want to integrate sensors with custom property management software—some manufacturers charge developers for platform access. Battery replacement costs add up; budget $2-4 per sensor every 2-3 years. When evaluating systems, calculate the 5-year total cost of ownership, not just the initial hardware price. A $30 sensor requiring a $10/month subscription costs $630 over five years, while a $70 sensor with free monitoring costs just $70.
Scalability for Property Portfolios
If you manage multiple properties, choose an ecosystem that scales efficiently. Proprietary systems often charge per-property fees that become prohibitive at scale, while open protocols like Z-Wave let you add unlimited sensors to a single hub across multiple locations. Some property management platforms now offer portfolio-wide security dashboards where you can monitor all your sensors from one interface, with role-based access for different property managers. Consider bulk purchasing discounts—buying sensors by the case (typically 20 units) can reduce per-unit costs by 15-25%. Look for systems that let you clone configurations; set up one unit perfectly, then push those settings to sensors at other properties. As your portfolio grows, you might graduate from consumer-grade systems to professional platforms like Alarm.com or DMP that offer centralized monitoring, custom reporting, and integration with tenant screening services.
Troubleshooting and Maintenance
Common Issues and Solutions
Vibration sensors can be finicky if not properly configured. The most frequent complaint is false alarms from environmental factors. If you’re getting alerts during windy days, the sensor is likely picking up frame flexing—increase the detection threshold or move the sensor closer to the lock mechanism where structural movement is less pronounced. Random night-time alerts often stem from HVAC systems cycling on; thermally insulate the sensor from the frame with a thin foam pad. If sensors stop responding, don’t assume dead batteries—metal door frames can create Faraday cages that block wireless signals. Try repositioning the sensor or adding a Z-Wave repeater nearby. Tamper alerts that never trigger during obvious tests usually indicate sensitivity set too high; most sensors need 5-10 seconds of sustained vibration, so a single knock won’t register.
Battery Replacement Schedules
Don’t wait for low-battery alerts, which often come too late. Create a maintenance schedule based on your specific sensors and usage patterns. In high-traffic rentals, batteries may last only 18 months; in quiet single-occupancy units, they can stretch to 4 years. Replace all batteries annually during your property inspection—this preventative maintenance costs less than emergency service calls. Keep detailed logs of battery installation dates; a simple spreadsheet tracking serial numbers and replacement dates prevents guesswork. For hard-to-reach sensors (third-floor windows), consider upgrading to extended-life lithium batteries that cost more but reduce service frequency. In cold climates, batteries deplete faster; schedule replacements before winter. Pro tip: keep a small stockpile of batteries at each property with a note “For Security Sensors Only” so tenants don’t pilfer them for TV remotes.
Firmware Updates and Security Patches
Your sensors are tiny computers vulnerable to hacking if not regularly updated. Most reputable manufacturers release firmware updates quarterly to patch security vulnerabilities and improve detection algorithms. Enable automatic updates if the system supports them, but schedule them during low-risk periods (never during vacancy). For systems requiring manual updates, check for new firmware monthly and apply within 48 hours of release—set a recurring calendar reminder. Outdated firmware not only leaves you exposed to potential hacking but can also cause compatibility issues with hub updates, leading to sensor failures. Document the current firmware version during each property inspection; if a sensor malfunctions and you discover it’s running two-year-old firmware, your insurance claim might be denied due to negligence. Some enterprise-grade systems offer staged rollouts, letting you test updates on one property before deploying across your portfolio.
Frequently Asked Questions
Can tenants install door and window sensors without landlord permission?
Generally, tenants can install temporary, non-damaging security devices under the “right to quiet enjoyment” principle, but this varies by jurisdiction. Most leases prohibit alterations without written consent, and even adhesive mounts can damage paint or finishes. The safest approach is requiring tenants to request approval, specifying the sensor model and installation method. Some landlords provide a pre-approved list of renter-friendly sensors and offer to install them, maintaining control while meeting tenant security needs. Always document any tenant-installed devices to avoid disputes about property condition at move-out.
Are vibration tamper alerts legal in rental properties?
Exterior sensors on entry doors and ground-floor windows are typically legal as security improvements, similar to upgraded locks. Interior sensors occupy a legal gray area—while generally permissible in common areas, they can raise privacy concerns inside leased units. The key is data minimization: sensors should only alert during tamper attempts, not log normal entry/exit patterns. Always disclose sensor presence in the lease, avoid monitoring private spaces like bedrooms, and consult local landlord-tenant law. In some states, you may need explicit written consent or a legitimate business justification like a history of break-ins.
What’s the difference between tamper alerts and regular entry alerts?
Entry alerts trigger when a door or window physically opens, breaking the magnetic contact between sensor and magnet. Tamper alerts activate when the sensor detects vibrations from forced entry attempts—prying, kicking, lock manipulation—before the entry point actually opens. This gives you an early warning, potentially preventing damage. Most quality sensors provide both alert types with distinct notifications, letting you differentiate between a tenant arriving home and someone trying to break in. For rentals, this distinction helps you respond appropriately without overreacting to normal tenant activity.
Will these sensors damage doors or windows?
Properly installed sensors cause no structural damage. Modern adhesive mounts are designed for clean removal, though they may remove paint if not heated before peeling. Screw-mounted sensors create small holes (typically 1/8") that are easily patched during turnover. The greater risk is tenant damage from improper removal—provide clear instructions or require professional uninstallation. Some landlords install small metal mounting plates with semi-permanent adhesive, then attach sensors magnetically to the plates. This protects the door frame while allowing easy sensor removal. Always photograph installation sites before and after to document conditions.
How do I prevent false alarms from normal vibrations?
Start with proper placement—avoid mounting sensors near HVAC vents, elevators, or heavily trafficked streets. Use sensitivity settings appropriate to the location; ground-floor street-facing windows need lower sensitivity than third-floor windows. Enable time-delay features requiring 3-5 seconds of sustained vibration before alerting. Create schedules that automatically adjust sensitivity—reduce it during daytime hours when construction or deliveries might occur, increase it at night. Advanced sensors with machine learning can automatically filter out normal patterns. Test thoroughly after installation by simulating real-world conditions: slam doors, run appliances, wait for heavy trucks to pass.
Can I take my sensors with me when I move?
If you’re a tenant who installed sensors, you generally can remove them if they weren’t permanently affixed and you repair any damage. For adhesive-mounted sensors, heat the mount with a hair dryer before peeling to minimize paint damage. If you’re a landlord, sensors are considered fixtures or improvements that stay with the property. However, you could structure them as “provided equipment” that tenants rent for a monthly fee, allowing removal when they move. Document ownership clearly in the lease to avoid disputes. For portable standalone sensors that don’t require hub connection, removal is straightforward, but whole-system sensors integrated into a security panel typically must stay.
Do these sensors work when the internet is down?
It depends on the connectivity protocol. Wi-Fi sensors become blind without internet, though some cache events and upload them when connection restores. Z-Wave and Zigbee sensors continue functioning locally, triggering sirens or recording to local hubs, but can’t send remote alerts without internet. For critical protection, choose sensors with cellular backup that can send SMS alerts independent of Wi-Fi. Some systems offer “offline mode” where sensors communicate directly with a local alarm panel that has battery backup and cellular connectivity. During vacancy periods, consider pairing sensors with a cellular-enabled hub even if tenants normally use Wi-Fi, ensuring continuous monitoring between tenancies.
Are there monthly fees associated with these sensors?
Many smart sensors require subscription fees for full functionality. Basic local alerting (siren, hub notification) often works without fees, but cloud storage, remote app access, SMS alerts, and professional monitoring typically cost $3-30 monthly per property. Some manufacturers offer “free tier” services with limited features, while others require subscriptions from day one. When calculating costs, factor in that professional monitoring may reduce insurance premiums by 5-10%, potentially offsetting the monthly fee. For portfolios, look for volume discounts or enterprise plans that monitor multiple properties under a single subscription. Always clarify whether fees are per-sensor or per-location, as this dramatically affects total costs.
Can landlords require tenants to use these sensors?
You can require tenants to keep installed security systems operational, but forcing them to actively use or pay for monitoring is more complex. Most jurisdictions allow you to mandate that tenants not disable safety devices, including security sensors, similar to smoke detectors. However, requiring tenants to arm/disarm systems or pay monitoring fees may be considered an additional lease term requiring separate consideration. The best practice is to install sensors that monitor only for tampering (not normal entry), which don’t impact tenant daily life. If you want tenants to use full security features, offer them as an optional amenity or bundle the cost into rent with proper disclosure. Never use sensor data to enforce lease violations like unauthorized guests—that’s a legal minefield.
How many sensors do I need for my rental property?
For comprehensive coverage, install sensors on every exterior door and every ground-floor window. A typical 3-bedroom house needs 8-12 sensors: front door, back door, side door (if applicable), and 5-9 windows depending on layout. Focus on accessible windows—those near the ground, close to trees, or adjacent to balconies. For multi-unit buildings, also sensor common area doors like laundry rooms or storage areas. Upper-floor windows can often be skipped unless they’re easily accessible. During vacancy periods, add temporary sensors to interior doors leading to valuable areas like utility rooms containing copper pipes. Remember that quality trumps quantity—a few well-placed, high-quality sensors provide better protection than dozens of cheap, poorly positioned ones.