There’s nothing quite like the frustration of walking into your garage workshop on a Saturday morning, seeing your breath fog in the air, and watching your motivation freeze solid along with your fingers. For DIYers, the garage isn’t just storage—it’s a sanctuary where projects come to life. But when temperatures plummet, that sanctuary becomes an icebox, and your woodworking, automotive work, or metalworking ambitions get shelved until spring. Smart scheduling technology has revolutionized garage heating, transforming it from a manual, energy-wasting chore into an intelligent system that learns your habits, pre-warms your space before you grab your coffee, and keeps your tools (and fingers) at optimal temperatures without sending your energy bill through the roof. For the hands-on enthusiast who loves tackling projects solo, understanding these systems isn’t just about comfort—it’s about extending your productive year-round and maximizing every dollar spent on heating.
Top 10 Garage Heaters with Smart Scheduling
Detailed Product Reviews
1. Dreo Smart Wall Heater, Electric Space Heater for Bedroom 1500W, 120° Vertical Oscillation, Adjustable Thermostat, Remote Control, 24H Timer, Easy-Mount Heater for Indoor Use, Works with Alexa, WH719S
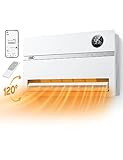
Overview: The Dreo WH719S is a sophisticated smart wall heater engineered for bedroom comfort, delivering 1500W of PTC ceramic heating with intelligent features that prioritize convenience and sleep quality.
What Makes It Stand Out: The 120° vertical oscillation creates superior vertical air distribution, eliminating cold spots more effectively than static wall heaters. Unprecedented 1°F temperature accuracy within a 41-95°F range provides precise climate control. Smart integration shines with Alexa/Google Home compatibility and the Dreo app for remote scheduling. Sleep mode automatically dims the LED display and reduces noise, addressing common bedroom heating complaints. The included drilling guide and reusable filter simplify installation and maintenance.
Value for Money: At $116.99, this heater sits competitively in the smart wall heater segment. It offers better oscillation and sleep-specific features than similarly priced Heat Storm models while undercutting premium brands like Stiebel Eltron by $50-100. The combination of wide oscillation, precise thermostat, and smart integration justifies the investment for bedroom use.
Strengths and Weaknesses: Strengths include excellent vertical heat distribution, multiple smart control options, whisper-quiet operation, sleep-friendly auto-dimming, and straightforward installation. Weaknesses are the 1500W limit for rooms over 300 sq ft, potential Wi-Fi connectivity issues in older homes, and limited horizontal oscillation. The vertical-only oscillation may not suit all room layouts.
Bottom Line: Ideal for tech-savvy users seeking bedroom-specific heating with smart home integration. The Dreo WH719S delivers exceptional comfort features and precise control, making it a worthwhile investment for modern bedrooms up to 300 square feet.
2. DREO Smart Wall Heater, IP24 Electric PTC Space Heaters for Indoor Use, 30° Oscillation, Adjustable Thermostat, Remote Control, Works with Alexa, 24H Timer, Easy-mounted for Office, Bedroom, Home

Overview: The DREO wall heater delivers powerful PTC ceramic heating in a compact, smart-enabled package with IP24 waterproof rating, making it versatile for various indoor environments including moisture-prone spaces.
What Makes It Stand Out: This model’s impressive 11.5 ft/s airflow rapidly distributes heat while maintaining an ultra-low 28 dB noise level—quieter than most competitors. The IP24 waterproof rating enables safe bathroom use, a rare feature in wall heaters. Manual 30° oscillation provides precise heat direction control. ECO mode with app-based temperature calibration optimizes energy efficiency. The 5 VA flame-retardant construction exceeds standard safety requirements, making it exceptionally safe for continuous operation.
Value for Money: Priced at $89.98, this represents outstanding value for a smart-enabled wall heater with waterproofing. It undercuts most IP-rated competitors by $40-60 while offering comparable smart features. The waterproof rating alone justifies choosing this over standard models for bathrooms or humid environments.
Strengths and Weaknesses: Strengths include ultra-quiet operation, IP24 waterproof rating, robust 5 VA flame-retardant construction, strong airflow performance, and budget-friendly smart integration. Weaknesses are the manual (not automatic) 30° oscillation, narrower angle than some models, and the 70.8-inch power cord may require extension for optimal placement. The 1500W output suits small to medium rooms best.
Bottom Line: A versatile, safe, and affordable smart heater perfect for offices, bathrooms, and bedrooms. The DREO delivers premium features at a mid-range price, making it an excellent choice for moisture-prone spaces where safety and quiet operation are priorities.
3. InoKraft 10000W Electric Garage Heater with Remote, Ceiling Mount Fan Forced Shop Heater with Digital Thermostat, 240V Hardwired Space Heater for Garage&Workshop, 12-hour Timer and Overheat Protection
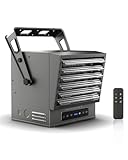
Overview: The InoKraft Max Heat is a commercial-grade 10,000W garage heater designed for serious workshop heating, requiring 240V hardwired installation to tackle large spaces up to 1,000 square feet.
What Makes It Stand Out: This powerhouse can raise temperatures by 90°F in a 1000 ft² space, delivering industrial performance for home workshops. Five-angle adjustment during installation provides exceptional directional control rarely seen in garage heaters. Smart ECO mode automatically adjusts operation based on ambient temperature, optimizing energy use. The fan-delay function ensures efficient heat distribution by running the fan after heating cycles. Operating at 60 dB, it’s relatively quiet for its power class, while the 12-hour timer adds convenience.
Value for Money: At $220, this heater competes with commercial units costing $300-400. The 10,000W output and large space coverage provide excellent value for serious DIYers and workshops. While professional installation adds expense, the energy-efficient ECO mode and durable construction ensure long-term operational savings that offset initial costs.
Strengths and Weaknesses: Strengths include massive heating power, flexible five-angle mounting, ECO energy savings, remote convenience, and robust overheat protection. Weaknesses are the mandatory professional hardwired installation, 60 dB noise level that’s noticeable in quiet settings, and 240V requirement that may need electrical upgrades. It’s overkill for standard residential garages under 500 sq ft.
Bottom Line: Perfect for large workshops, warehouses, and oversized garages. The InoKraft delivers commercial-grade performance at a consumer price, provided you invest in professional installation. It’s a powerhouse solution for spaces that standard heaters simply cannot warm effectively.
4. FLANUR Space Heaters for Indoor Use, Smart Portable Electric Heater with Thermostat, WiFi and Voice Control, 12H Timer, 4 Modes, 36dB 1500W PTC Ceramic Safety Heat for Office Bedroom Home 1Pack Black

Overview: The FLANUR portable heater combines smart connectivity with comprehensive safety features in a compact, lightweight design that moves easily between rooms while delivering efficient 1500W PTC ceramic heating.
What Makes It Stand Out: Four-mode versatility (1500W/1000W/ECO/fan-only) provides year-round utility beyond heating. Safety features exceed standards: V0 flame-retardant material, tip-over protection, 24-hour auto-off, dual fuse protection, and child lock create a multi-layered safety system. At 36 dB, it’s remarkably quiet. The temperature memory function maintains user preferences, while 70° oscillation effectively distributes heat. Smart controls via Havaworks app, Alexa, and Google Home offer full remote management.
Value for Money: At $48.99, this is exceptional value for a smart-enabled portable heater. Competitors charge $60-80 for similar features without smart connectivity. The robust safety suite and four-mode operation make it a budget-friendly powerhouse that outperforms many higher-priced portables.
Strengths and Weaknesses: Strengths include outstanding multi-layered safety features, ultra-quiet 36 dB operation, affordable smart integration, portable lightweight design, and four-mode versatility. Weaknesses are temperature adjustment limited to ECO mode only, 2.4GHz Wi-Fi restriction (no 5GHz), and manufacturer warnings against bathroom/carpet use despite safety features. The 1500W output suits small to medium rooms but not large open spaces.
Bottom Line: An excellent choice for families prioritizing safety and versatility. The FLANUR delivers smart controls and exceptional protection at an unbeatable price, ideal for bedrooms and offices where portability and peace of mind are essential.
5. Garage Heater 7500W Electric Fan-forced Heater - Wall/Ceiling Mount, Smart Temperature Control, Overheat Protection, Remote Control & Timer for Workshop, Garage, and Warehouse

Overview: This 7500W fan-forced garage heater provides robust heating for medium-large spaces up to 800 sq ft, with flexible wall or ceiling mounting and adjustable power levels for customized warmth in demanding workshop environments.
What Makes It Stand Out: Adjustable power levels allow customization for varying weather conditions and space sizes—a practical feature missing in many fixed-output garage heaters. The industrial-grade stainless steel heating element and powder-coated finish ensure durability in harsh workshop environments. The fan delay function prevents cold air blasts and improves energy efficiency by circulating residual heat. Both wall and ceiling mounting options maximize floor space, while the smart temperature control maintains precise 45-99°F settings.
Value for Money: Priced at $139.76, this heater offers strong value for 7500W output, bridging the gap between underpowered 1500W portables and expensive 10,000W+ commercial units. The durable construction and flexible mounting justify the investment over cheaper alternatives lacking adjustable power and robust safety features.
Strengths and Weaknesses: Strengths include adjustable power output, durable stainless steel construction, versatile mounting options, comprehensive safety systems (auto-reset switch, overheat protection), and precise temperature control. Weaknesses include unclear smart home integration (no app/voice control mentioned), shorter 1-9 hour timer versus competitors’ 12-24 hour options, and installation may require electrical upgrades for some users. The 7500W output is ideal for 400-800 sq ft spaces.
Bottom Line: A solid mid-range garage heater for serious DIYers and workshop enthusiasts. The adjustable power and durable build make it a practical choice for medium-sized spaces needing reliable, customizable heating without the cost of commercial-grade units.
6. Heat Storm HS-1500-PHX-WIFI Infrared Heater, Wifi Wall Mounted

Overview: The Heat Storm HS-1500-PHX-WIFI delivers efficient infrared heating in a sleek wall-mounted design. This 1500-watt unit connects to Wi-Fi for smartphone temperature control, making it ideal for bedrooms, kitchens, and offices where floor space is precious. Its cool-to-touch exterior and integrated cord management system ensure both safety and clean aesthetics.
What Makes It Stand Out: The Wi-Fi connectivity with phone app control sets this heater apart from basic models. The ability to hide cords inside the unit when mounted over an outlet creates a truly seamless look. The combination of tip-over protection, touch screen controls, and remote offers multiple safety and convenience layers rarely found at this price point.
Value for Money: At $124.99, this heater offers excellent value for tech-savvy users wanting smart home integration. Comparable smart heaters often cost $150+, while basic wall-mounted units lack app control. The included remote and advanced safety features justify the premium over non-Wi-Fi alternatives, making it a cost-effective modern heating solution.
Strengths and Weaknesses: Strengths include Wi-Fi/app control, space-saving design, cool-touch safety, hidden cord management, and remote included. Weaknesses are limited to 1500W power (unsuitable for large rooms), wall-mount only (no feet included), and potential Wi-Fi connectivity issues in some home networks.
Bottom Line: The Heat Storm HS-1500-PHX-WIFI is an excellent choice for anyone seeking smart, safe, and unobtrusive heating in small to medium rooms. Its app control and clean installation make it perfect for modern homes, though those needing to heat larger spaces should look elsewhere.
7. InoKraft 7,500W Electric Garage Heater, Wire: 8 AWG, Plug: NEMA 14-50P, Remote, Ceiling Mount, Digital Thermostat, 240 Volt, 24-Hour Timer, Overheat Protection, ECO Mode, Ideal for Garage

Overview: The InoKraft 7500W Electric Garage Heater is a powerhouse designed for serious heating needs. This 240-volt, fan-forced unit rapidly warms spaces up to 750 square feet, making it ideal for garages, workshops, and large areas. With professional-grade features and flexible mounting options, it tackles industrial-strength heating demands efficiently.
What Makes It Stand Out: The massive 7500-watt output and 240V configuration deliver commercial-level performance for residential use. Five adjustable angles and selectable high/low/ECO modes provide precise heat direction and energy management. The integrated 24-hour timer and digital thermostat offer automation capabilities that transform a cold garage into a comfortable workspace automatically.
Value for Money: At $195.49, this heater represents exceptional value for heating large spaces. Comparable garage heaters with similar wattage typically exceed $250. The included NEMA 14-50P plug and 8.2-foot cord eliminate expensive electrical kit purchases, though professional installation is required. For serious DIYers or workshop enthusiasts, the performance justifies every penny.
Strengths and Weaknesses: Strengths include powerful 7500W heating, large area coverage, ECO mode for efficiency, adjustable angles, quiet 65 dB operation, and comprehensive safety features. Weaknesses are the 240V requirement mandating professional installation, lack of smart/Wi-Fi connectivity, and being overkill for small rooms.
Bottom Line: The InoKraft 7500W is a top-tier garage heater for those needing serious warmth in large spaces. While installation requires an electrician, its power, efficiency, and features make it unbeatable for workshops and garages. Skip this for small rooms, but it’s perfect for industrial applications.
8. Brightown Smart Wall Heater, Electric Space Heater for Indoor Use 1500W, 5 Optional Modes, Adjustable Thermostat, Easy-Mount Heater for Bedroom with Remote Control, 12H Timer, Works with Alexa, Grey

Overview: The Brightown Smart Wall Heater combines rapid heating technology with modern smart home integration at an accessible price point. This 1500W unit features PTC ceramic elements for fast, stable warmth and offers five operating modes including ECO for energy conservation. Its sleek grey design complements any indoor space while providing versatile mounting options.
What Makes It Stand Out: The five-mode versatility (ECO, 600W/1000W/1500W, fan-only) provides exceptional flexibility for different heating needs. Alexa integration and app control at under $90 is remarkable value. The precise 1°F temperature accuracy and 2-second fast heating deliver premium performance typically found in more expensive competitors.
Value for Money: At $89.98, this heater is a budget-friendly smart heating champion. Most Wi-Fi enabled heaters start at $120+, making this an exceptional deal. The combination of multiple power modes, app control, and safety certifications (ETL-listed) offers features usually reserved for premium models, delivering outstanding bang for your buck.
Strengths and Weaknesses: Strengths include affordable smart integration, five heating modes, rapid heating, precise thermostat, remote/app/voice control, and ETL safety certification. Weaknesses are the 12-hour timer (shorter than some competitors), potential circuit overload if used with other high-power devices, and limited suitability for very large spaces.
Bottom Line: The Brightown Smart Wall Heater is an outstanding value for those wanting smart heating without breaking the bank. Its versatile modes and quick heating make it perfect for bedrooms and offices. While not for large areas, it excels in small to medium rooms where convenience and efficiency matter most.
9. Smart Space Heater, 1500W PTC Heater with Wifi/App/Alexa/Google Voice Control for Indoor Use, Heats & Cools 2 in 1 Eco Heater for Home Office Bedroom Living Room Bathroom Nursery Apartment

Overview: This Smart Space Heater delivers impressive versatility with its 2-in-1 heating and cooling functionality. The 1500W PTC ceramic element provides rapid winter warmth while the fan-only mode offers summer cooling. Wi-Fi connectivity enables app and voice control through Alexa and Google Assistant, making it a year-round climate solution for any indoor space.
What Makes It Stand Out: The all-season 2-in-1 design eliminates the need for separate heating and cooling devices, saving money and storage space. The intelligent ECO mode automatically adjusts power output to maintain temperature while minimizing energy consumption. Multiple modes including Sleep mode with quiet operation cater to specific scenarios from quick heating to nighttime comfort.
Value for Money: At $57.59, this is arguably the best value in smart climate control. Most basic space heaters cost this much without any smart features. The addition of Wi-Fi, voice control, cooling function, and comprehensive safety features at this price point is unprecedented, making it an unbeatable budget option.
Strengths and Weaknesses: Strengths include unbeatable price, 2-in-1 heating/cooling, Wi-Fi/voice control, multiple modes, portable design, and robust safety features (tip-over, overheat, cool-touch). Weaknesses are basic build quality typical of budget models, potentially shorter lifespan, and limited heating range suitable only for small to medium rooms.
Bottom Line: This Smart Space Heater is a phenomenal budget choice for those wanting smart features and year-round functionality. Its 2-in-1 design and app control at under $60 is unmatched. Perfect for apartments, offices, or bedrooms where space and budget are limited, though durability may not match premium brands.
10. DREO Wall Heater for Bathroom, Smart Space Heaters with ALCI Plug, 1500W, 120° Vertical Oscillation, Adjustable Thermostat, 24H Timer, Easy Installation Electric Heater for Indoor use, Bedroom, Office
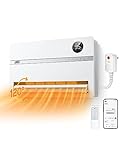
Overview: The DREO Wall Heater redefines bathroom heating safety with its specialized ALCI anti-leakage plug and comprehensive protection systems. This 1500W unit features innovative vertical oscillation up to 120 degrees, ensuring even heat distribution across bathroom spaces. Smart app integration with Alexa and Google Home allows for convenient scheduling and voice control in moisture-prone environments.
What Makes It Stand Out: The ALCI plug is a game-changer for bathroom use, automatically cutting power if it detects electrical leakage, preventing shocks in wet conditions. The vertical oscillation feature is unique among wall heaters, eliminating cold spots in tall spaces. The air outlet self-correction system prevents malfunctions, while the 70.8-inch cord with recessed storage maintains clean aesthetics.
Value for Money: At $129.99, this heater commands a premium but delivers specialized bathroom safety features worth the investment. Standard heaters risk hazards in bathrooms, while DREO’s ALCI protection and moisture-resistant design provide peace of mind. Comparable bathroom-safe heaters cost significantly more, making this reasonably priced for its niche application.
Strengths and Weaknesses: Strengths include ALCI bathroom safety plug, vertical oscillation, smart app/voice control, 24-hour timer, overheat protection, and space-saving design. Weaknesses are higher price for wattage, limited to indoor use, and installation requirements may challenge some users.
Bottom Line: The DREO Wall Heater is the ideal choice for bathroom heating where safety cannot be compromised. Its ALCI plug and oscillation features justify the premium price for moisture-prone environments. Perfect for bathrooms, though those seeking general room heating may find better value in non-specialized models.
Why Smart Scheduling is a Game-Changer for DIY Garage Workshops
The Evolution from Manual to Intelligent Climate Control
Remember the old days of cranking up a space heater an hour before working, then either forgetting to turn it off (hello, sky-high electric bill) or shivering through the first half of your project? Traditional garage heating demanded constant manual adjustment and rewarded forgetfulness with wasted energy. Smart scheduling represents a quantum leap forward, embedding microprocessors and connectivity modules directly into your heating unit or thermostat. These systems don’t just follow a clock—they integrate with your smartphone, respond to your location, and adapt to weather forecasts. For DIYers, this means your garage reaches that perfect 65°F precisely when you need it, whether you’re an early bird who likes to start at 6 AM or a weekend warrior who needs consistent warmth for a two-day furniture build.
How Smart Scheduling Transforms Your Workflow
The real magic happens when your heater becomes an invisible project assistant. Imagine your epoxy resin curing at exactly the right temperature because your garage maintained 70°F overnight, or your wood glue setting properly during a cold snap because the space never dropped below 60°F. Smart scheduling allows you to create micro-climates for specific project phases—cranking up the heat during active sanding and painting, then dropping it to an economical 50°F during curing times. You can program different zones if you have a large garage, keeping your workbench area toasty while leaving storage areas cooler. This level of control means you’re not just heating air; you’re optimizing conditions for craftsmanship.
Real-World Benefits for Different DIY Disciplines
Woodworkers benefit from stable humidity and temperature control that prevents wood movement and cracking. Automotive enthusiasts can maintain consistent temperatures for paint curing and keep tools rust-free. Electronics hobbyists need warmth for soldering and component storage. Metalworkers appreciate the ability to pre-heat the space before working with cold steel. Each discipline has unique thermal requirements, and smart scheduling lets you create custom profiles. A woodworker might run a “Finishing Schedule” that maintains 72°F for three days straight during a polyurethane application, while a mechanic might use a “Weekend Project” mode that heats the space from 7 AM to 10 PM on Saturdays and Sundays.
Decoding Garage Heater Types with Smart Capabilities
Electric Forced-Air Heaters: The DIY-Friendly Option
Electric forced-air units represent the most accessible entry point for smart garage heating. These heaters function like powerful hair dryers, pulling in cold garage air, heating it over electric coils, and blasting it back out. Modern smart versions integrate Wi-Fi modules directly into the control board, allowing app-based scheduling without external thermostats. Look for units with built-in temperature sensors that report back to your phone, not just simple on/off switches. The key advantage for DIYers is installation simplicity—most require only a 240V circuit and basic mounting. However, pay attention to CFM (cubic feet per minute) ratings; a smart heater that can’t move enough air will create hot and cold spots, defeating the purpose of precise scheduling.
Infrared Radiant Heaters: Precision Heating for Workspaces
Infrared heaters work by warming objects and people directly, not the air—perfect for DIYers who want instant warmth at their workbench without heating the entire garage. Smart infrared units can be programmed to warm up your specific workstation five minutes before you arrive, creating a personal comfort zone. These heaters excel in poorly insulated garages because they don’t waste energy heating air that escapes through drafts. When evaluating smart infrared options, check for units with zone control capabilities. Some advanced models allow you to pair multiple infrared panels with a single smart controller, letting you heat your workbench area to 70°F while keeping the car storage area at 55°F, all from one app.
Ductless Mini-Split Systems: The Premium Choice
Mini-splits offer both heating and cooling, making them a year-round climate solution for serious DIYers. Their smart scheduling capabilities are typically more sophisticated than plug-in heaters, featuring inverter technology that modulates output rather than simply cycling on/off. This means your schedule can target precise temperatures, and the system will maintain them efficiently. The DIY installation aspect is more complex—you’ll need to handle refrigerant lines and vacuum pumps—but many manufacturers now offer “DIY-friendly” mini-splits with pre-charged line sets. The smart features on these units often include humidity control, air filtration scheduling, and even maintenance reminders based on runtime hours.
Natural Gas and Propane Units: Power and Efficiency
For those with access to natural gas or propane, these heaters deliver serious BTUs economically. Smart scheduling for gas units typically involves a smart thermostat wired to the heater, controlling gas valves and ignition sequences. The complexity lies in safely integrating smart controls with combustion appliances. Modern units feature electronic ignition systems that play nicely with smart thermostats, but you’ll need to ensure proper venting and carbon monoxide detector integration. Some advanced models include modulating gas valves that can throttle between 40-100% output, allowing your schedule to fine-tune temperatures rather than just cycling the unit on and off.
Electric vs. Gas: Making the Right Choice for Smart Integration
Electrical Infrastructure Requirements
Before falling in love with a 10,000-watt electric smart heater, audit your panel. Most garages have limited electrical service, and smart heaters demand dedicated circuits. A 5,000-watt unit at 240V draws about 21 amps, requiring a 30-amp breaker and 10-gauge wire. For smart scheduling to work reliably, you need clean, stable power—voltage drops can cause Wi-Fi modules to reset, losing your schedule. Consider installing a whole-house surge protector to safeguard the sensitive electronics in your smart heater. If your panel is full, you might need a sub-panel, which adds complexity but gives you room for future smart workshop upgrades like automated dust collection or lighting.
Gas Line Considerations and Smart Valve Controls
Installing a gas heater as a DIYer requires extreme caution. While you can handle the mounting and electrical connections, gas line work often requires a licensed professional. Smart scheduling for gas heaters depends on low-voltage thermostat wiring (typically 24V) that controls a gas valve. Some smart thermostats can modulate these valves, but compatibility varies. Look for heaters labeled “millivolt” or “24V thermostat compatible.” The smart aspect comes from the thermostat, not the heater itself. Consider smart thermostats with remote sensors so you can monitor temperature at your workbench while the thermostat sits in an optimal location. Never install a gas heater without proper ventilation and a hardwired CO detector with smart alerts to your phone.
Cost Analysis Over Time
Electric smart heaters cost more to operate but less to install—perfect for DIYers comfortable with electrical work. Gas units have lower operational costs but higher upfront investment and installation complexity. Smart scheduling tilts the economics in your favor regardless of fuel type by reducing waste. A gas heater might pay for itself in three winters with aggressive smart scheduling, while an electric unit could take five. Factor in your local utility rates; in areas with cheap natural gas, a smart gas heater is a no-brainer. But if you’re in a region with high gas connection fees or your garage lacks a gas line, the math favors electric. Smart features add $50-150 to the base cost but can save 15-30% on energy bills.
Essential Smart Scheduling Features for DIYers
Seven-Day Programming vs. Adaptive Learning
Basic smart heaters offer seven-day programming—set it and forget it. This works well if your schedule is predictable. But adaptive learning takes it further, using AI to recognize patterns. After a few weeks, the system learns that you always heat the garage on Tuesday evenings for your woodworking club and Saturday mornings for car maintenance. It’ll start suggesting schedules and even pre-heat based on your phone’s location. For DIYers, adaptive learning is invaluable because project time is often sporadic. The system might notice you heat the space every time you order lumber online and start pre-heating automatically when it sees a shipping notification. Look for units that let you toggle between manual scheduling and adaptive modes.
Geofencing and Occupancy Detection
Geofencing uses your smartphone’s location to trigger heating. Set a radius around your home—when you cross it, the heater kicks on. This means you never waste energy heating an empty garage, but it’s always warm when you arrive. Occupancy detection takes this further using PIR sensors or door sensors. Some smart heaters can detect when you open the garage door and start heating immediately. For detached garages, occupancy sensors are crucial because geofencing might not distinguish between being in your house vs. your garage. The best systems combine both: geofencing for initial warm-up, then occupancy sensors to maintain temperature while you’re actively working.
Multi-Zone Control for Large Garages
If your garage exceeds 600 square feet, single-zone heating creates temperature stratification—hot near the heater, cold in corners. Smart multi-zone systems use dampers or multiple heater units controlled by a central app. You can create zones like “Workbench,” “Vehicle Storage,” and “Tool Storage,” each with independent schedules. Your workbench might stay at 68°F during project days while the car zone stays at 50°F. This requires either a ducted system with smart dampers or multiple smart heaters grouped in an app. Some advanced controllers can even balance the load, ensuring you don’t exceed your electrical service by running two high-wattage heaters simultaneously.
Understanding Wi-Fi and Connectivity Protocols
2.4GHz vs. 5GHz Networks: What You Need to Know
Most smart garage heaters use 2.4GHz Wi-Fi because it penetrates walls better and reaches detached garages more reliably. However, 2.4GHz is also more congested and prone to interference from microwaves, baby monitors, and neighbor’s networks. If your garage is close to your router, a 5GHz-capable heater offers faster response times and more stable connections. The downside: 5GHz signals drop off quickly with distance and obstacles. Many smart heaters are dual-band, automatically selecting the best network. During setup, ensure your phone is on the same band as the heater—this is a common pitfall that causes pairing failures. For detached garages, consider a Wi-Fi extender or mesh node in the garage itself.
Mesh Network Compatibility
Mesh networks like Eero, Google Nest Wi-Fi, or Orbi have become standard in modern homes, but they can confuse smart devices. Some older smart heaters only work with a single router SSID and struggle when mesh nodes hand off connections. Look for heaters specifically labeled “mesh compatible” or that use cloud-based control rather than direct local Wi-Fi connections. Cloud-based systems communicate through manufacturer servers, so as long as the garage has internet access, the schedule works. Local-control devices that rely on direct Wi-Fi connections to your phone are more prone to dropout in mesh environments. Test connectivity by walking between your house and garage during setup—if the app loses connection mid-way, you may need to adjust mesh settings.
What Happens When Wi-Fi Goes Down?
This is the question every DIYer should ask. Quality smart heaters have fallback modes. Most will continue executing the last programmed schedule stored in local memory even without internet. Some revert to a basic thermostat setting—say, maintaining 60°F until connectivity returns. The worst-case scenario is a heater that simply shuts off, leaving your garage frozen and your projects at risk. During research, look for “offline mode” or “local scheduling” in the specifications. Consider heaters with manual override controls so you can walk out and turn a dial if the network fails. Pro tip: connect your garage’s Wi-Fi equipment to a UPS battery backup—if the router stays online during a power blip, your heater’s smart features remain intact.
Smart Home Ecosystem Integration Deep Dive
Works with Alexa, Google, and Apple HomeKit
Voice control turns your garage heater into a hands-free system, invaluable when you’re elbow-deep in sawdust or grease. “Alexa, warm up the garage to 70 degrees” should trigger your schedule instantly. However, integration depth varies. Basic skills allow on/off and temperature adjustments. Advanced integration lets you include the heater in complex routines: “Alexa, I’m going to work in the garage” could turn on the heater, lights, dust collection, and play your workshop playlist. Apple HomeKit offers the most secure integration but supports fewer heater models. Google Assistant excels at natural language commands. Alexa has the most third-party device support. Test the voice commands before committing—some integrations are clunky, requiring precise phrasing that kills the convenience.
IFTTT and Advanced Automation
If This Then That (IFTTT) and similar platforms like SmartThings or Hubitat unlock next-level automation. You can create applets that trigger heating based on weather: “If outdoor temperature drops below 30°F, increase garage temperature by 5°F.” Or link to your calendar: “If I have a workshop event scheduled, pre-heat the garage one hour before.” For DIYers, the killer app is integration with garage door sensors: “If garage door opens, turn on heater and lights.” This creates a seamless entry experience. Some smart heaters have native IFTTT channels; others require bridging through a smart thermostat. The possibilities are endless but require technical comfort. Start simple—one or two automations—then build complexity as you learn the system.
Hub-Based vs. Hub-Free Solutions
Hub-free heaters connect directly to Wi-Fi and work through a proprietary app. They’re simpler to set up but create app sprawl—another icon on your phone. Hub-based systems (SmartThings, Hubitat, Home Assistant) centralize control, letting you manage your heater alongside lights, security, and other devices. For DIYers already invested in smart home tech, a hub-based approach offers more powerful automation and local control. The downside: if the hub fails, you lose control of everything. Newer Matter-compatible heaters promise the best of both worlds—hub-free setup with hub-like interoperability. As of 2024, Matter support in garage heaters is limited but growing rapidly. If you’re planning for the future, Matter compatibility is worth seeking.
DIY Installation: What You Can (and Can’t) Do Yourself
Electrical Wiring: When to Call a Pro
Even the most capable DIYer needs to respect electrical codes. Running a new 240V circuit for a smart heater involves load calculations, proper gauge wire, conduit installation, and breaker panel work. While you can physically do this work, many jurisdictions require an electrician’s license for 240V circuits. A middle-ground approach: you handle the mounting and low-voltage thermostat wiring, then hire an electrician for the high-voltage connection. This saves money while ensuring safety and code compliance. Smart heaters often have diagnostic LEDs that help troubleshoot wiring issues—if the Wi-Fi module won’t power up, check for 120V between neutral and ground. Never work on live circuits; use a non-contact voltage tester religiously.
Mounting and Positioning for Optimal Performance
Smart scheduling can’t overcome poor placement. For forced-air heaters, mount them high on the wall, angled downward, to maximize air circulation. Avoid corners where airflow gets blocked. Infrared heaters should point at your work area, not at open space. Consider the Wi-Fi signal strength when positioning—mounting a smart heater in a metal faraday cage (your garage) near the outer wall closest to your house improves connectivity. Leave clearance for the antenna, often a small bump on the unit’s side. For ceiling-mounted units, ensure you can reach the control panel for initial setup—balancing on a ladder with your phone trying to pair Wi-Fi is a recipe for frustration. Some units allow setup through the app after basic power-on, but many require physical button presses.
Setting Up Smart Controls and Apps
The setup process typically involves: 1) Power on the heater, 2) Download the manufacturer’s app, 3) Create an account, 4) Put the heater in pairing mode (usually holding a button), 5) Connect your phone to the heater’s temporary Wi-Fi network, 6) Enter your home Wi-Fi credentials, 7) Wait for connection, 8) Update firmware. This process fails about 30% of the time due to phone settings. Disable cellular data during setup, ensure Bluetooth is on (some use it for initial pairing), and grant the app location permissions (for Android). If setup fails, factory reset the heater—usually unplugging for 30 seconds, then holding a button while plugging back in. Document your Wi-Fi password and schedule settings; if you change routers, you’ll need to reconfigure everything.
Electrical Requirements and Load Management
Dedicated Circuit Necessities
Smart garage heaters must have dedicated circuits—no exceptions. Sharing a circuit with your table saw or dust collector will trip breakers and reset your heater’s electronics, corrupting schedules. For heaters up to 5,000W, a 30-amp circuit suffices. For 7,500W units, you need 40 amps. At 10,000W, you’re looking at a 50-amp circuit and potentially a service panel upgrade. Smart features add 5-10 watts of continuous draw for the Wi-Fi module—negligible for heating costs but important for circuit loading calculations. If you’re planning multiple smart devices in your garage (heater, lights, security), consider a sub-panel with separate circuits for each. This isolates issues and prevents a single tripped breaker from darkening your entire smart workshop.
Understanding Amp Draw and Breaker Sizing
The formula is simple: Watts ÷ Volts = Amps. A 7,500W heater at 240V draws 31.25 amps. Breakers should be sized at 125% of continuous load, so 31.25 × 1.25 = 39 amps, requiring a 40-amp breaker. Wire gauge matters: 30-amp circuits need 10 AWG, 40-amp need 8 AWG, 50-amp need 6 AWG. Smart heaters with soft-start features reduce inrush current, preventing lights from dimming when the heater kicks on. This is gentler on your electrical system and reduces the chance of nuisance trips. Check the heater’s specifications for “inrush current” or “locked rotor amps”—lower numbers are better. Some smart heaters report real-time amp draw in their apps, helping you monitor for electrical issues before they become problems.
Smart Load Balancing Features
Advanced smart heaters can communicate with your electrical panel or home energy management system to avoid peak demand charges. If your utility uses time-of-use pricing, the heater can automatically shift heating to off-peak hours, pre-heating your garage during cheap electricity periods and coasting during expensive peaks. Some units integrate with smart panels like Span or Leviton Load Center, receiving signals to reduce consumption when the house is near max capacity. This prevents main breaker trips and allows you to install a larger heater than your panel might otherwise support. The scheduler can be programmed with your utility rate schedule, automatically optimizing for cost. For DIYers with solar panels, this feature is gold—your heater can ramp up when solar production is high and dial back when clouds roll in.
Crafting the Perfect Heating Schedule for Your Projects
The Pre-Heat Strategy for Early Morning Sessions
Smart scheduling shines when you’re an early riser. Instead of waking to a cold garage, program a “Morning Warm-Up” routine that starts 30-45 minutes before your alarm. The key is calculating the right lead time: a well-insulated 400 sq ft garage might need only 20 minutes, while a drafty 800 sq ft space could require an hour. Use the heater’s app to monitor temperature rise rates and fine-tune. Many smart heaters learn this automatically, noting how long it takes to raise the temperature from 50°F to 70°F and adjusting future pre-heat start times accordingly. For variable schedules, use geofencing as a backup—if you deviate from your normal routine, the heater still warms up when you’re heading home.
Weekend Warrior Programming
If you primarily work weekends, create a distinct schedule that differs from weekday settings. A typical approach: heat to 65°F from 8 AM to 10 PM Saturday and Sunday, then drop to 50°F overnight. But smart scheduling allows nuance. You can create “Project Mode” that maintains 70°F for 48 hours straight during a critical glue-up or paint curing period, then automatically returns to normal. Some apps let you set heating budgets: “Don’t exceed $20 in electricity this weekend,” and the system will optimize scheduling to stay within budget. If you’re expecting a lumber delivery, you can remotely activate heating from your phone to ensure the wood acclimates properly before you even get home.
Vacation and Away Modes
Smart scheduling isn’t just about heating when you’re there—it’s about protecting your garage when you’re not. Set a minimum temperature of 45°F to prevent tools from rusting and liquids from freezing. Some systems integrate with home security systems: when you arm the alarm in “Away” mode, the garage heater automatically drops to conservation temperature. If you have a freeze sensor in the garage, it can override the schedule and turn on heat if temperatures plummet unexpectedly, preventing burst pipes or damaged finishes. Advanced systems can even detect power outages and send alerts, so you know if your garage is at risk while you’re on vacation.
Energy Efficiency: Maximizing Savings with Smart Scheduling
BTU Calculations for Garage Spaces
Oversized heaters waste money; undersized ones run constantly and burn out. The formula: (Garage sq ft × Height × Temperature Rise × 0.133) = BTU needed. For a 500 sq ft garage with 10-foot ceilings, heating from 30°F to 65°F (35° rise) requires 23,275 BTU. Convert to watts: BTU ÷ 3.41 = watts, so about 6,825 watts. Smart scheduling optimizes this by using staged heating. A properly sized heater might run 60% of the time to maintain temperature, but a smart schedule can pulse it strategically—running at 100% for short bursts during off-peak hours, then coasting. This reduces total runtime and energy costs. Some smart heaters include BTU calculators in their apps, letting you input garage dimensions and insulation values to recommend optimal settings.
Insulation’s Impact on Heating Efficiency
No smart schedule can fix a leaky garage. Before investing in a smart heater, audit your insulation. A well-insulated garage (R-15 walls, R-30 ceiling) holds heat for hours, allowing smart schedules to use “coasting” effectively. A poorly insulated garage loses heat rapidly, forcing the heater to run constantly regardless of scheduling. Smart heaters with temperature logging can help identify insulation problems. If the temperature drops 10°F in an hour after the heater turns off, you have leaks. Use the data to prioritize weatherstripping, insulating the garage door, or adding foam board to walls. The return on investment is massive—proper insulation can reduce heating costs by 50% and allows smaller, cheaper heaters to do the job.
Energy Usage Monitoring and Reporting
One of the most valuable smart features is real-time energy tracking. The app shows exactly how many kilowatt-hours you’ve used today, this week, or this month. You can see which schedules consume the most power and adjust accordingly. Some systems generate cost reports: “You spent $42 heating the garage this month, 15% less than last month.” This data helps optimize your schedule. Notice that heating from 6-8 AM costs twice as much as heating from 10 PM-12 AM due to time-of-use rates? Shift your pre-heat to start at 5 AM instead of 6. The best systems export data to spreadsheets, letting DIYers analyze patterns and create custom efficiency algorithms. This turns your garage heating into a data-driven optimization project.
Beyond Scheduling: Advanced Smart Features Worth Considering
Temperature Zoning and Sensor Integration
High-end smart heaters support wireless temperature sensors you place around the garage. Instead of heating based on a single thermostat location, the system averages readings or prioritizes specific zones. Place a sensor at your workbench, another near stored lumber, and a third by the garage door. Your schedule can then say: “Maintain workbench at 68°F, but don’t let lumber storage drop below 55°F.” This prevents over-heating the entire space just to keep one area comfortable. Some sensors also measure humidity, crucial for woodworkers. The heater can then run a dehumidification cycle (if it’s a mini-split) or activate a separate smart dehumidifier when humidity exceeds 60%.
Voice Control and Custom Commands
Beyond basic “turn on the heater,” advanced voice integration allows custom scenes. “Alexa, set garage to finishing mode” could raise temperature to 72°F, turn on dedicated task lighting, and start a two-hour timer. Google Assistant’s routines can trigger based on voice, time, or other device states. For Apple users, Siri Shortcuts can create complex automations with conditional logic: “If garage temperature is below 50°F, turn on heater and send me a notification when it reaches 65°F.” The key is creating memorable, specific commands that match your workflow. Document these commands and post them in your garage until they become second nature.
Firmware Updates and Future-Proofing
Smart devices become dumb if manufacturers stop supporting them. Choose heaters from established brands with a track record of firmware updates. The app should have an “update available” notification, and the process should be straightforward—preferably automatic during off-hours. Updates fix bugs, improve scheduling algorithms, and patch security vulnerabilities. Before buying, check online forums for complaints about abandoned products. A heater that received updates last month is likely to stay supported. Some manufacturers have open APIs, allowing third-party developers to create integrations even if the company eventually discontinues support. This future-proofs your investment and keeps your smart garage relevant for years.
Maintenance and Longevity of Smart Garage Heaters
Seasonal Maintenance Checklists
Smart scheduling features can remind you of maintenance tasks. At the start of heating season, your app should prompt you to: clean or replace air filters, check electrical connections for corrosion, verify Wi-Fi antenna integrity, test safety shutoffs, and inspect heating elements for scale buildup. For gas heaters, this includes checking the pilot light or ignition system, inspecting the flue for blockages, and testing CO detectors. Create a recurring calendar event in the app: “Every October 1st, run maintenance checklist.” Some smart heaters have self-diagnostics that run on startup and report issues like reduced airflow or element degradation before they cause failures.
Cleaning Smart Sensors and Connectivity Modules
Dust is the enemy of both heating elements and electronics. The Wi-Fi module’s antenna can get coated in sawdust, reducing signal strength. Monthly, use compressed air to blow out the heater’s control compartment. The temperature sensor, often a small probe inside the unit, can drift if covered in grime. Gently clean it with isopropyl alcohol. If your heater uses external wireless sensors, change their batteries annually and clean their vents. Check for firmware updates after cleaning—sometimes the act of opening the unit triggers a diagnostic that reveals issues. Never spray water or cleaners directly on the control panel; moisture can seep into the Wi-Fi module and cause permanent damage.
When to Replace vs. Repair
Smart heaters have a shorter lifespan than dumb ones—typically 8-12 years vs. 15-20 years—because the electronics fail before the heating elements. If the Wi-Fi module dies but the heater still works manually, you can add an external smart thermostat for $100-200 instead of replacing the entire unit. However, if the heating element fails in a 10-year-old unit, replacement makes more sense. Smart features can help make this decision. The app might show the heater running 40% longer to achieve the same temperature, indicating efficiency loss. If repair costs exceed 50% of a new unit’s price, upgrade. Newer models offer better scheduling algorithms and security features that justify the investment.
Troubleshooting Common Smart Scheduling Issues
Connectivity Dropouts and Solutions
The most common complaint: the heater goes offline randomly. First, check signal strength in the app—look for RSSI values above -70 dBm. If weaker, relocate your router or add a mesh node. Next, ensure your router isn’t auto-switching channels; manually set it to a less congested channel (1, 6, or 11 for 2.4GHz). Some routers have “Airtime Fairness” features that deprioritize IoT devices—disable this. If dropouts correlate with microwave use, your heater is on the same channel. Change it. For persistent issues, assign the heater a static IP address in your router settings; this prevents DHCP lease renewals from causing brief disconnections. As a last resort, some heaters allow connecting to a guest network with simpler settings.
App Synchronization Problems
Your phone shows the heater is off, but you hear it running. This sync issue stems from the app not refreshing its status. Force-close and reopen the app. If persistent, log out and back in. Check if the heater’s clock is correct—schedules rely on accurate time, and a power outage can reset it to factory default. Most heaters sync time via the internet, but if connectivity is spotty, they drift. In the app, look for “sync time” or “update clock” options. Some systems have a “push to sync” button on the unit itself. If you have multiple users (family members), ensure you’re not overriding each other’s schedules—create separate profiles or designate one person as schedule manager.
Schedule Conflicts and Overrides
You set a schedule, but manual adjustments don’t stick. This happens when schedules have priority levels. “Vacation mode” might override daily schedules, or “away” settings might take precedence. Understand your app’s hierarchy. Some systems have “temporary override” that lasts until the next schedule change, while “permanent override” disables scheduling entirely until you manually re-enable it. If your schedule seems to ignore setpoints, check for hidden features like “smart away” that automatically adjust based on phone location, potentially conflicting with your manual schedule. When in doubt, factory reset the schedule and rebuild it step by step, testing each change.
Security and Privacy in the Connected Garage
Protecting Your Network and Devices
Your garage heater is a network device and potential entry point for hackers. Never connect it to your primary Wi-Fi network. Create a separate IoT network or guest network with a strong, unique password. Enable WPA3 encryption if your router supports it. Update your router’s firmware regularly. Some advanced users create VLANs to isolate garage devices entirely. Check if your heater supports two-factor authentication for the app account—enable it. Disable any features you don’t use, like remote access from outside your home if you only need local control. Periodically check your router’s connected devices list for unfamiliar MAC addresses, which could indicate unauthorized access.
Data Privacy Considerations
Smart heater manufacturers collect data—temperature settings, usage patterns, location. Read the privacy policy. Look for companies that anonymize data and don’t sell it to third parties. European brands often comply with GDPR, offering stricter privacy protections. Some apps let you opt out of data collection, though this might disable features like energy reports. Be wary of free apps—they’re often monetizing your data. Paid apps or subscription services typically have better privacy practices. If you’re concerned, use a dummy email account for registration and disable location permissions after initial setup (though this breaks geofencing). Remember, your heating schedule reveals when you’re home—valuable information for burglars if data is breached.
Best Practices for Secure Smart Heating
Change the default password immediately after setup. Use a password manager to generate a strong, unique password. Enable automatic firmware updates to patch security vulnerabilities. If the heater has a physical reset button, consider placing it out of sight to prevent tampering. For detached garages, install a security camera covering the heater—if someone physically accesses it, they could potentially join it to a different network and control it maliciously. Regularly audit which third-party services have access to your heater through integrations like IFTTT and revoke unused connections. Finally, have a non-smart backup plan: know how to operate the heater manually if smart features are compromised.
Frequently Asked Questions
What size smart garage heater do I need for my space?
Calculate your garage’s volume (length × width × height) and desired temperature rise (target temp minus coldest outdoor temp). A basic rule: 10 watts per square foot for well-insulated garages, 15 watts per square foot for poorly insulated spaces. For a 500 sq ft insulated garage, plan for a 5,000-watt unit. Smart features don’t change the sizing math, but they do improve efficiency—so you might size down by 10% if the unit has adaptive learning and excellent scheduling. Always check the manufacturer’s BTU calculator in their app for precise sizing.
Can I install a smart garage heater myself or do I need an electrician?
You can handle mounting, low-voltage thermostat wiring, and app setup. However, any 240V electrical work requires a licensed electrician in most jurisdictions. The risk isn’t just shock—improper wiring can cause fires and void insurance. A safe compromise: you install the heater and run conduit, then have an electrician make the final connections at the panel and heater. Gas heater installation always requires a professional for the gas line connection and leak test. DIY-friendly mini-splits with pre-charged lines are an exception, but you still need electrical work.
Will a smart garage heater work if my internet goes down?
Most quality units store the last programmed schedule in local memory and continue operating normally without internet. However, you can’t make remote adjustments, and features like geofencing or weather-based scheduling won’t work. Basic on/off and temperature setpoint functions remain available through on-unit controls. Some heaters have Bluetooth backup for local control. Always test this during setup—unplug your router and verify the heater executes its schedule. If it doesn’t, look for a model with better offline capabilities.
How much money can I realistically save with smart scheduling?
Expect 15-30% reduction in heating costs compared to manual control. The savings come from eliminating forgetfulness (no more heating an empty garage all day), optimizing pre-heat times (not running the heater longer than necessary), and leveraging time-of-use rates. A DIYer spending $100/month on garage heating could save $180-360 annually. The payback period for the smart premium is typically 2-3 years. Actual savings depend on your climate, insulation, and how inconsistent your manual habits were. Use the heater’s energy monitoring to track savings month-over-month.
What’s the difference between a smart thermostat and a smart heater?
A smart thermostat controls a dumb heater, adding scheduling and connectivity. A smart heater has these features built-in. For new installations, a smart heater offers cleaner integration and often more advanced features like energy monitoring. For existing heaters, adding a smart thermostat is more economical. Smart thermostats shine when controlling gas heaters or multiple heating zones. Smart heaters excel in simplicity—one app, one device, no compatibility issues. For DIYers starting from scratch, the small premium for a smart heater is worth it; for those with a working heater, a smart thermostat is the practical upgrade path.
Can I integrate my garage heater with existing smart home routines?
Yes, through platforms like Alexa Routines, Google Home Automations, or Apple Shortcuts. Most smart heaters work with IFTTT, allowing triggers like “When I say ‘workshop time,’ turn on heater, set lights to 100%, and play my ‘focus’ playlist.” The key is choosing a heater compatible with your existing ecosystem. Check for “Works with Alexa/Google/Apple HomeKit” certification. Hub-based systems like SmartThings offer the deepest integration, letting you create complex conditional logic. Test integration before the return period expires—some “compatible” devices have limited functionality.
Are smart garage heaters secure from hacking?
No connected device is 100% secure, but risks are minimal with proper precautions. Use a separate IoT network, strong passwords, and enable two-factor authentication. Reputable brands encrypt data and undergo security audits. The biggest risk isn’t a hacker turning on your heater—it’s the heater being used as an entry point to your network. Keep firmware updated and disable unused features. For maximum security, choose a heater that works locally without cloud dependency, though this limits remote access. The convenience of smart heating generally outweighs the small security risk for most DIYers.
Do smart heaters work in detached garages with weak Wi-Fi?
They can, but you’ll likely need a Wi-Fi extender or mesh node in or near the garage. Powerline adapters with Wi-Fi hotspots work well if your garage shares electrical service with the house. Some heaters support external antennas you can mount for better reception. Before buying, use a Wi-Fi analyzer app to check signal strength at the installation location. If RSSI is below -75 dBm, plan on extending your network. Ethernet-over-coax adapters are another option if your garage has cable TV wiring. Consider heaters with Bluetooth backup or local control as a failsafe.
What happens to my schedule during daylight saving time changes?
Quality smart heaters automatically adjust for DST based on their internet time sync. However, some older models or budget options require manual adjustment. Check the app settings for “automatic time zone” or “DST adjustment” options. If you live in an area that doesn’t observe DST, ensure you can disable automatic changes. The best systems maintain schedule integrity—your 6 AM pre-heat stays at 6 AM local time regardless of DST. After the time change, verify your schedules executed correctly for a day or two. If not, a quick app update or manual time reset usually fixes it.
How long do smart garage heaters typically last?
The heating elements last 15-20 years, but the smart electronics typically fail after 8-12 years. Dust, temperature extremes, and power surges degrade circuit boards. Units with replaceable Wi-Fi modules extend lifespan. Regular maintenance—cleaning, firmware updates, surge protection—adds years. When the smart features die, the heater often still works manually, so you’re not left completely cold. Budget for replacement around year 10, but don’t be surprised if it lasts longer in a clean, conditioned garage. The technology is evolving rapidly, so a 10-year-old smart heater is technologically ancient anyway. Plan upgrades around major workshop renovations or electrical upgrades for maximum efficiency.