Gaming setups have evolved from simple desks with monitors into immersive command centers where every element contributes to performance and atmosphere. Lighting, once an afterthought, now sits at the intersection of functionality and personal expression, transforming how you experience every frame, every victory, and every late-night gaming session. The right light strips don’t just illuminate—they extend your screen into your physical space, reduce eye strain during marathon sessions, and create a signature aesthetic that’s instantly recognizable.
But with countless options flooding the market, each promising to revolutionize your setup, how do you separate genuine innovation from marketing fluff? This comprehensive guide cuts through the noise, focusing on the core technologies, strategic considerations, and expert techniques that will help you build a lighting ecosystem that’s perfectly tailored to your gaming style—without mentioning a single brand name.
Top 10 Light Strips for Gaming Setups
Detailed Product Reviews
1. Govee RGBIC LED Strip Lights, Smart LED Lights for Bedroom, Bluetooth LED Lights APP Control, DIY Multiple Colors on One Line, Color Changing LED Strip Lighting Music Sync, Home Decor, 16.4ft

Overview: The Govee RGBIC LED Strip Lights deliver advanced lighting technology for bedroom and home decor enthusiasts. At 16.4 feet, this Bluetooth-enabled strip displays multiple colors simultaneously on a single line, creating vibrant gradients and dynamic effects that traditional RGB strips cannot match. Controlled via the Govee Home App, users access 16 million colors and 64+ preset scenes without needing Alexa integration.
What Makes It Stand Out: The RGBIC technology is the star feature, allowing true multi-color display per segment rather than single-color-at-a-time limitations. The 11 music sync modes with high-sensitivity microphone create immersive experiences that pulse with your audio. The active DIY community within the app provides endless inspiration, while regular AI-generated theme updates keep content fresh.
Value for Money: At $13.49 ($0.82 per foot), this strip offers exceptional value for RGBIC technology typically found in pricier alternatives. Comparable strips cost 30-50% more, making this an accessible entry point into advanced smart lighting. The feature set rivals premium brands, delivering professional-grade effects without the premium price tag.
Strengths and Weaknesses: Pros: True RGBIC multi-color display; robust app with community features; excellent music synchronization; frequent content updates; simple Bluetooth setup Cons: No Alexa/Google Assistant support; requires 2.4GHz Wi-Fi for some features; adhesive may weaken on textured surfaces
Bottom Line: Perfect for users wanting advanced lighting effects without breaking the bank. The Govee RGBIC strip transforms any space into a dynamic visual experience, making it a top choice for bedroom ambiance and home entertainment.
2. MATICOD RGB LED TV Strip USB Lights for Backlight and Behind, App Remote Control, Music Sync, Multicolor, 9.84FT for 32"-43" TV
Overview: The MATICOD RGB LED TV Strip provides targeted backlighting for 32-43 inch televisions, creating an immersive viewing experience that reduces eye strain. This 9.84-foot USB-powered strip integrates directly with your TV’s USB port and offers three control methods for maximum convenience. Designed specifically for entertainment setups, it delivers ambient lighting that enhances contrast and atmosphere.
What Makes It Stand Out: Versatility in control sets this apart—you can adjust settings via Bluetooth app, 21-key remote, or inline 3-key controller. The built-in high-sensitivity microphone enables real-time music sync that responds to both TV audio and room sound. The 5050 LED model provides brighter output than standard 3528 chips, while the app offers 21+ dynamic modes beyond typical static colors.
Value for Money: At $7.99, this is one of the most affordable TV backlighting solutions available. Competitors with similar features typically start at $12-15, making MATICOD a budget-friendly entry into smart TV lighting. The triple control method adds value by eliminating reliance on a single control source.
Strengths and Weaknesses: Pros: Multiple control options; sensitive music sync; easy USB installation; bright 5050 LEDs; strong adhesive backing; responsive customer support Cons: Limited to smaller TVs (32-43"); app occasionally disconnects; no RGBIC multi-color per segment; shorter length may not cover larger screens
Bottom Line: An excellent budget pick for smaller TV owners wanting ambient backlighting. The MATICOD strip delivers core features effectively, though its size limitations and occasional connectivity hiccups keep it from premium status.
3. Under Monitor RGB Light Bar, LED Light for Desk Gaming Setup, USB Powered Keyboard Light, 12 Inch 5V, 353 Color Change Modes, Wireless Remote, LED Ambient Lights for Room Decor, Desk Setup, PC
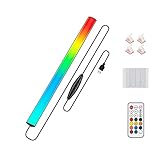
Overview: This 12-inch RGB light bar targets desk and gaming setups, providing focused illumination under monitors or behind displays. Unlike traditional strips, this bar format delivers directed ambient lighting with 353 dynamic modes and 12 static colors. USB-powered with a memory function, it remembers your last setting while offering both wireless remote and inline switch control for quick adjustments.
What Makes It Stand Out: The sheer number of modes (353) dwarfs most competitors, offering unmatched customization. The aluminum housing provides superior heat dissipation and a premium feel compared to plastic alternatives. Its dual-control system—wireless remote plus physical switch—eliminates app dependency, ensuring instant access without smartphone pairing delays.
Value for Money: At $14.99, this light bar sits in the mid-range but offers professional-grade build quality. Similar specialized monitor bars cost $20-30, making this a cost-effective solution for targeted desk lighting. The durability and extensive mode selection justify the price premium over basic strips.
Strengths and Weaknesses: Pros: Incredible 353 dynamic modes; premium aluminum construction; memory function; dual control methods; easy adhesive installation; focused light bar design Cons: 12-inch length may be short for ultrawide monitors; no app/smart features; limited to USB power; remote requires line-of-sight
Bottom Line: Ideal for gamers and professionals wanting focused desk lighting without app complexity. The extensive mode library and solid build quality make this a reliable, high-performance ambient lighting solution.
4. Govee RGBIC Gaming Lights, 10ft Neon Rope Lights Soft Lighting for Gaming Desks, LED Strip Lights Syncing with Razer Chroma, Support Cutting, Smart App Control, Music Sync, Adapter (Only 2.4G Wi-Fi)

Overview: The Govee RGBIC Gaming Lights represent a premium neon rope solution designed for serious gaming setups. This 10-foot strip features 42 individually controllable segments with 84 LEDs per meter, delivering dense, vibrant illumination without traditional light spots. The innovative inverted illumination technology diffuses light evenly through soft silicone, creating a professional neon effect that wraps elegantly around desk edges.
What Makes It Stand Out: The glare-free diffusion technology eliminates harsh hotspots, protecting eyes during extended gaming sessions. Integration with Razer Chroma and Govee’s AI Gaming Sync Box creates unparalleled immersion, synchronizing lighting with in-game actions. The cuttable design (12 specific points) allows precise customization, while the Shore 45-degree silicone material provides durability and flexibility surpassing standard neon ropes.
Value for Money: At $74.99 ($7.50 per foot), this is a significant investment. However, the density of LEDs, advanced diffusion technology, and ecosystem integration justify the premium. Comparable professional-grade gaming lights cost $90-120, making this competitively priced for enthusiasts seeking seamless Razer integration.
Strengths and Weaknesses: Pros: Superior RGBIC segment control; glare-free diffusion; Razer Chroma sync; cuttable customization; durable silicone construction; dense LED placement Cons: Requires 2.4G Wi-Fi only; AI Gaming Box sold separately; cannot rejoin cut sections; premium price point; limited to gaming use cases
Bottom Line: A must-have for Razer ecosystem users wanting the ultimate immersive gaming station. The advanced diffusion and dense LED configuration deliver professional results, though the ecosystem lock-in and price limit its appeal to casual users.
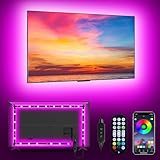
5. TK99SW TV LED Lights, 13.2ft Music Sync RGB Strip Lights with Remote & App Control, USB Powered for 32-65 Inch TVs, PC, Bedroom, Gaming Setup, Home Cinema

Overview: The TK99SW TV LED Lights offer an ultra-budget entry into smart TV backlighting, stretching 13.2 feet to accommodate 32-65 inch displays. This USB-powered strip provides both remote and app control with 16 million colors and music synchronization. The timer function adds automation convenience, while the versatile length makes it suitable for TVs, PCs, bedrooms, and gaming setups beyond just television use.
What Makes It Stand Out: The sub-$5 price point is remarkable for a dual-control smart LED strip with music sync. Coverage of up to 65-inch TVs at this price is virtually unmatched. The high-sensitivity microphone delivers responsive audio synchronization that rivals more expensive options, while the timer function provides automation typically reserved for premium products.
Value for Money: At $4.99, this represents exceptional value—costing less than a fast-food meal while delivering core smart features. Even budget alternatives typically start at $10-12. The compromise comes in build quality and longevity, but for the price, it’s a low-risk introduction to TV backlighting.
Strengths and Weaknesses: Pros: Unbeatable price; generous 13.2ft length; dual control methods; music sync capability; timer automation; wide TV size compatibility Cons: Build quality concerns; adhesive may fail over time; app reliability issues; no RGBIC multi-color; limited brightness compared to premium options
Bottom Line: Perfect for budget-conscious buyers wanting to experiment with TV backlighting. While durability questions exist, the feature set and price make it an excellent value proposition for temporary setups or first-time users.
6. Govee RGBIC Gaming Light Bars H6047 with Smart Controller, Wi-Fi Smart LED Gaming Lights with Music Modes and 60+ Scene Modes Built, Works with Alexa & Google Assistant, Game Room Lights Decor

Overview: The Govee RGBIC Gaming Light Bars represent a premium entry in ambient gaming lighting, designed for enthusiasts who demand cutting-edge technology. These Wi-Fi-enabled bars feature advanced RGBIC technology, allowing multiple colors to display simultaneously across each bar, creating dynamic rainbow effects that standard RGB cannot match.
What Makes It Stand Out: True game-changer status comes from Razer Chroma integration, syncing lighting directly with compatible games for unprecedented immersion. The smart dial controller offers tactile, instant control without opening apps. With 60+ preset scenes, 16.8 million colors, and dual audio sync capabilities (speakers and headphones), these bars create a cohesive ecosystem that responds to both your gameplay and room audio.
Value for Money: At $79.99, these sit at the premium end but justify the cost through ecosystem integration and build quality. Competing light bars lack Razer Synapse support and RGBIC technology. While cheaper alternatives exist, none match the seamless automation with Alexa/Google Assistant and the refined desktop controller that serious gamers crave.
Strengths and Weaknesses: Pros include industry-leading RGBIC lighting, Razer Chroma compatibility, intuitive smart dial, robust app ecosystem, and dual audio input. Cons involve requiring three separate software installations (Govee Home, Razer Synapse, Govee Desktop), premium pricing that may exceed casual gamers’ budgets, and occasional Wi-Fi connectivity hiccups reported by some users.
Bottom Line: For dedicated gamers seeking the ultimate immersive experience, these light bars deliver unmatched performance. The Razer integration and RGBIC technology make them worth the premium. Casual users may find better value elsewhere, but enthusiasts will appreciate the refined ecosystem and responsive controls.
7. KSIPZE LED Lights for TV, 16.5ft TV led Backlight for 45-75 Inch TVs RGB TV Backlight Behind Music Sync Smart APP & Button Control TV LED Strip Lights USB Powered for Bedroom/Gaming

Overview: The KSIPZE LED TV Backlight offers an affordable entry into ambient television lighting, providing a 16.5-foot strip designed for 45-75 inch screens. This USB-powered solution emphasizes plug-and-play simplicity with both app and physical button control options.
What Makes It Stand Out: Remarkable value proposition at under $9, delivering core smart features typically found in pricier alternatives. The Bluetooth-enabled control system provides responsive adjustments without requiring Wi-Fi, while the generous length accommodates larger TVs that budget options often exclude. USB power means no additional wall adapters cluttering your setup.
Value for Money: Exceptional affordability makes this a low-risk introduction to TV backlighting. At $8.99, it costs less than a movie ticket while offering 16+ colors, dynamic modes, and music synchronization. Premium brands charge 3-5x more for similar functionality, though they may offer superior LED density and app polish.
Strengths and Weaknesses: Pros include unbeatable price, simple installation, broad TV size compatibility, dual control methods, and low power consumption. Cons feature basic RGB (no addressable LEDs), potential adhesive longevity issues, limited brightness compared to premium strips, and a less refined app experience. The 3-button controller, while functional, lacks the sophistication of dial or voice controls.
Bottom Line: Perfect for budget-conscious buyers wanting to test TV backlighting without significant investment. It delivers essential features reliably, though enthusiasts will eventually crave more advanced capabilities. For bedrooms, dorm rooms, or secondary TVs, this represents outstanding value that transforms viewing experiences for less than $10.
8. Ledagic Led Lights for TV, 13.2ft TV Led Backlight 32-65 Inch, USB Led Light Strip with Remote, App Control, RGB Led Strip Lights Music Sync Color Changing Led Lights for Bedroom, Gaming Accessories

Overview: The Ledagic LED TV Backlight targets the ultra-budget segment with a 13.2-foot strip suitable for 32-65 inch displays. Offering triple control via app, remote, and manual buttons, this USB-powered kit prioritizes accessibility and basic functionality for entry-level users.
What Makes It Stand Out: At $5.99, it’s among the cheapest smart LED solutions available, yet still includes music synchronization and app control—features often omitted at this price point. The inclusion of both remote and app control provides flexibility that some budget competitors lack. The 5050 LED specification with 15 beads per meter delivers adequate brightness for ambient lighting.
Value for Money: Nearly disposable pricing makes this ideal for experimentation or temporary setups. Costing less than fast food, it provides legitimate smart home functionality. However, corners are cut: shorter length, smaller TV range, and basic build quality. It’s 33% cheaper than Product 7 but offers proportionally less coverage and features.
Strengths and Weaknesses: Pros include rock-bottom pricing, multiple control options, music sync capability, easy USB power, and straightforward installation. Cons involve limited length restricting larger TVs, non-addressable RGB only, questionable long-term durability, weaker adhesive, and no voice assistant integration. The 24-key remote feels dated compared to modern controllers.
Bottom Line: A no-brainer for those wanting the absolute cheapest functional TV backlight. It works adequately for small to medium setups but lacks refinement. Recommended for kids’ rooms, dormitories, or as a gift accessory where perfection isn’t required. Serious users should spend slightly more for better quality and longevity.
9. Smart LED Light Bars, RGB+IC Light Bar for Room, 16 Million Colors & 213 Preset Modes, Music Sync Gaming Lights, App Control & Remote Control Ambient Lighting for TV Backlight, Game Room Lights Decor

Overview: These Smart LED Light Bars position themselves as a mid-range alternative to premium brands, offering addressable RGB+IC technology in a 17.3-inch dual-bar setup. With 213 preset modes and triple control methods, they target gamers and entertainment enthusiasts seeking advanced features without flagship pricing.
What Makes It Stand Out: The impressive 213 preset modes dwarf most competitors, providing unmatched variety out-of-the-box. The metal construction with aluminum alloy backing and round base offers superior stability and heat dissipation compared to plastic-bodied alternatives. Triple control via app, remote, and control box ensures accessibility regardless of user preference or technical comfort.
Value for Money: At $25.98, these deliver 70% of premium features for one-third the cost of Govee’s comparable offering. The RGB+IC technology, robust build quality, and extensive preset library create compelling value. While lacking Razer Chroma integration, they include music sync and scene modes that satisfy most users’ needs.
Strengths and Weaknesses: Pros include excellent preset variety, sturdy metal construction, multiple control options, addressable LEDs, and strong price-to-performance ratio. Cons involve lesser-known brand reputation, potential app reliability issues, no voice assistant compatibility mentioned, and shorter bars that may not suit massive displays. Setup instructions may be less polished than premium alternatives.
Bottom Line: Outstanding value for gamers wanting advanced lighting without the premium tax. The metal build and extensive presets make these feel more expensive than they are. Skip if you need Razer integration or voice control, but for most users, these bars deliver premium ambiance at a budget-friendly price point.
10. 32.8Ft Neon Rope Lights,Flexible Led Rope Lights Control with App/Remote,Multiple Modes RopeLights,IP65 Outdoor RGB Led Neon Lights NonWater Resistant,Music Sync Gaming Led NeonLight Strip

Overview: These 32.8-foot neon rope lights diverge from traditional light bars and strips, offering unparalleled flexibility for creative installations. Designed for both indoor gaming setups and outdoor applications, the silicone-encased LEDs can be bent into custom shapes or cut to length for personalized designs.
What Makes It Stand Out: The extraordinary length and pliability enable installations impossible with rigid bars—wrap around desks, create neon signs, or outline entire rooms. IP65 rating provides dust and water resistance for patio or gaming cave versatility. At 32.8 feet, it’s five times longer than standard TV strips, offering whole-room coverage for the price of a single premium light bar.
Value for Money: At $23.69, the per-foot cost is remarkably low. While brightness per LED may be less concentrated than dedicated bars, the sheer length provides ambient coverage that multiple short strips couldn’t match economically. Perfect for renters or decorators who value adaptability over pinpoint accuracy.
Strengths and Weaknesses: Pros include massive length, extreme flexibility, IP65 protection, music sync, app/remote control, and timer functionality. Cons feature confusing “NonWater Resistant” description conflicting with IP65 rating, lower brightness density, potential color consistency issues over long runs, and adhesive challenges on textured surfaces. The neon diffuser softens effects, which may disappoint users wanting sharp light beams.
Bottom Line: Ideal for creative personalities wanting maximum installation freedom. Transform entire spaces rather than just a TV area. The IP65 rating and length make it uniquely versatile, though those wanting focused gaming immersion should choose light bars instead. A fantastic value for ambient room lighting with gaming flair.
Why Gaming Setup Lighting Transforms Your Experience
The Science Behind Immersive RGB
Your brain processes ambient lighting as an extension of what’s happening on-screen. When a grenade explodes in the corner of your vision and your wall lights pulse with matching orange hues milliseconds later, your spatial awareness sharpens. This phenomenon, called environmental extension, tricks your peripheral vision into believing the game world is larger than your monitor. Research shows that synchronized ambient lighting can reduce perceived motion blur and improve reaction times by up to 12% in fast-paced games. The key isn’t just adding light—it’s adding the right light that responds intelligently to your gameplay.
From Niche to Necessity
Five years ago, LED strips were novelty items. Today, they’re standard equipment for competitive gamers and content creators alike. The shift happened as games became more visually dynamic and streaming grew dominant. Viewers expect production value, and creators need lighting that adapts to different moods—intense red for horror games, cool blue for strategy titles, pulsing rainbow effects for celebrations. But beyond aesthetics, proper bias lighting behind your monitor reduces eye fatigue by decreasing the contrast between your bright screen and dark room, letting you game longer without headaches.
Understanding Light Strip Technologies
Addressable vs. Non-Addressable LEDs
This distinction determines everything about your lighting’s capability. Non-addressable strips light up all LEDs in a single color simultaneously—simple, reliable, and power-efficient. Addressable strips let you control each LED individually, creating wave effects, chase patterns, and true screen-mirroring. For gaming, addressable is the gold standard. The WS2812B protocol remains the industry benchmark, offering 16.8 million colors per LED with refresh rates fast enough for sub-100ms response times. However, addressable strips demand more processing power and often require dedicated controllers, adding complexity that’s worth it only if you’ll actually use the advanced features.
RGB, RGBIC, and RGBW Explained
RGB is the baseline—red, green, and blue diodes mixing to create colors. RGBIC adds an independent control chip, enabling addressable functionality without separate controllers. RGBW introduces a dedicated white diode, producing cleaner whites and pastels that RGB alone struggles with. For gaming, RGBIC offers the best balance of control and simplicity. RGBW becomes valuable if you use your setup for content creation or productivity where accurate white lighting matters. Avoid strips that claim “RGB” but only offer 16 basic colors—they’re using outdated controllers that dither rather than truly mix colors.
Strip Form Factors and Flexibility
Standard flexible strips with 3M adhesive backing work for 90% of setups, but rigid aluminum channels provide cleaner lines and better heat dissipation for permanent installations. COB (Chip-on-Board) strips pack LEDs so densely they create a seamless line of light without visible dots—perfect for monitor backlighting where you don’t want spotting. For desk edges, consider corner-specific strips with 90-degree connectors that maintain brightness around bends without breaking the circuit. The bend radius matters: most strips tolerate 20mm curves, but tighter bends require specialized corner pieces or risk damaging copper traces.
Essential Features to Evaluate
Brightness Levels and Color Accuracy
Measured in lumens per meter, gaming strips should output 300-600 lumens for ambient lighting—bright enough to be seen in daylight but dimmable to 5% for night gaming. Color accuracy, measured by how closely the emitted color matches the digital input, separates premium from budget options. Look for strips with gamma correction and 8-bit per channel minimum (24-bit total). High-end options offer 16-bit color depth, eliminating banding in gradients. Test color accuracy by displaying pure cyan and magenta; cheap strips show these as washed-out blue and pink.
LED Density and Strip Dimensions
LED density, measured in LEDs per meter (LEDs/m), directly impacts smoothness. Thirty LEDs/m creates obvious hotspots; sixty is the minimum for gaming. Ninety to 144 LEDs/m produces the seamless gradients you see in professional setups. Strip width matters too—10mm strips fit behind most monitors, while 12mm versions house larger LEDs for higher brightness. For under-desk mounting, consider 15mm strips with built-in diffusers that soften the light and prevent harsh reflections on glossy desk surfaces.
Connectivity Protocols
Your control method defines convenience. USB-powered strips plug directly into your PC, powering on/off with your system but limited to 5V and shorter lengths. 12V strips require wall adapters but support longer runs and brighter output. Wi-Fi enables cloud control and voice commands but adds latency. Bluetooth offers direct, low-latency control without internet dependency—ideal for gaming. The sweet spot? USB-powered strips with Bluetooth backup, giving you instant PC integration and manual override when needed.
Installation and Mounting Strategies
Surface Preparation and Adhesive Options
Even the best adhesive fails on dusty or oily surfaces. Clean mounting areas with isopropyl alcohol and let dry completely. For textured surfaces like wood grain or matte desks, apply 3M VHB (Very High Bond) tape instead of standard foam adhesive—it conforms to micro-textures and holds 10x stronger. Temperature matters: apply adhesive when surfaces are above 20°C (68°F) for maximum bond strength. If you live in a humid climate, add a thin bead of clear silicone sealant along strip edges to prevent moisture ingress that causes adhesive failure.
Professional-Grade Mounting Solutions
For setups you’ll reconfigure, skip adhesive entirely. Aluminum mounting channels with snap-in diffusers create a finished look and let you swap strips in seconds. Magnetic mounting strips—thin ferrous tape applied to surfaces with magnetic LED strips—offer ultimate flexibility. For monitor mounting, 3D-printed corner brackets position strips at the optimal 45-degree angle, directing light toward the wall while hiding the strip from direct view. This eliminates glare while maximizing the bias lighting effect.
Navigating Corners and Complex Layouts
Never fold LED strips at sharp 90-degree angles—this cracks solder joints and creates dead zones. Instead, use L-shaped connectors for addressable strips or cut-and-bridge techniques for non-addressable ones. When crossing gaps (like between desk sections), use stranded wire bridges rather than rigid connectors, which stress the strip over time. For spiral patterns around monitor arms or desk legs, calculate the path length first: measure the circumference and multiply by desired rotations, then add 15% for overlap and connection losses.
Power Management Fundamentals
Voltage Selection and Implications
5V strips are safe and simple but limited to about 2 meters before voltage drop dims the far end. They’re perfect for monitor backlighting and small accent areas. 12V strips handle 5-meter runs efficiently and offer better brightness-to-power ratios, making them ideal for desk perimeters and room-scale installations. 24V strips are overkill for most gaming setups but essential for large-scale accent lighting where you need consistent brightness across 10+ meter runs. Always match your power supply exactly—using a 12V supply on a 5V strip destroys the LEDs instantly.
Calculating Power Load
Every LED draws current, and addressable RGB LEDs at full white consume about 60mA each. For a 2-meter strip with 60 LEDs/m (120 total), that’s 7.2 amps at 5V—36 watts. Always spec your power supply at 120% of calculated load: a 45W minimum for that example. Undersized supplies cause color inconsistency, flickering, and premature failure. Use online LED power calculators, but add 20% for controller overhead and peak brightness spikes during effects. Never chain multiple strips to a single power input beyond the manufacturer’s rating; instead, inject power every 2-3 meters using parallel wiring.
Clean Cable Management
Power injection points create cable clutter. Hide them behind cable raceways painted to match your walls. For desk installations, route power cables through the same grommets as your monitor and peripheral cables, securing them with hook-and-loop straps every 15cm. Use right-angle USB connectors and low-profile DC jacks to minimize protrusion. Consider a centralized power distribution block under your desk—one high-amperage supply feeding multiple strips through a bus bar reduces wall wart clutter and lets you control everything with a single smart switch.
Synchronization Capabilities
Real-Time Game Integration
True game sync requires screen-capturing software that samples your display’s edge pixels and maps them to LED zones. This adds 2-5% CPU overhead and introduces 50-150ms latency—noticeable in competitive shooters. Hardware-based capture cards reduce this to under 20ms but cost significantly more. Some games offer native SDK integration, sending lighting data directly through the game engine with near-zero latency. Check if your favorite titles support these protocols; if not, you’re relying on screen sampling, which works best for slower-paced, visually rich games.
Music Visualization
Audio-reactive modes use Fast Fourier Transform (FFT) to break audio into frequency bands, mapping bass to warm colors and treble to cool hues. Quality varies wildly: basic controllers use 3-5 bands, creating jerky transitions, while premium options analyze 32+ bands for fluid, responsive effects. For streaming, ensure your lighting reacts to game audio only, not your microphone, to prevent feedback loops. Some software lets you separate inputs, applying game audio to room lights and voice audio to a subtle desk accent.
Cross-Device Ecosystems
The holy grail is one software controlling your strips, keyboard, mouse, and headset. This requires either a unified proprietary ecosystem or open standards like Razer Chroma Connect or MSI Mystic Light Sync. Open standards offer broader compatibility but often sacrifice advanced features. Proprietary systems deliver tighter integration but lock you into one brand. The compromise? Use a master controller like OpenRGB or SignalRGB that bridges different protocols, though setup complexity increases significantly.
Strategic Placement for Maximum Impact
Monitor Backlighting Techniques
The optimal distance from monitor to wall is 15-25cm—closer creates hotspots, further dilutes the effect. Mount strips 3-5cm from the monitor’s edge, angled at 45 degrees toward the wall. This creates an even glow without seeing individual LEDs. For ultrawide monitors, use two shorter strips rather than one long one; the center connection point prevents voltage drop and lets you create separate left/right zones for directional effects. Curved monitors benefit from flexible strips that follow the contour, but mount them on the flat rear panel, not the curved bezel.
Desk and Furniture Accents
Under-desk lighting should face downward, not outward, to avoid glare on your legs and floor. Mount strips in aluminum channels with diffusers, positioned 5cm from the desk’s front edge. This creates a floating effect while hiding the light source. For desk interiors (inside cable trays or drawers), use motion-activated strips that turn on only when needed, preserving LEDs and reducing distraction. Edge lighting on desk surfaces works best with COB strips in shallow 5mm channels, creating a razor-thin line of light that defines the desk’s perimeter without being overpowering.
Room-Wide Ambient Layers
Don’t light everything equally. Create layers: bright accent strips behind your monitor (focal point), medium brightness under your desk (task area), and dim perimeter lighting on baseboards (ambient fill). This hierarchy prevents visual chaos and lets you adjust mood by layer. For baseboard lighting, mount strips facing upward into a cove molding that hides the source and reflects light off the wall, creating a soft gradient rather than a harsh line. Ceiling-mounted strips should be in deep channels (15mm+) with 60-degree lenses that direct light toward walls, not straight down.
Software Ecosystem and Customization
Mobile vs. Desktop Control
Mobile apps offer convenience but add a layer of abstraction—unlocking your phone, opening an app, navigating menus. For gaming, desktop software with global hotkeys is superior. Map lighting profiles to function keys: F9 for competitive mode (dim red to preserve night vision), F10 for streaming mode (bright, camera-friendly white), F11 for chill mode (slow color cycles). The best setups run a lightweight background service that detects running games and auto-switches profiles, though this requires granting screen-reading permissions that some security-conscious users avoid.
Creating Custom Profiles
Start with a base profile: 30% brightness, 4500K white for general use. Layer game-specific profiles on top. For horror games, use deep red at 10% brightness with slow pulsing to avoid breaking immersion. For racing games, create a speedometer effect: strips on the right side glow green at low speed, transitioning to yellow, then red as you accelerate, using telemetry data if available. Save profiles as JSON files for easy backup and sharing within modding communities. Advanced users can script profiles that react to Discord notifications (blue flash for mentions, red for DMs) or system stats (temperature-based color shifts).
Macro Integration
Bind complex lighting sequences to mouse buttons or keyboard macros. A clutch play could trigger a victory animation—wave effects cascading across your room in team colors. This requires software that exposes an API or webhook. Some controllers accept HTTP requests, letting you trigger effects from IFTTT or custom scripts. Imagine your lights flashing when you get a Twitch follower or turning red when your GPU temperature spikes. The integration possibilities are limited only by your willingness to tinker with automation platforms.
Budget Planning and Value Assessment
Entry-Level vs. Premium Tiers
Budget strips ($15-30) offer basic RGB with remote control—fine for static accent lighting but lacking in color accuracy and brightness control. Mid-range ($40-70) introduces addressable LEDs, decent software, and reliable adhesive. Premium ($80-150) delivers high LED density, excellent color gamut (95%+ of sRGB), robust software with game integration, and quality mounting hardware. The jump from mid-range to premium buys you consistency: colors match what you select, effects render smoothly, and the hardware lasts 50,000+ hours instead of 20,000. For a primary setup, invest in premium for monitor backlighting and mid-range for secondary accents.
Expansion Costs
Starting small and expanding seems economical but creates compatibility headaches. Different batches of LEDs have slight color variations—what you buy six months later won’t perfectly match today’s strips. Controllers have limited channels; adding zones requires upgrading hubs. Power supplies max out, necessitating additional wall warts. Plan your final layout first, even if you buy in stages. Choose a controller ecosystem that supports your maximum envisioned zones (account for future desk upgrades or room changes), and buy a power supply rated for 150% of your eventual load. This upfront planning saves money and frustration long-term.
Long-Term Value
Cheap strips fail at connector points where solder joints crack from thermal cycling. Premium options use gold-plated connectors and flexible PCBs that withstand repeated bending. Warranty matters—one-year coverage is standard, but two years indicates manufacturer confidence. Consider power efficiency: a 24W strip running 4 hours daily costs about $3.50/year in electricity, while an inefficient 60W strip costs $9. Over five years, the “expensive” efficient strip pays for itself. Also factor in software longevity: will the app receive updates for new OS versions? Open-source supported hardware often outlives proprietary apps that get abandoned.
Design Principles and Common Mistakes
Avoiding Light Pollution
Light pollution is stray light hitting your screen, creating glare and reducing contrast. Prevent it by angling strips away from your monitor and using black electrical tape to mask any light leakage. Test by turning off room lights and sitting in your gaming position; you should not see direct LED points, only reflected glow. If you stream, light pollution murders webcam quality, forcing you to overcompensate with brightness and creating a washed-out image. Use flags—small pieces of cardboard painted black—to block light from hitting your camera lens while preserving the ambient effect.
Color Theory for Gaming Spaces
Random rainbow cycles are visually exhausting. Apply color theory: use complementary colors for accent vs. ambient lighting (blue ambient with orange accents creates depth). Match color temperature to game genre: warm (2700K-3500K) for cozy RPGs, neutral (4000K-5000K) for strategy, cool (6000K-7000K) for sci-fi shooters. Saturation matters—keep it below 70% for ambient lighting to avoid overwhelming your primary light source (the monitor). For team-based games, use your team’s color at low saturation as a constant background, pulsing brighter during objectives.
Power Supply Pitfalls
The most common failure point isn’t the LEDs—it’s an undersized power supply running hot, degrading capacitors until voltage ripple causes flickering. Never bury power bricks in enclosed spaces; they need airflow. Calculate total wattage, then add 50% headroom. If a supply feels hot to the touch, it’s too small. Modular power supplies with detachable cables reduce clutter but verify connector polarity—reversing positive and negative instantly destroys LED controllers. Use a kill-a-watt meter to measure actual draw; manufacturers often overstate efficiency, and real-world numbers help you size UPS backup power correctly.
Future-Proofing Your Investment
Emerging Technology Standards
Matter, the new smart home standard, promises cross-brand compatibility. Early Matter-compatible lighting controllers are hitting the market, offering IP-based control that bypasses proprietary clouds. Wi-Fi 6E support reduces latency for wireless strips, crucial for sync applications. POE (Power over Ethernet) lighting is emerging for permanent installations, combining data and power in one cable—overkill for most gamers but perfect for dedicated streaming rooms. Keep an eye on PCIe lighting cards that directly interface with your GPU, offering sub-10ms sync without CPU overhead.
Smart Home Integration
Linking your gaming lights to broader smart home systems unlocks scenarios: lights turning red when your smart doorbell detects motion (alerting you to pizza delivery mid-raid), or automatically dimming when you say “Alexa, game mode.” This requires hubs that support both gaming protocols (like Razer Synapse) and home automation (like Home Assistant). The bridge is often a Raspberry Pi running custom scripts that translate between systems. While complex, this integration lets your gaming space respond to real-world events, creating truly contextual lighting.
Modular Upgrade Paths
Choose ecosystems with swappable components: controller boxes that work with multiple strip types, power supplies with standard barrel connectors, and software that supports third-party hardware via plugins. Avoid strips with molded connectors; instead, opt for screw-terminal or JST-SM connectors that let you replace failed sections without soldering. Some premium systems use a master-slave architecture where one intelligent controller manages multiple dumb strips, letting you upgrade the brain without replacing all the LEDs when new features emerge.
Maintenance and Longevity
Proper Cleaning Techniques
Dust on LED strips acts as a heat insulator, reducing lifespan. Clean monthly with compressed air, holding the can upright to avoid moisture. For sticky residue or grime, use a microfiber cloth dampened with water only—chemical cleaners cloud diffusers and degrade silicone coatings. Never spray directly onto strips; moisture seeps into connections. For strips in channels, remove the diffuser and clean it separately with mild soap, ensuring it’s completely dry before reassembly to prevent water spots that diffuse light unevenly.
Troubleshooting Common Issues
Flickering usually indicates power supply issues or loose connections. Check voltage at the strip’s end with a multimeter; if it’s more than 0.5V below the supply voltage, you need power injection. Dead sections mean a failed LED or solder joint; for addressable strips, one dead LED kills the entire downstream chain. Replace it by desoldering and bridging with a new LED or cutting the section and splicing in a fresh strip. Color inconsistency across the strip points to voltage drop or a failing controller; measure each LED’s forward voltage to isolate the culprit.
Firmware Management
Controller firmware updates fix bugs and add features but can brick devices if interrupted. Always update via USB rather than wireless for reliability, and never during a thunderstorm or on an unstable power grid. Before updating, export your lighting profiles—some updates wipe custom settings. Check update logs in community forums before installing; manufacturers sometimes push buggy releases. For advanced users, custom firmware like WLED unlocks features but voids warranties and risks hardware damage if misconfigured. Keep a backup controller if you depend on your lighting for streaming income.
Frequently Asked Questions
What’s the difference between RGB and RGBIC, and which should I choose for gaming?
RGB strips display one color at a time across the entire length, while RGBIC (RGB Independent Control) allows individual LED control for complex effects. For gaming, RGBIC is strongly recommended—it enables screen-mirroring, wave effects, and directional lighting that reacts to in-game events. The independent chip in each LED segment processes commands faster and more accurately, creating the smooth transitions that make gaming immersion work. RGB is acceptable only for static accent lighting where you don’t need dynamic effects.
How many light strips do I actually need for a complete gaming setup?
Start with three zones: one behind your monitor (2-3 meters), one under your desk (3-4 meters), and one for room ambient lighting (5-10 meters around baseboards or ceiling). This creates a layered effect with depth. You can always expand later, but planning three zones from the beginning ensures you buy a controller with enough channels. A single-zone setup feels flat, while more than five zones becomes difficult to manage and offers diminishing returns unless you have a multi-monitor streaming rig.
Can I cut LED strips to fit my exact space, and will they still work?
Yes, but only at designated cut points marked by copper pads, typically every 2.5cm to 10cm depending on LED density. Cutting elsewhere destroys that segment. After cutting, you must seal the cut end with silicone or heat-shrink to prevent oxidation and short circuits. Addressable strips require precise cutting—if you cut through a chip instead of between them, the entire downstream section fails. Always measure twice, cut once, and test the strip before mounting. Keep cut-off pieces; they can be spliced together with connectors for small accent areas.
Will adding LED strips to my gaming setup significantly increase my electricity bill?
Modern LED strips are highly efficient. A typical 2-meter addressable strip uses 15-25W at full brightness—running 4 hours daily costs roughly $1.50-$2.50 per year. Even a full-room installation with 10 meters of strips uses less power than a single 60W incandescent bulb. The real power cost comes from inefficient power supplies; a cheap 12V adapter might waste 30% as heat, while a quality switching supply wastes under 10%. Your gaming PC itself is the power hog; lighting is negligible in comparison.
Do I need a separate hub or controller for each brand of light strip I buy?
Unfortunately, yes—most brands use proprietary protocols that don’t interoperate. You can mix brands, but you’ll manage them through separate apps. Universal controllers like those supporting WLED or OpenRGB can control multiple strip types from one interface, but setup requires technical skill. For simplicity, commit to one ecosystem for your primary lighting and accept that secondary accents from other brands will need independent control. Some advanced users run a Home Assistant server to unify everything, but that’s overkill for most gamers.
How do I synchronize my lights with the games I’m playing?
You need software that captures your screen and maps colors to LED zones. Install the lighting brand’s desktop app, enable screen sampling, and configure capture zones corresponding to your strip placement. For lower latency, check if your games support the brand’s SDK—games built in Unity or Unreal often have plugins. Some controllers accept DirectX or Vulkan overlays, sampling the framebuffer directly with minimal performance impact. Expect 2-5% CPU usage for screen sampling; if that’s unacceptable, hardware capture cards offer zero-overhead solutions at $100+.
Are adhesive-backed LED strips reliable for long-term mounting, or will they fall off?
Standard 3M adhesive lasts 1-3 years depending on environmental conditions. Heat, humidity, and dust accelerate failure. For permanent installations, supplement adhesive with mounting clips every 30cm or use aluminum channels. If you must rely on adhesive alone, clean surfaces with alcohol, apply firm pressure for 30 seconds, and let cure for 24 hours before use. In hot climates (above 30°C), adhesive softens and fails—use high-temperature automotive-grade VHB tape instead. For rental spaces, magnetic mounting lets you remove strips without damage.
What brightness level is ideal for gaming without causing eye strain or screen glare?
For monitor backlighting, aim for 10-15% of your screen’s brightness—typically 30-50 lumens measured at the wall. This provides enough bias light to reduce eye fatigue without washing out blacks. For desk accents, 20-30% brightness (100-150 lumens) creates presence without distraction. Room ambient lighting should be dimmable to 5% for night gaming, maxing at 40% for general use. Always use software dimming rather than reducing voltage, which causes color shift. Test by displaying a dark scene; you should see detail on-screen without the lights creating visible haze.
Can I mix different brands or types of LED strips in one cohesive setup?
Physically, yes—using universal connectors and power injection. Visually, it’s challenging. Different brands have varying color calibrations; the same “red” command produces different hues. LED densities differ, creating visible seams where strips meet. Controllers can’t synchronize effects across brands, so patterns won’t flow smoothly. The best approach is using one brand for connected zones (like monitor and desk) and a separate, distinct brand for isolated accents (like shelf lighting) where mismatches won’t be noticeable. Color-match by eye and accept that perfect uniformity requires a single ecosystem.
How long do gaming LED strips typically last before needing replacement?
Quality LED strips are rated for 50,000 hours—6 years of 24/7 use. Realistically, you’ll replace them for technological upgrades before they die. However, cheap strips often fail at 20,000 hours due to poor heat management and undersized resistors. Power supplies usually fail first, at 3-5 years. Adhesive degradation forces replacement sooner than LED failure. To maximize lifespan, run strips at 80% brightness maximum, ensure adequate ventilation, and keep firmware updated. If a section dies, it’s often cheaper to replace just that segment than the entire installation.