The creator economy has exploded into a $250 billion ecosystem where your visual presentation can make or break your success before you even utter a word. Whether you’re streaming on Twitch, filming YouTube tutorials, or recording podcasts, your lighting setup isn’t just equipment—it’s your silent co-star that shapes audience perception, engagement, and ultimately, your revenue. But here’s the reality most experts won’t tell you: you don’t need to drop a month’s rent on professional studio lighting to achieve that coveted, high-production look.
Smart light panels have democratized studio-quality illumination, packing thousands of color options, app-controlled precision, and dynamic effects into sleek, wall-mountable designs. The sub-$200 category is particularly exciting, offering a sweet spot where innovation meets accessibility. This comprehensive guide will walk you through everything you need to know about selecting the perfect smart light panels for your creative space—without mentioning a single brand name. We’re diving deep into the technical specifications, feature sets, and strategic considerations that separate disappointing purchases from game-changing investments.
Top 10 Smart Light Panels for Creator Studios
Detailed Product Reviews
1. Torjim 12’’ LED Video Light Kit | High Brightness | 5 Lighting Modes | 3000-6500K Studio Lights with Tripod Stand, Phone Holder &Wireless Remote | Professional Photography Lighting for Video Recording

Overview: The Torjim 12’’ LED Video Light Kit delivers professional-grade illumination in an accessible package designed for content creators, vloggers, and remote workers. This 24W system combines a high-brightness LED panel with a stable tripod stand, smartphone holder, and wireless remote, creating a complete single-light solution for under $40.
What Makes It Stand Out: The side-emitting LED technology distinguishes this kit from competitors, producing exceptionally soft, shadow-free lighting that flatters skin tones without harsh hotspots. The five preset color temperature modes (3000K-6500K) offer quick adjustments for warm indoor scenes or cool daylight replication. The included wireless remote shutter provides hands-free smartphone control—a rare feature at this price point that dramatically improves solo shooting efficiency.
Value for Money: At $39.99, this all-in-one kit eliminates the need to purchase components separately, saving beginners approximately $20-30 compared to assembling comparable gear. While 24W output won’t illuminate large spaces, it’s perfectly calibrated for desk-based streaming, product photography, and interview setups where proximity matters more than raw power.
Strengths and Weaknesses: Strengths include intuitive touch controls, natural-looking light quality, stable tripod construction, and the versatile wireless remote. The compact footprint suits small studios. Weaknesses center on the single-light limitation—shadows can be problematic without a fill source—and the modest 24W output, which struggles beyond six feet. The smartphone holder, while functional, feels less robust than professional alternatives.
Bottom Line: An exceptional starter kit for aspiring creators prioritizing ease-of-use and natural light quality. The Torjim delivers where it counts for desk-based content creation, though serious videographers will eventually want to upgrade to a multi-light system.
2. NiceVeedi 2-Pack Photography Lighting Kit, 36W Bi-Color Studio Lights 2700-6500K CRI 95+, Dimmable LED Video Light Kit with Remote Control & 72” Tripod Stand, Lighting for Video Recording/Photography

Overview: The NiceVeedi 2-Pack kit brings professional studio capabilities to independent creators through two 36W bi-color LED panels with integrated barndoors, premium CRI 95+ color accuracy, and adjustable-height stands. This $89.99 system targets serious photographers and videographers needing versatile, controllable lighting for diverse shooting scenarios.
What Makes It Stand Out: The built-in four-leaf barndoor design eliminates setup time while offering precise light shaping from 90° to 150°—a feature typically reserved for cinema-grade fixtures costing twice as much. The combination of 36W output per light and 2700K-6500K range provides exceptional flexibility, while the 25% gear brightness adjustment enables rapid, repeatable settings during fast-paced shoots.
Value for Money: Two complete lights with stands for $90 represents compelling value, undercutting competitors like Neewer and GVM by $30-50 for comparable specs. The included infrared remote with 26-foot range and real-time LED display further enhances the professional feature set without inflating cost, making this an economical choice for multi-light interviews or product shoots.
Strengths and Weaknesses: Major strengths include powerful output, excellent color rendering, quick-deploy barndoors, and robust aluminum tripods extending to 72 inches. The remote control simplifies adjustments across both lights simultaneously. Weaknesses include the infrared remote’s line-of-sight limitations and the lack of battery power options, restricting use to studio environments with AC access. Some users may find the 1900K adjustment steps too coarse for subtle corrections.
Bottom Line: A professional-grade lighting solution that punches above its weight class. The NiceVeedi kit is ideal for creators ready to invest in quality multi-light setups without breaking the bank, though mobility-focused users should consider battery-powered alternatives.
3. VIJIM VL120 RGB Video Light, Portable LED Camera Light Panel 0-360 Full Color, CRI 95+ 2500-9000K LED 3100mAh Rechargeable DSLR Lighting for Vlogging, Photography, Video Conference
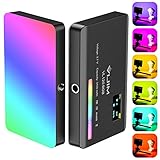
Overview: The VIJIM VL120 redefines portable creative lighting through a pocket-sized RGB panel delivering full-spectrum color control and cinematic effects. Weighing just 120g with a built-in 3100mAh battery, this $33.95 light empowers vloggers and filmmakers to paint with light anywhere, offering 0-360° hue adjustment and 20 built-in scene modes.
What Makes It Stand Out: The HSI/CCT/Scenes triple-mode system provides unprecedented creative flexibility at this price point. From emergency vehicle simulations to paparazzi flashes and candlelight flicker, the 20 effects eliminate post-production work for realistic ambient lighting. The 2500-9000K range exceeds most studio lights, while the 95+ CRI ensures color accuracy even in extreme temperature settings.
Value for Money: Competing RGB panels from brands like Aputure and Lume Cube cost $80-150, making the VL120 a budget breakthrough for creators wanting cinematic effects without premium pricing. The rechargeable battery’s 2-15 hour runtime (depending on brightness) eliminates constant battery swaps, further reducing long-term costs.
Strengths and Weaknesses: Strengths include extreme portability, versatile effects, excellent color rendering, USB-C charging with passthrough capability, and broad camera compatibility via the 1/4" screw mount. The silicone diffuser creates surprisingly soft output for its size. Weaknesses include limited brightness (1250Lux at 0.3m) unsuitable for key lighting in large scenes, and the small form factor provides limited coverage area. The interface requires a learning curve for HSI mode navigation.
Bottom Line: An indispensable creative tool for mobile filmmakers and vloggers prioritizing portability and effects over raw power. While not a primary key light, the VIJIM VL120 excels as an accent, fill, or background light that sparks visual storytelling possibilities.
4. 2 Light Panels for 32x32 Inch Photo Studio Light Box: 140 LED - LB12B 360° Rotating Dimming Light Bar Kit, Suitable for Takerers/HitTopss/Fasonic/ZKEEZM 32" Large Lightbox (2 Light Panels/1 Adapter)
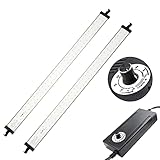
Overview: This specialized LB12B light panel kit upgrades 32-inch photo lightboxes with professional-grade illumination through two rotating LED bars delivering 5600K daylight-balanced output. Designed specifically for product photography, the $59.99 system replaces stock lighting with 140 high-efficiency LEDs producing ≥5600 lumens of CRI 95+ accurate light.
What Makes It Stand Out: The 360° rotating functionality on each 70-LED bar enables precise directional control impossible with fixed-position strips, allowing photographers to eliminate unwanted reflections on glossy products or create dramatic side-lighting for texture emphasis. The stepless 10-100% dimming provides subtle exposure control without color shift, while the ≥30,000-hour lifespan ensures years of consistent performance.
Value for Money: Dedicated product photographers using 32" lightboxes from Takerers, HitTopss, or ZKEEZM will find this kit transforms their setup’s capabilities for less than the cost of a single professional panel light. The upgrade eliminates harsh hotspots and color casts common with generic lightbox LEDs, directly improving image quality and reducing editing time—a measurable return on investment.
Strengths and Weaknesses: Strengths include perfect lightbox integration, exceptional color accuracy, robust rotation mechanism, high brightness output, and long LED lifespan. The plug-and-play design requires no technical expertise. Weaknesses include limited compatibility (32" boxes only), fixed 5600K temperature (no bi-color adjustment), and lack of remote control. The system demands a lightbox purchase if not already owned, increasing total investment.
Bottom Line: A transformative upgrade for existing 32-inch lightbox owners seeking professional product photography results. While niche in application, the LB12B panels deliver targeted performance that general-purpose lights cannot match, making them essential for e-commerce sellers and catalog photographers.
5. 30W Upgraded Photography Lighting Kit, Anautin 1-Pack LED Video Lighting for Video Recording, 3700Lux Studio Lights with Tripod Stand for Photography, Streaming, Gaming, Podcast, Filming, Vlogging

Overview: The Anautin 30W LED Video Lighting Kit positions itself as the ultimate budget-friendly solution for content creators entering the lighting game. At just $28.97, this single-panel system delivers 3700 lumens across an impressive 2500-8500K range with 95+ CRI, plus 30 built-in effects—specifications that challenge lights costing three times more.
What Makes It Stand Out: The 8.2-foot (2.5m) charging cable liberates positioning in rooms with inconvenient outlets, a common frustration with shorter cords. The advanced heat dissipation design enables true 24/7 continuous operation without flicker or overheating—rare assurance at this price tier. Combined with 180° rotation and extendable tripod (16"-62"), the kit adapts to overhead, eye-level, and low-angle lighting setups.
Value for Money: No competitor under $30 offers this combination of brightness, color range, effects, and reliable continuous operation. While build quality reflects the price point, the performance-per-dollar ratio is unmatched for beginners testing lighting concepts before investing in premium gear. The included velcro cable management straps demonstrate thoughtful cost-saving design.
Strengths and Weaknesses: Strengths include exceptional CCT range, high brightness output, long cable, stable continuous operation, and versatile positioning. The 30 effects add creative flexibility. Weaknesses include single-light limitation, plastic construction that may not withstand heavy travel, and lack of remote control. The 10 brightness levels (vs. stepless) limit fine-tuning precision.
Bottom Line: The best entry-level lighting investment for budget-conscious creators. The Anautin kit sacrifices some refinement for raw capability, delivering professional-grade features that genuinely enhance video quality without requiring professional-grade spending.
6. ULANZI VL49 RGB Video Lights, LED Camera Light 360° Full Color Portable Photography Lighting w 3 Cold Shoe, 2000mAh Rechargeable CRI 95+ 2500-9000K Dimmable Panel Lamp Support Magnetic Attraction

Overview: The ULANZI VL49 is a pocket-sized RGB LED panel designed for mobile content creators who need versatile, on-the-go lighting. Weighing mere ounces and fitting in your palm, this $20 light delivers professional-grade color control with a CRI of 95+ and an impressive 2500-9000K temperature range, making it suitable for everything from warm candlelit scenes to cool daylight simulations.
What Makes It Stand Out: This light’s magnetic back panel sets it apart from competitors, allowing instant attachment to metal surfaces without stands or clamps. The 360° RGB hue adjustment (0-359°) unlocks creative possibilities for cinematic color effects, while the triple cold shoe mounts enable multi-light configurations. The 2000mAh battery provides 2-10 hours of runtime and charges via USB-C while in use—eliminating downtime during shoots.
Value for Money: At $19.95, the VL49 delivers features typically found in lights costing three times as much. Comparable RGB panels from premium brands often exceed $60 without offering significantly better performance. For vloggers, product photographers, and social media creators, this represents exceptional ROI, though professionals may need higher output for large-scale productions.
Strengths and Weaknesses: Pros: Extreme portability, magnetic mounting versatility, wide color temperature range, excellent color accuracy, USB-C pass-through charging, affordable entry into RGB lighting. Cons: Limited 800lux brightness insufficient for large scenes, small form factor creates harsh shadows without diffusion, single-light package requires multiple purchases for full setup.
Bottom Line: The VL49 is a must-have tool for mobile creators and YouTubers who prioritize flexibility over raw power. While it won’t replace studio strobes, its innovative magnetic design and RGB capabilities make it invaluable for run-and-gun videography and creative accent lighting on a budget.
7. LINCO Lincostore Photo Video Studio Light Kit AM169 - Including 3 Color Backdrops (Black/White/Green) Background Screen

Overview: The LINCO AM169 is a comprehensive entry-level studio kit that bundles everything needed for basic portrait, product, and video work. For $124.99, you receive two 24" softboxes, two 33" umbrellas, four 30W LED bulbs, and a complete 6.7ft green screen backdrop system—essentially a turnkey solution for aspiring photographers building their first home studio.
What Makes It Stand Out: This kit’s inclusion of a three-color backdrop system (black, white, green) with adjustable stands provides immediate versatility for chroma key compositing and classic portrait work. The four-lamp configuration allows for proper three-point lighting setups, while the combination of softboxes and umbrellas offers both focused and diffused lighting options without additional purchases.
Value for Money: Priced under $125, purchasing these components separately would easily exceed $200. The backdrop system alone typically costs $50-80, making the lighting equipment essentially a $50 add-on. However, the 30W bulbs (equivalent to 150W incandescent) provide modest illumination best suited for small spaces and close-up work rather than professional studio environments.
Strengths and Weaknesses: Pros: Complete all-in-one package, includes backdrop support, multiple light modifiers, four-light setup capability, excellent for learning studio techniques. Cons: Underpowered bulbs limit working distance, entry-level build quality, complex initial assembly, lacks dimming controls, no carrying case included.
Bottom Line: Perfect for beginners, students, and home-based creators on tight budgets, the AM169 kit delivers remarkable value despite its limitations. While professionals will quickly outgrow the power output, it provides an unbeatable foundation for mastering studio lighting fundamentals without breaking the bank.
8. RGB Photography Lighting Kit, 50W Bi-Color Professional LED Studio Lights, 2300k~8500k Dimmable Photo Lights for Photography Filming Camera Video Recording Stage Shooting Streaming YouTube TikTok

Overview: This 50W RGB studio light targets serious content creators who need professional-grade illumination with creative flexibility. Delivering 3800lux at 1 meter with a wide 2300-8500K CCT range and full RGB color control, this single-panel kit includes an adjustable aluminum stand, barn doors, diffuser, and wireless remote—packing high-end features into a sub-$100 package.
What Makes It Stand Out: The 644-LED array combines 252 warm white, 252 cool white, and 140 RGB diodes for true bi-color performance with 27 color modes. The automatic cooling fan and aerospace-grade aluminum housing prevent overheating during extended shoots, while the U-shaped bracket enables 360° positioning. Multi-lamp pairing allows synchronized control across several units for complex setups.
Value for Money: At $99.99, this panel competes with brands like GVM and Neewer that charge $150+ for similar specifications. The inclusion of a robust 33"-79" stand, barn doors, and remote adds $40-50 of value. While it lacks battery power (AC-only), the professional build quality and brightness make it a cost-effective alternative to premium monolights for studio-bound creators.
Strengths and Weaknesses: Pros: High 3800lux output, excellent color range, silent aluminum construction, barn doors for light shaping, remote control included, supports multi-light setups. Cons: AC power only (no battery option), cooling fan may produce audible noise for quiet video, single-light package, remote requires separate AA batteries.
Bottom Line: An exceptional choice for YouTubers, streamers, and product photographers who need reliable, powerful studio lighting with RGB creativity. The AC-only design limits location work, but for dedicated studio spaces, this light delivers professional performance that punches well above its price point.
9. NEEWER BASICS LED Video Light, 2 Pack Studio Panel Key Lighting Kit with Tripod Stands & Filters, Bi Color Dimmable Portable 3200~5600K CRI95 750lux for Photography Recording Streaming Podcast, BP66

Overview: Neewer BASICS delivers a no-frills, functional 2-light kit for $39.99, targeting budget-conscious creators who need reliable illumination without premium features. Each 10W panel produces 750lux at 0.5m with 3200-5600K bi-color adjustment and CRI95+ accuracy, making them suitable for video calls, streaming, and basic content creation where color fidelity matters.
What Makes It Stand Out: The 2-pack configuration at this price point is unmatched, providing proper key and fill lighting out of the box. The integrated 6.6ft USB cables with 5V/2A power requirement allow charging from laptops, power banks, or standard adapters—offering true portability without proprietary batteries. The convertible stands function as tripods, tabletop supports, or selfie sticks, maximizing versatility in tight spaces.
Value for Money: Two lights with stands for under $40 represents exceptional value, essentially costing half what competitors charge for a single comparable panel. While the 750lux output is modest, the kit includes four color filters and delivers professional CRI95+ accuracy. The caveat: it requires a standard 5V/2A adapter—fast chargers trigger a safety shutdown, limiting power options.
Strengths and Weaknesses: Pros: Unbeatable price for two lights, USB-powered portability, high CRI, versatile stands, magnetic filter system, no battery maintenance needed. Cons: Low brightness limits distance, narrow CCT range versus RGB competitors, cannot use fast chargers, plastic construction feels entry-level, no remote control.
Bottom Line: Ideal for Zoom calls, TikTok creators, and beginner YouTubers who need simple, effective lighting on a shoestring budget. While it lacks the power and features of premium kits, the dual-light setup and USB convenience make it a practical starting point that delivers professional color accuracy at an impulse-buy price.
10. Shirtal 14" LED Studio Lights,60W Photography Lighting Kit,2800-6500K Dimmable Photo Video Light for YouTube,Video Recording,Game Streaming

Overview: The Shirtal kit provides two 60W LED panels with professional specifications for $79.99, targeting serious content creators who need high output and color accuracy. Each 14" panel delivers 6000 lumens via 448 LEDs with an exceptional CRI98+ rating, ensuring broadcast-quality color reproduction for YouTube, streaming, and commercial photography work.
What Makes It Stand Out: The 60W per-panel power rivals monolights costing twice as much, while the silent passive cooling system (400+ heat dissipation holes) eliminates fan noise—critical for video recording. The upgraded barn doors and removable soft panel provide professional light control, and the included remote manages both lights simultaneously. The 10.2" square panels offer a larger emitting surface than typical budget lights, creating softer shadows.
Value for Money: Two 60W lights with stands, barn doors, phone clips, and a carrying bag for $80 undercuts competitors by 30-40%. Similar kits from Godox or Elgato exceed $150. The CRI98+ rating matches high-end cinema lights, while the silent operation and robust aluminum stands deliver durability that budget brands typically sacrifice.
Strengths and Weaknesses: Pros: High 60W output per light, exceptional CRI98+ accuracy, silent operation, barn doors included, large light-emitting area, comprehensive accessory package, sturdy aluminum stands. Cons: Tripods max at 70" (shorter than professional standards), no RGB color modes, AC-only power limits location use, carrying bag quality is functional but not premium.
Bottom Line: A powerhouse dual-light kit that delivers professional-grade illumination for creators ready to elevate production quality. The combination of high CRI, silent operation, and serious brightness makes it perfect for studio-based YouTubers, streamers, and product photographers. While the stands could be taller, the overall value and performance make this a smart upgrade from entry-level lighting.
Why Smart Light Panels Are Revolutionizing Creator Studios
Traditional studio lighting is static, bulky, and requires constant manual adjustment. Smart light panels flip this paradigm entirely, giving creators programmable, animated lighting that responds to your content in real-time. The magic lies in their ability to transform a bland bedroom into a cyberpunk gaming den, a minimalist interview space, or a vibrant art studio with a single tap on your smartphone.
For creators operating under budget constraints, these panels deliver multi-functional value. They serve as key lights, background accents, mood enhancers, and even practical effects—all while consuming minimal power and physical space. The integration with streaming software, music visualizers, and smart home ecosystems means your lighting becomes an active participant in your content rather than passive illumination.
Understanding the $200 Budget Sweet Spot
The sub-$200 price bracket represents a critical inflection point in the smart lighting market. Below this threshold, you often encounter panels with limited brightness, poor color accuracy, and unreliable connectivity. Above it, you enter professional-grade territory with features most solo creators won’t fully utilize. The $200 range captures the “prosumer” zone—where hobbyist aspirations meet professional-grade functionality.
What You Sacrifice vs. What You Gain
At this price point, you’ll typically sacrifice metal chassis builds for high-quality polycarbonate, and you might see slightly lower lumen-per-dollar ratios compared to $400+ systems. However, what you gain is remarkable: access to millions of colors, reliable Wi-Fi connectivity, robust mobile apps, and compatibility with major streaming platforms. Most panels in this range offer 80-90% of premium features at 40-50% of the cost.
Budget Allocation Strategies
If your total budget is $200, resist the urge to blow it all on a single large panel. A strategic approach involves mixing sizes—perhaps one medium-sized centerpiece panel ($80-120) supplemented by two smaller accent panels ($40-60 each). This creates depth and dimensionality that a single panel simply cannot achieve. Alternatively, invest in a starter kit with 3-4 smaller panels that you can arrange in geometric patterns, which often provides more visual impact than one monolithic light source.
Key Technical Specifications Explained
Understanding the numbers behind smart panels prevents disappointment and returns. Let’s decode the jargon that manufacturers love to obscure.
Lumens and Brightness Levels
Lumens measure total light output, and this is where many budget panels stumble. For creator studios, aim for a minimum of 200 lumens per square foot of coverage area. A typical 10x12 foot room needs panels collectively producing 2,000-3,000 lumens for adequate illumination. Be wary of panels advertising “brightness” without specifying lumens—they’re often using LED count as a misleading proxy. Remember: you can always dim a bright panel, but you can’t make a dim panel brighter without adding more units.
Color Temperature Range (CCT)
Correlated Color Temperature (CCT) determines how “warm” (orange) or “cool” (blue) your white light appears. Creator studios need panels offering 2700K-6500K range at minimum. The lower end (2700K-3500K) creates cozy, intimate vibes perfect for podcasting or evening streams. The higher end (5000K-6500K) delivers crisp, daylight-balanced illumination essential for product reviews and detailed work. Panels that skip the middle ranges force you to compromise your aesthetic vision.
Color Rendering Index (CRI)
CRI measures how accurately a light source reveals colors compared to natural sunlight. For creators showcasing products, artwork, or even their own skin tone, a CRI of 90+ is non-negotiable. Budget panels often hide low CRI ratings (70-80) behind flashy RGB capabilities. Poor CRI makes everything look washed out, greenish, or muddy—destroying the professional quality you’re trying to build. Always verify CRI specifications before purchasing.
RGB vs. RGBWW vs. RGBIC
These acronyms define color mixing capabilities. Standard RGB combines red, green, and blue LEDs, creating decent colors but murky whites. RGBWW adds warm white and cool white LEDs, producing clean whites and more saturated colors. RGBIC (Individually Controlled) zones allow different sections of one panel to display different colors simultaneously—crucial for gradient effects and animations. For creator studios, RGBWW is the baseline; RGBIC is the premium target if animations are central to your brand.
Essential Features for Content Creation
Technical specs tell half the story. The feature set determines how seamlessly lighting integrates into your workflow.
App Control and Connectivity Options
Your panel’s app is your command center. Look for apps offering both quick presets and granular control over individual LEDs. Bluetooth-only panels limit your control range and often have latency issues. Wi-Fi-enabled panels with 2.4GHz support provide reliable connectivity through walls and across rooms. The best apps offer widget shortcuts, allowing you to switch scenes without unlocking your phone—perfect for mid-stream adjustments.
Voice Assistant Integration
“Alexa, set stream scene” might sound gimmicky until your hands are occupied with camera equipment. Voice control through Alexa, Google Assistant, or Siri enables quick changes without breaking your flow. More importantly, it allows integration into broader smart home routines—dimming room lights, activating panels, and starting your stream simultaneously. Verify that voice commands can trigger custom scenes, not just on/off functions.
Preset Scenes and Customization
Quality panels ship with 20+ professionally designed scenes optimized for different content types. Beyond presets, the ability to create, save, and schedule custom scenes is vital. Look for apps that let you adjust transition speeds between colors—slow fades for podcasts, rapid strobes for gaming highlights. The gold standard is scene sharing via QR codes or links, letting you import setups from other creators in your niche.
Syncing Capabilities with Content
Screen mirroring technology captures colors from your monitor and replicates them on your panels in real-time, creating immersive gaming streams. Music sync modes use your microphone or system audio to pulse lights with beats—essential for music producers and DJs. Advanced panels offer SDK or API access, letting you program custom reactions to chat donations, follows, or subscriber alerts through platforms like Streamlabs or OBS.
Mounting and Placement Strategies
Even the best panels underperform with poor positioning. Your studio’s layout dictates your mounting strategy.
Wall-Mounted Configurations
Wall mounting creates clean, professional aesthetics while saving desk space. Use mounting systems offering 15-30 degrees of tilt adjustment to direct light away from your camera lens, preventing flare. For drywall installation, always locate studs; panel weight adds up quickly. Consider cable routing before drilling—nothing ruins a sleek setup like visible power cords. Mounting height should place panel centers at 5-6 feet for optimal light distribution across your face and background.
Desktop and Freestanding Options
Not everyone can drill into rental walls. Desktop stands with weighted bases provide stability for panels up to 12 inches. For larger panels, tripod-style floor stands with adjustable height (4-7 feet) offer maximum flexibility. Look for stands with integrated cable management clips and quick-release plates for repositioning. Freestanding setups excel for creators who frequently reconfigure their space for different content series.
Creative Layout Patterns
The arrangement of multiple panels creates your signature visual brand. Linear arrangements work for minimalist setups and tech reviewers. Honeycomb patterns add artistic flair for creative streams. Asymmetrical clusters generate dynamic energy for gaming content. When planning layouts, use painter’s tape to mock panel positions on your wall before purchasing—visualizing the final result prevents buyer’s remorse and measurement errors.
Power and Connectivity Considerations
Your studio’s electrical infrastructure directly impacts panel performance and safety.
Wired vs. Wireless Power Solutions
All smart panels require wired power; “wireless” refers only to data connectivity. However, power delivery methods vary. USB-C powered panels offer flexibility for mobile creators but rarely exceed 1,500 lumens. Dedicated power adapters with barrel connectors deliver maximum brightness but create cable clutter. The emerging standard is power-over-USB-C with 45W+ adapters, balancing portability with performance. Calculate total wattage before plugging multiple panels into one power strip—budget setups often overload circuits.
Hub Requirements and Standalone Operation
Some ecosystems require proprietary hubs for full functionality, adding $30-50 to your total cost. True Wi-Fi panels connect directly to your router, eliminating hub expenses but potentially congesting your 2.4GHz band with multiple devices. For creators with 10+ smart devices, a dedicated IoT router or VLAN segment prevents network conflicts that cause panels to drop connections mid-stream. Always verify hub requirements before purchasing to avoid hidden costs.
Software and Ecosystem Compatibility
Your lighting should enhance your tech stack, not complicate it.
Mobile App Functionality
Test the app before buying—many offer demo modes. Key indicators of quality include: sub-100ms response time, offline mode for local control, and multi-user sharing for team channels. Red flags include apps requiring constant location access, excessive battery drain, or sub-3-star ratings. The best apps offer desktop companions for setup and mobile apps for daily control, playing to each platform’s strengths.
Desktop Control Options
Streaming from a PC demands desktop control. Look for panels with companion apps or Stream Deck plugins, letting you trigger scenes with programmable keys. Some manufacturers offer OBS integration through browser sources, displaying current lighting states on your stream. Advanced users can leverage command-line tools or REST APIs to script complex lighting sequences triggered by chat bots or automation software like Node-RED.
Third-Party Integration
Matter/Thread support future-proofs your investment, ensuring compatibility with upcoming smart home standards. IFTTT integration opens infinite possibilities—flash lights when you receive a donation, turn red when your stream drops frames, or sync with your calendar for automatic “recording” scene activation. Home Assistant compatibility appeals to tech-savvy creators wanting local control without cloud dependencies, crucial for privacy-focused channels.
Durability and Build Quality Factors
Budget doesn’t have to mean fragile, but you must know where manufacturers cut corners.
Materials and Construction
Panels under $200 typically use polycarbonate diffusers rather than glass. High-quality polycarbonate offers 90% light transmission with shatter resistance—ideal for active creators. Check for UV stabilization ratings; cheap plastics yellow within months of sunlight exposure. The frame should feel rigid when twisted; flex indicates weak internal structures that won’t survive frequent repositioning. Metal mounting points embedded in plastic frames provide durability without the full metal chassis cost.
Heat Dissipation and Longevity
LEDs die from heat, not usage hours. Quality panels include aluminum heat sinks behind the LED array, extending lifespan from 15,000 to 50,000+ hours. Inferior panels rely on plastic housings that trap heat, causing color shift and premature failure. Before mounting, run panels at maximum brightness for 30 minutes—if the rear surface exceeds 120°F, consider adding ventilation gaps or active cooling. Panels with thermal throttling automatically dim when overheating, protecting your investment but potentially ruining a stream.
Common Pitfalls to Avoid
Even seasoned creators make these mistakes when selecting budget smart panels.
Overlooking Lumens for Color Options
A panel offering 16 million colors at 500 lumens is less useful than one offering 1 million colors at 1,500 lumens. Brightness forms the foundation; color is the enhancement. Prioritize lumens first, then evaluate color capabilities. Many creators discover their RGB panels can’t function as primary key lights, forcing expensive secondary purchases. Test brightness claims by checking user photos in real studios, not marketing renders.
Ignoring App Store Reviews
The hardware might be perfect, but a buggy app transforms your panel into a dumb light. Sort app reviews by “most recent” to catch current issues after updates. Look for patterns in complaints—if 20 reviews mention “won’t connect to 5GHz Wi-Fi,” that’s a design limitation, not user error. Developers actively responding to negative reviews indicate ongoing support, crucial for long-term functionality.
Underestimating Power Adapter Quality
Budget panels often cheap out on power supplies. Heavy adapters with UL certification and over-current protection prevent fire hazards and voltage fluctuations that cause flicker on camera. Weigh the adapter in your hand—quality units feel substantial due to shielding and cooling components. If the adapter runs hot during normal use, it’s underspecced and will fail within months, potentially taking your panel with it.
Optimizing Your Setup for Different Content Types
Your niche dictates your lighting priorities. Customize your approach accordingly.
Gaming Streams and Dynamic Lighting
Fast-paced gaming content demands low-latency screen mirroring and rapid scene transitions. Position panels behind your monitor to extend screen colors into your physical space, reducing eye strain while creating immersion. Use cooler color temperatures (6500K) during competitive play to maintain alertness, switching to warmer tones (4000K) for community interaction segments. Create dedicated “victory” and “defeat” scenes with contrasting colors for instant emotional communication.
Product Photography and Reviews
Color accuracy reigns supreme here. Use panels with 95+ CRI in a 3-point lighting arrangement: two panels at 45-degree angles for even illumination, one behind the product for separation. Set color temperature to 5500K to match daylight standards. Disable all RGB effects—consistency matters more than flair. Use the panel’s dimming curve to create gradient backgrounds, making white products pop against darker tones.
Podcasting and Talking Head Videos
Consistency and skin tone rendering are critical. Mount panels at eye level, 3-4 feet from your face, diffused through a white sheet if brightness exceeds 1,000 lumens. Set color temperature between 4000K-4500K for flattering, neutral skin tones. Create a subtle, slow-shifting warm-to-cool gradient on background panels to add visual interest without distraction. The key is subtlety—viewers should notice improved production value, not the lighting itself.
Artistic and Music Performances
Here, RGBIC panels shine. Program custom animations that sync with your music’s BPM or art creation process. Mount panels vertically to create “light curtains” that pulse with each beat. Use the panel’s zone control to paint different colors across your canvas or instrument, creating visual metaphors for your creative flow. The goal is making lighting a performative element, not just illumination.
Future-Proofing Your Investment
Technology evolves rapidly; your panels should evolve with it.
Firmware Update Policies
Check manufacturer update frequency before buying. Companies releasing updates quarterly demonstrate active development, often adding features and fixing bugs long after purchase. Avoid brands with firmware dated over a year ago—it’s a dead product line. The best manufacturers publish detailed changelogs, letting you see exactly what’s improved. Some even offer beta programs for early access to cutting-edge features.
Expanding Your Setup Over Time
Start with a scalable ecosystem. Panels that support grouping let you add units incrementally without reconfiguring your entire setup. Verify that the app handles 10+ panels without performance degradation. Some systems limit groups to 4-5 panels, forcing awkward workarounds. Look for “master-slave” pairing options where one panel’s settings automatically propagate to new additions, maintaining scene consistency.
Community and Developer Support
Active Reddit communities, Discord servers, and GitHub repositories indicate passionate user bases. These communities share scenes, troubleshoot issues, and develop third-party tools. Manufacturers engaging with these communities—offering beta access or feature voting—show customer-centric development. A vibrant community often provides better support than official channels, especially for niche use cases like OBS integration or custom scripting.
Frequently Asked Questions
1. Can smart light panels under $200 truly replace traditional softboxes and key lights?
For solo creators and small studios, absolutely. Modern panels deliver 1500-2500 lumens, matching entry-level softboxes. The key is proper positioning and diffusion. Use a white shower curtain or photography umbrella to soften harsh LED output. While they won’t replace $1,000 professional kits for commercial shoots, they exceed the needs of YouTube, Twitch, and TikTok creators when used correctly. The trade-off is learning curve—softboxes are plug-and-play, while smart panels require app configuration.
2. How many panels do I actually need for a professional-looking setup?
Minimum viable setup: three panels. One serves as your key light (positioned 45 degrees from your face), one as fill light (opposite side, dimmed 50%), and one as backlight/rim light (behind you, colored for separation). This classic 3-point lighting creates dimensionality. For background interest, add two more panels for a total of five. Under $200, this translates to either three medium panels or five smaller ones. Quality trumps quantity—two bright, high-CRI panels beat four dim, inaccurate ones.
3. Will these panels work if I have no windows or natural light?
This is where they excel. Without natural light, you have complete color control, eliminating mixed lighting nightmares. Set your panels to 5500K for “daylight” consistency year-round. The challenge becomes avoiding a “cave” feeling—use warmer accent panels (3000K) in background elements to add depth. Without window constraints, you can mount panels anywhere, creating more dynamic compositions. Just ensure your total lumen output compensates for the lack of ambient light; windowless rooms typically need 20-30% more artificial illumination.
4. Do I need a dedicated 2.4GHz Wi-Fi network for smart panels?
Not strictly necessary, but highly recommended for reliability. Most panels only support 2.4GHz, which gets crowded with phones, tablets, and IoT devices. Creating a separate SSID for smart devices reduces interference and connection drops. If your router doesn’t support multiple networks, at least ensure it’s using 20MHz channel width on 2.4GHz instead of 40MHz—this reduces overlap with neighboring networks. For streamers, a dropped panel connection mid-stream is catastrophic; network isolation prevents this.
5. How do I prevent smart panels from causing flicker on camera?
Flicker stems from PWM (Pulse Width Modulation) dimming at frequencies that clash with your camera’s shutter speed. First, set panels to 100% brightness and use physical diffusion to reduce intensity rather than digital dimming. If you must dim, use the app’s “anti-flicker” or “flicker-free” mode, which increases PWM frequency above 20kHz. Match your camera’s shutter speed to local AC frequency—1/50s for 50Hz regions, 1/60s for 60Hz regions. Test footage at your planned settings before going live; flicker often appears only in specific brightness ranges.
6. Can I travel with these panels for on-location shoots?
Portability varies dramatically. Panels under 12 inches and USB-C powered travel well in padded camera bags. Larger panels with proprietary power adapters become cumbersome. Look for travel-friendly features: removable cables, carrying cases, and auto-reconnect to known Wi-Fi networks. Some creators build custom foam inserts in Pelican cases for their panel array. Remember: hotel Wi-Fi often blocks IoT devices, so Bluetooth backup control is essential for travel. Budget an extra 30 minutes for setup at each location—travel means recalibrating for new room dimensions and color reflections.
7. What’s the realistic lifespan of budget smart light panels?
Quality panels last 30,000-50,000 hours (8 hours daily = 10-17 years). However, the weak link is often the power adapter (2-5 years) and Wi-Fi module (obsolescence in 5-7 years). Budget panels may degrade faster if they lack proper heat management. Expect 3-5 years of optimal performance, with gradual color shift after that. The LEDs won’t “die” but will become less accurate. Pro tip: run panels at 80% max brightness instead of 100% to double their effective lifespan without noticeable output difference.
8. How do I match smart panel colors to my on-screen branding?
Use hex color codes from your brand guidelines. Most quality apps accept #RRGGBB input for precise matching. Take a photo of your panels displaying brand colors, then use your phone’s color picker tool to verify accuracy—apps can lie. Account for wall color; white panels on colored walls reflect inaccurately. Create a “brand scene” with all panels set to your exact colors, saved as your default. For video, record a 10-second color chart clip at the start of each session to white-balance your camera to the panels, ensuring post-production color consistency.
9. Are there hidden costs beyond the panel’s price?
Absolutely. Factor in mounting hardware ($10-30), extension cables ($15-25), smart plugs for remote power cycling ($10 each), and potentially a dedicated tablet for control ($50 used). If your router is outdated, a mesh Wi-Fi node near your studio ($80) prevents connection issues. Some premium app features require subscriptions ($3-5/month)—verify this before purchase. Finally, budget for a spare power adapter ($20-30); when one fails, shipping time means days of dark streams.
10. How do I troubleshoot when panels won’t connect or respond?
Start with the 30-30-30 rule: unplug panel for 30 seconds, press and hold power button for 30 seconds, plug back in while holding for 30 seconds—this forces factory reset. Next, check router settings: disable AP isolation, ensure WPA2 security (some panels choke on WPA3), and verify 2.4GHz is enabled with a unique SSID. If issues persist, use a Wi-Fi analyzer app to check channel congestion—move your network to channels 1, 6, or 11 for least interference. As last resort, create a mobile hotspot with same credentials as your home network; if panels connect, the issue is router settings, not the panels. Document working configurations—future you will thank present you when adding panels.