Your 3D printer enclosure is more than just a box—it’s a controlled environment where magic happens, layer by layer. But what happens when that magic goes sideways? A failed print can turn into a tangled mess, a fire hazard, or hours of wasted time and filament. Motion sensors are the unsung heroes of smart enclosures, offering you eyes on your prints even when you’re halfway across the house. Whether you’re building your first enclosure from IKEA tables or fine-tuning a professional-grade setup, adding DIY motion detection transforms passive boxes into intelligent systems that pause prints, trigger lights, or send alerts before disaster strikes.
This guide dives deep into the world of DIY motion sensors specifically tailored for 3D printer enclosures. We’ll explore the technologies that work best in the unique conditions of heated chambers, the integration tricks that pros use, and the critical features that separate reliable monitoring from frustrating false alarms. No brand endorsements here—just pure technical knowledge to help you build a system that matches your skill level, budget, and safety requirements.
Top 10 DIY Motion Sensors for 3D Printer Enclosures
Detailed Product Reviews
1. Creality Vibration Compensation Sensor for Ender-3 V3 KE 3D Printer
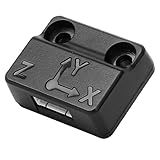
Overview: The Creality Vibration Compensation Sensor is a specialized upgrade designed specifically for the Ender-3 V3 KE, addressing one of the most persistent issues in 3D printing: ringing artifacts. This compact module utilizes an ADXL345 sensor to measure Z-axis resonance frequencies, feeding compensation parameters directly into Creality OS for real-time correction.
What Makes It Stand Out: Unlike generic vibration sensors, this unit is purpose-built for Creality’s ecosystem, offering plug-and-play integration with the Ender-3 V3 KE. It directly tackles ringing marks that plague high-speed printing by automatically calibrating input shaping parameters. The sensor’s precision measurement of resonance frequencies allows for firmware-level compensation rather than mechanical workarounds, preserving print speed without sacrificing quality.
Value for Money: At $13.29, this sensor delivers exceptional value for Ender-3 V3 KE owners. Comparable generic ADXL345 modules cost $8-12 but require extensive manual configuration, wiring, and bracket printing. Creality’s official sensor includes optimized firmware support and dedicated bracket designs available through Creality Cloud, saving hours of troubleshooting. For users seeking professional-grade prints without mechanical modifications, this small investment yields significant quality improvements.
Strengths and Weaknesses: Strengths include seamless Creality OS integration, precise ringing reduction, and dedicated community support with printable brackets. The low price point makes high-tech compensation accessible. However, it’s limited to Ender-3 V3 KE compatibility, requiring users to source bracket files separately. Installation demands careful mounting and firmware updates, which may intimidate beginners. The sensor’s single-axis measurement focuses only on Z-axis resonance, potentially missing X/Y-axis artifacts.
Bottom Line: This vibration compensation sensor is a must-have upgrade for Ender-3 V3 KE owners pursuing flawless prints. While installation requires some technical comfort, the dramatic reduction in ringing artifacts at high speeds justifies the minimal investment. For $13.29, you’re getting OEM-integrated performance that transforms print quality.
2. 1m Filament Runout Sensor Cable for 3D Printers, 3-Pin Laser Sensor Wire with Dual 2.54mm Connectors for DIY Upgrades
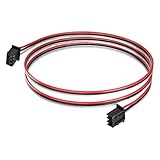
Overview: This 1-meter filament runout sensor cable serves as a critical connectivity solution for 3D printers employing 3-pin laser or mechanical detection systems. Featuring dual 2.54mm connectors, it bridges the gap between sensors and mainboards in DIY upgrades and replacement scenarios, ensuring reliable signal transmission for uninterrupted printing.
What Makes It Stand Out: The cable’s universal 2.54mm connector design offers remarkable versatility across Reprap-style printers and commercial machines alike. Its plug-and-play nature eliminates the need for crimping or soldering, making sensor installations accessible to hobbyists. The 1-meter length provides ample routing flexibility for various printer frame sizes, while the stable signal transmission prevents false positives that can ruin multi-hour prints.
Value for Money: Priced at $21.66, this cable sits at the premium end for a 1-meter wire assembly. Generic 3-pin JST cables cost $5-10, but often suffer from inconsistent wiring standards and flimsy connectors. This unit justifies its price through durable construction, verified compatibility with major sensor types, and time-saving installation. For DIY enthusiasts, the reliability and standardized pinout prevent costly print failures, making it a worthwhile insurance policy.
Strengths and Weaknesses: Strengths include robust connectors, generous length, wide compatibility, and clean plug-and-play installation. The cable’s build quality ensures longevity through thousands of print cycles. However, the $21.66 price is steep compared to DIY wiring solutions. The fixed 1-meter length may be excessive for compact printers, requiring cable management. Some users might need to verify pinout compatibility with non-standard mainboards, as laser and mechanical sensors sometimes differ.
Bottom Line: While priced higher than generic alternatives, this filament runout sensor cable delivers professional-grade reliability for critical print monitoring. It’s an excellent choice for serious makers who value plug-and-play convenience over cost savings. For DIY upgrades where failure isn’t an option, this cable earns its keep.
3. Creativity 3D Printer Filament Detection Sensor Module Filament Run-Out Pause Detecting Monitor for 3D Printer Lerdge Board 1.75mm Filament (Black)

Overview: This filament detection sensor module from Creativity offers an affordable safeguard against print failures caused by filament depletion. Designed for 1.75mm filament and compatible with Lerdge boards, this compact monitor automatically pauses printing when material runs out, preventing wasted time and incomplete models.
What Makes It Stand Out: The sensor’s smart module design integrates directly with printer firmware for seamless pause-and-resume functionality. Unlike basic mechanical switches, this unit provides reliable detection without adding significant friction to the filament path. Its dedicated Lerdge board compatibility ensures proper signaling, while the universal 1.75mm sizing makes it adaptable to most modern printers with minor firmware tweaks.
Value for Money: At just $6.99, this sensor represents one of the most cost-effective insurance policies for 3D printing. Comparable runout sensors range from $10-25, often requiring additional cables or brackets. This module includes everything needed for basic installation, delivering professional pause-resume capability at a fraction of the cost. For budget-conscious makers, it provides peace of mind during overnight prints without breaking the bank.
Strengths and Weaknesses: Key strengths include ultra-low price, reliable detection, minimal filament drag, and straightforward integration with Lerdge systems. The compact black housing blends discreetly into printer frames. However, the product description contains repetitive marketing language that obscures technical specifications. Limited compatibility information may require research for non-Lerdge boards. The sensor lacks an included cable, necessitating separate purchase. Documentation appears minimal, potentially challenging beginners.
Bottom Line: This $6.99 filament sensor is a steal for Lerdge board users and tinkerers comfortable with firmware configuration. While it requires additional cabling and some technical know-how, the cost savings are substantial. For those seeking affordable print protection, this module delivers core functionality without unnecessary frills.
4. 3PCS MINI Motion Sensor Detector Module SR602 Pyroelectric Infrared PIR kit Sensory Switch Bracket for Arduino

Overview: This three-pack of SR602 mini PIR motion sensor modules provides Arduino enthusiasts with compact, high-sensitivity infrared detection for DIY projects. These pyroelectric sensors detect human movement up to 5 meters away, offering a responsive sensory switch solution in a tiny footprint suitable for space-constrained applications.
What Makes It Stand Out: The SR602’s exceptional sensitivity and fast response time distinguish it from bulkier PIR modules. Operating across a wide 3.3V-15V range with minimal 20uA quiescent current, these sensors excel in battery-powered projects. The included lenses and mounting brackets enable rapid prototyping, while the 3.3V logic output directly interfaces with modern microcontrollers without level shifting.
Value for Money: At $7.99 for three modules, this kit offers remarkable value at approximately $2.66 per sensor. Individual SR602 units typically retail for $4-6, making this bundle ideal for multi-sensor projects or educational purposes. The inclusion of lenses and brackets adds further value, eliminating separate component sourcing. For hobbyists building smart home devices or interactive installations, this pack delivers professional-grade sensing at hobbyist pricing.
Strengths and Weaknesses: Strengths include ultra-low power consumption, wide voltage compatibility, compact size, and included mounting hardware. The 5-meter detection range suits most indoor applications. However, the 0-3.5m recommended range suggests sensitivity drops significantly beyond that distance. The small size makes wiring delicate, potentially challenging for beginners. Lack of onboard sensitivity adjustment requires external circuitry or firmware tuning. The product description contains some grammatical errors that may confuse technical specifications.
Bottom Line: This SR602 three-pack is an exceptional value for Arduino hobbyists and DIY electronics enthusiasts. While it demands careful handling and some technical expertise, the performance-to-price ratio is outstanding. For projects requiring multiple motion detection points, this kit provides reliable, low-power sensing that won’t strain your budget.
5. SENSKY BS010BW DC 12v to 24v 3A Mini Dimmable Pir Motion Sensor Switch Occupancy Sensor Switch for DIY LED Lighting,Kitchen Cabinet(White)
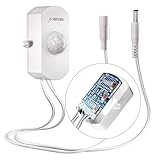
Overview: The SENSKY BS010BW is a sophisticated mini PIR motion sensor switch designed for 12-24V DC LED lighting systems. This dimmable occupancy sensor automatically controls lighting through infrared detection, offering adjustable brightness levels, delay timing, and ambient light sensitivity for customized automation in cabinets, closets, and under-counter applications.
What Makes It Stand Out: Unlike basic motion switches, this unit features intuitive push-button configuration for all settings, eliminating the need for tedious screwdriver adjustments. The seven-level dimming (15-100%) and seven delay options (15 seconds to 30 minutes) provide unprecedented control. The integrated light sensor prevents daytime activation, while the compact white housing integrates discreetly into modern cabinetry.
Value for Money: Priced at $9.99, this sensor switch delivers premium features at a mid-range price point. Comparable dimmable PIR switches cost $15-25, often with limited adjustability. The SENSKY’s comprehensive feature set, 3A current handling, and dual-voltage compatibility make it suitable for extensive LED strip installations. For DIY kitchen or wardrobe lighting, it replaces manual switches and expensive smart home hubs with autonomous, energy-saving control.
Strengths and Weaknesses: Strengths include easy push-button programming, wide dimming range, flexible delay settings, and intelligent light sensing. The 3A capacity supports substantial LED arrays. However, the 35Lux light sensor threshold isn’t user-adjustable, potentially limiting customization. The unit requires careful mounting within the 5-meter detection range for optimal performance. Some users report sensitivity to rapid temperature changes. The white housing may not suit all decor preferences, and the lack of remote control limits smart home integration.
Bottom Line: The SENSKY BS010BW is an excellent choice for DIY LED lighting automation where simplicity and functionality matter. For under $10, you get professional-grade occupancy sensing with dimming capabilities that rival more expensive systems. While it lacks Wi-Fi connectivity, its standalone reliability makes it perfect for cabinet and closet lighting projects.
6. Creality Official Ender 3 V3 SE/KE Filament Runout Sensor Kit, 3D Printer Smart Filament Break Detection Module Detector with LED Light, Precise Detection, Upgrade Accessories for Ender 3 V3 SE

Overview: The Creality Official Ender 3 V3 SE/KE Filament Runout Sensor Kit is a purpose-built accessory designed specifically for Creality’s latest Ender 3 iterations. This sensor automatically pauses prints when filament depletes, preventing costly failures and wasted time. As an official Creality product, it promises seamless integration without the compatibility headaches often associated with third-party upgrades.
What Makes It Stand Out: The kit’s metal filament guider with a polished surface minimizes friction, ensuring consistent feeding compared to plastic alternatives that can wear down. The independent modularized design features a frosted exterior that looks premium while housing an efficient detection mechanism. The blue LED provides instant visual feedback—illuminated when filament is present, dark when spools run dry—eliminating guesswork during troubleshooting.
Value for Money: At $15.99, this official kit commands a modest premium over generic sensors but includes all necessary mounting hardware: a long material rack, isolated columns, brackets, cables, and screws. For Ender 3 V3 SE/KE owners, the plug-and-play compatibility and guaranteed performance justify the price, saving hours of potential configuration and calibration.
Strengths and Weaknesses: Strengths include perfect model-specific compatibility, ultra-smooth filament passage, clear LED status indicators, and a comprehensive installation package. The metal guide is particularly durable. Weaknesses are its limited compatibility (only SE/KE models) and slightly higher cost than universal alternatives. Advanced users might find the detection method basic compared to sensors that also detect clogs.
Bottom Line: This is the ideal upgrade for Ender 3 V3 SE/KE owners seeking reliable, hassle-free filament runout protection. The official pedigree, quality construction, and complete hardware kit make it worth the small premium over generic options.
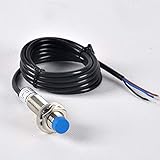
7. 3D Printer DIY Inductive Probe PL-08N2 Inductive Proximity Sensor Switch Detector PL-08N Bed Leveling Probe NPN NC DC 6-36V 300mA Compatible with VORON 3D Printer

Overview: The PL-08N2 Inductive Proximity Sensor is a professional-grade probe widely adopted in the Voron 3D printer community for precise bed leveling. This DIY component detects metal bed surfaces without physical contact, enabling automatic mesh bed compensation. With its NPN NC configuration and 8mm detection range, it’s built for enthusiasts who demand accuracy and reliability in their printer builds.
What Makes It Stand Out: The 8mm detection distance offers generous clearance between probe and build plate, reducing crash risks during calibration. Built-in polarity, short-circuit, and overload protection safeguard your printer’s control board—a critical feature absent in cheaper sensors. The 2-meter cable provides ample routing flexibility, while the red LED indicator confirms successful triggering. Its robust ABS detection surface withstands high-temperature environments near the hotend.
Value for Money: At $9.99, this sensor delivers industrial-grade specifications at a hobbyist price point. Comparable probes from 3D printing brands often cost twice as much. For Voron builders or those upgrading Cartesian printers, it’s a proven component with extensive community documentation, eliminating the trial-and-error of unproven alternatives.
Strengths and Weaknesses: Strengths include exceptional 8mm range, comprehensive electrical protections, long cable, and widespread Voron community support. The NPN NC output is ideal for many control boards. Weaknesses include requiring firmware configuration (not plug-and-play), being limited to ferrous materials (iron beds), and needing technical expertise for proper installation and tuning. It’s overkill for printers with BLTouch or similar probes.
Bottom Line: An excellent choice for advanced users building or upgrading printers with inductive leveling capabilities. The professional specifications and community validation make it a smart investment for precision-focused enthusiasts comfortable with DIY implementation.
8. 2pcs DC 5V NPN NO M12 4mm Sensor LJ12A3-4-Z/BX Inductive Proximity Sensor Switch for 3D Printer CNC Z Probe auto Bed Leveling
Overview: This pair of LJ12A3-4-Z/BX inductive proximity sensors offers budget-conscious makers a dual-pack solution for 3D printer auto bed leveling. Operating at 5V DC with NPN NO output, these M12-sized switches detect metal surfaces without contact, enabling Z-probe functionality for firmware like Marlin. The package provides redundancy or dual-printer upgrades at an attractive price point.
What Makes It Stand Out: Getting two sensors for $9.99 represents exceptional value, allowing spare parts or multi-printer setups. The 5V operation directly interfaces with many 5V-tolerant control boards without voltage dividers. The compact M12 form factor fits most hotend mounts, and the 4mm detection range is sufficient for standard bed distances. These sensors serve double-duty in CNC and automation projects, increasing versatility.
Value for Money: Two sensors for under ten dollars is hard to beat. Individual sensors from 3D printing suppliers typically cost $7-12 each. While requiring some DIY effort, the cost savings are substantial for hobbyists comfortable with wiring and firmware tweaks. This makes professional bed leveling accessible to entry-level builders.
Strengths and Weaknesses: Strengths include unbeatable dual-pack pricing, 5V compatibility, compact size, and cross-platform utility. However, the description confusingly claims “capacitive” while specifications confirm inductive operation. The 4mm range is shorter than premium probes, and NPN NO output often requires pull-up resistors or firmware inversion. Quality consistency between the two units may vary, and there’s minimal manufacturer support.
Bottom Line: A cost-effective entry into inductive bed leveling for tinkerers. The dual-pack value is outstanding, but be prepared for DIY configuration and verify compatibility with your specific control board. Ideal for experimental builds rather than mission-critical printing.
9. HiLetgo 3pcs MINI SR602 Motion Sensor Detector Module Pyroelectric Infrared Sensory Switch High Sensitivity for Arduino PI

Overview: The HiLetgo SR602 Motion Sensor pack provides three pyroelectric infrared modules for DIY electronics enthusiasts. While marketed broadly, these sensors detect human movement up to 5 meters away, making them suitable for printer enclosure lighting automation, power management, or security add-ons rather than direct 3D printing functions. They output a 3.3V signal when triggered, compatible with most microcontrollers.
What Makes It Stand Out: The SR602 offers impressive 5-meter detection range with adjustable sensitivity, far exceeding smaller AM312 modules. Quiescent current of just 20uA enables battery-powered projects. The wide 3.3V-15V operating range provides flexibility across Arduino, Raspberry Pi, and other platforms. Receiving three units fosters experimentation across multiple projects or redundancy for critical applications.
Value for Money: At $8.49 for three, each sensor costs under $3—substantially cheaper than individual PIR modules from electronics retailers. For makers automating their printing workspace (enclosure fans, LED strips, power relays), this pack delivers exceptional utility. The low power draw and high sensitivity maximize project possibilities without breaking budgets.
Strengths and Weaknesses: Strengths include remarkable detection range, ultra-low power consumption, versatile voltage input, and unbeatable triple-pack pricing. The 3.3V output interfaces cleanly with modern controllers. Weaknesses include no direct 3D printer integration (requires custom coding), false triggers from temperature fluctuations near hot enclosures, and SR602 being less documented than common alternatives. The 5-meter range may be excessive for compact setups.
Bottom Line: Perfect for hobbyists wanting to automate their printing environment, not for direct printer upgrades. If you’re comfortable with Arduino/Raspberry Pi programming, these sensors offer incredible value for creating smart, energy-efficient workspace solutions around your 3D printing station.
10. IdeaFormer-3D Original IR3 V2 Filament Sensor, Conveyor Belt 3D Printer Filament Detection Sensor Module Filament Run-Out Pause Detecting Monitor

Overview: The IdeaFormer-3D IR3 V2 Filament Sensor tackles more than just runout detection—it monitors for nozzle clogs, filament tangles, and extruder jams, offering comprehensive print failure prevention. Designed for IdeaFormer’s conveyor belt printer but compatible with Marlin 2.0.x and Klipper firmware, this module provides intelligent pause functionality when filament movement anomalies occur, saving both time and material.
What Makes It Stand Out: Unlike basic runout sensors, this unit actively detects extrusion failures through integrated monitoring, addressing the most common print-killing issues beyond empty spools. The engineered filament path minimizes feeding resistance, preventing false triggers from binding. Its open-source firmware support ensures broad compatibility beyond IdeaFormer printers, while the simple screw-mount design eases installation on custom extruder assemblies.
Value for Money: At $12.99, it costs less than Creality’s basic runout sensor while offering superior functionality. Competitors with jam-detection capabilities often exceed $20. For users experiencing frequent clogs or tangles, the advanced detection justifies every penny by preventing failed prints that waste expensive filament.
Strengths and Weaknesses: Strengths include multi-failure detection (clogs, tangles, runout), low feeding resistance, open-source firmware compatibility, and straightforward mounting. The conveyor-belt heritage suggests robust design. Weaknesses include limited brand recognition compared to Creality, sparse community documentation, and potential compatibility quirks with proprietary firmware. The narrow focus on extrusion path may require custom bracket design for non-standard extruders.
Bottom Line: An excellent upgrade for advanced users seeking intelligent print monitoring beyond simple runout detection. While particularly valuable for IdeaFormer IR3 V2 owners, Marlin and Klipper users will appreciate the enhanced failure protection. Recommended for those willing to fine-tune settings for their specific extruder setup.
Why Motion Sensors Are Critical for Smart Enclosures
Motion detection in 3D printer enclosures serves multiple purposes beyond simple security. A well-implemented sensor acts as your first line of defense against thermal runaway scenarios by detecting mechanical failures before they escalate. When a print detaches from the bed and gets dragged by the nozzle, the abnormal movement pattern triggers an immediate pause command, saving your hotend from burial in molten plastic.
Beyond catastrophe prevention, motion sensors enable sophisticated automation workflows. Imagine lights that illuminate only when you peer inside, extraction fans that ramp up when the print head moves rapidly, or time-lapse cameras that capture perfect footage without wasting storage on idle hours. These sensors also provide valuable data for print failure detection algorithms, distinguishing between normal layer progression and the telltale jerky movements of a spaghetti monster in the making.
Understanding Motion Sensor Technologies for Enclosure Applications
Not all motion sensors handle the hostile environment of a 3D printer enclosure equally. The combination of temperature fluctuations, electromagnetic interference from stepper motors, and the need for precision detection creates unique challenges. Understanding the underlying technology helps you select the right approach for your specific use case.
Passive infrared (PIR) sensors detect heat signatures, making them excellent for human presence detection but potentially problematic near heated build chambers. Ultrasonic sensors emit sound waves and measure reflections, offering precise distance measurement but struggling with soft, sound-absorbing materials. Microwave radar sensors penetrate enclosure walls and work through glass, while camera-based systems provide visual verification at the cost of computational overhead. Each technology brings tradeoffs in power consumption, response time, and environmental immunity that directly impact your enclosure’s performance.
PIR Sensors: The Go-To Choice for DIY Builders
PIR sensors remain the most accessible entry point for DIY motion detection projects due to their low cost, minimal power requirements, and straightforward integration. These sensors detect infrared radiation changes caused by moving heat sources, which makes them ideal for detecting when you approach the enclosure to check a print. However, their thermal sensitivity requires careful positioning away from direct heat sources like heated beds or hotends.
When selecting a PIR module, pay close attention to the detection angle and range specifications. Narrow-beam sensors (45-60 degrees) work better for targeted monitoring of specific areas like the print bed, while wide-angle sensors (110+ degrees) cover entire enclosures but increase false trigger risks. Adjustable sensitivity and trigger time controls are essential features that let you fine-tune performance without rewriting code. Look for modules with built-in voltage regulators that accept 5-20V input, ensuring compatibility with both 5V microcontroller logic and 12V/24V printer power supplies.
Ultrasonic Sensors: Precision Distance Monitoring
For makers who need to detect specific mechanical movements rather than general presence, ultrasonic sensors offer millimeter-level precision. These modules measure the time it takes for sound waves to bounce off objects, creating a continuous distance map of your print’s progress. This capability enables advanced features like automatic first-layer squish detection or real-time print height verification against the g-code expected position.
The HC-SR04 and similar modules operate at 40kHz, well above human hearing range but potentially susceptible to interference from cooling fan vibrations. Mounting these sensors requires rigid fixation and careful angular alignment to avoid reflections from enclosure walls. Temperature compensation becomes crucial in heated enclosures, as sound speed varies significantly with air temperature—a 10°C change can shift measurements by nearly 2%. Advanced users implement Kalman filtering algorithms to smooth noisy readings and distinguish genuine print movement from environmental drift.
Microwave Radar Sensors: Through-Wall Detection Capabilities
Microwave Doppler radar sensors represent the cutting edge for enclosure monitoring, offering detection through non-metallic walls and glass doors without requiring line-of-sight. These modules emit low-power microwave signals and detect frequency shifts caused by moving objects, making them immune to temperature changes and ambient light conditions. Their penetration capability means you can mount sensors externally, protecting them from heat and fumes while simplifying wiring.
The tradeoff comes in power consumption and complexity. Microwave sensors typically draw 30-50mA continuously, compared to PIR’s microamp idle current, requiring careful power budget planning. They also detect any movement, including filament spooling or desk vibrations, necessitating sophisticated signal processing to isolate print-head motion. Look for modules with adjustable detection distance and sensitivity pots, or I2C interfaces for digital configuration. Some advanced units offer quadrature detection, providing directional information to distinguish incoming from outgoing movement.
Camera-Based Motion Detection: Visual Intelligence
While not a traditional motion sensor, USB cameras with software-based motion detection offer unparalleled flexibility for enclosure monitoring. By analyzing pixel changes between frames, these systems can differentiate between nozzle movement, bed shifting, and ambient light changes. Machine learning models can even recognize specific failure modes like warping, stringing, or complete print detachment.
The computational overhead demands a separate processing unit like a Raspberry Pi running OctoPrint with plugins. Frame rate and resolution directly impact detection latency and accuracy—15-20 FPS provides good responsiveness without overwhelming USB bandwidth. Infrared LEDs enable monitoring in dark enclosures without affecting light-sensitive resins. The major drawback is complexity: proper implementation requires understanding of OpenCV, background subtraction algorithms, and careful camera positioning to avoid glare from enclosure lighting.
Power Requirements and Voltage Compatibility
DIY motion sensor projects often stumble on power supply issues. Most sensor modules operate at 3.3V or 5V logic levels, while printer power supplies deliver 12V or 24V. Understanding how to safely tap power without introducing noise or voltage drops is crucial for reliable operation. Linear voltage regulators waste power as heat and can fail under continuous load, while switching buck converters offer efficiency but may introduce electromagnetic interference.
Consider creating a dedicated 5V rail using a high-quality UBEC (Universal Battery Eliminator Circuit) typically used in RC applications. These devices provide clean, isolated power with minimal ripple. For battery-powered wireless sensors, calculate duty cycles carefully—a PIR sensor drawing 50µA in standby can run for months on a 18650 cell, while a WiFi-enabled camera might need daily charging. Always include reverse polarity protection and adequate decoupling capacitors near your sensor modules to prevent motor-induced resets.
Connectivity Options: Wired vs. Wireless Architectures
The choice between wired and wireless connectivity shapes your entire enclosure design philosophy. Wired connections via GPIO pins offer deterministic response times under 10 milliseconds and immunity to network congestion, making them ideal for safety-critical pause triggers. Ribbon cables, properly shielded and routed away from stepper motor wiring, provide reliable communication for I2C or UART protocols.
Wireless solutions using ESP8266 or ESP32 modules deliver flexibility for remote monitoring and reduce cable clutter. However, WiFi latency can exceed 100ms, potentially allowing significant print damage before a pause command executes. For hybrid approaches, use wired connections for immediate safety responses and wireless for status updates and logging. Implement heartbeat protocols to detect sensor disconnections, and always configure fail-safe defaults where loss of signal triggers an immediate pause rather than continuing blindly.
Integration with OctoPrint and Klipper Ecosystems
Modern firmware platforms offer rich APIs for sensor integration, but implementation details vary significantly. OctoPrint’s plugin architecture allows Python scripts to monitor GPIO pins or MQTT messages from network sensors, with the Enclosure Plugin providing a user-friendly interface for basic automation. For advanced logic, write custom plugins that access the full OctoPrint API, enabling conditional actions based on print state, g-code progress, or multi-sensor voting systems.
Klipper’s configuration-driven approach requires adding sensor definitions to your printer.cfg file and creating g-code macros that respond to state changes. The [delayed_gcode] functionality enables sophisticated debouncing and timed sequences. Klipper’s real-time processing capabilities handle sensor interrupts with microsecond precision, crucial for high-speed printers where milliseconds matter. Both platforms support MQTT bridging, allowing you to centralize logic in home automation systems while maintaining local fail-safe operation.
Home Automation Platform Synergy
Extending your enclosure motion sensors into broader home automation ecosystems unlocks powerful scenarios. Home Assistant can correlate enclosure motion with room occupancy, automatically dimming lights and enabling silent notifications when you’re sleeping. Node-RED provides visual programming for complex logic, like triggering a smoke alarm cutoff relay if motion stops unexpectedly during a print while you’re away.
When integrating with cloud platforms, maintain local control autonomy. Your pause trigger should function even if your internet connection fails. Use edge computing principles: process critical safety logic on the printer’s microcontroller or local Raspberry Pi, while sending non-critical telemetry to the cloud. Implement rate limiting to prevent MQTT brokers from being overwhelmed by high-frequency sensor updates, and use retained messages with Last Will and Testament features to detect offline sensors immediately.
Response Time and Detection Range Calibration
In motion detection, speed and accuracy exist in tension. A sensor that triggers too quickly may false-alarm on benign movements, while slow debouncing can allow print damage. For direct-connected sensors, target total latency under 50ms from movement to pause initiation. This budget includes sensor activation (1-10ms), signal propagation (negligible for wired), microcontroller processing (5-20ms), and firmware response (10-30ms).
Calibration involves more than adjusting sensitivity pots. Create test g-code patterns that simulate failure modes: sudden bed shifts, extruder jams, or layer slips. Log sensor response times and false positive rates across different print speeds and temperatures. For PIR sensors, use black electrical tape to create physical masks that limit the field of view to only the critical print area. Ultrasonic sensors benefit from acoustic damping materials on enclosure walls to reduce multipath reflections. Document your calibration settings in version-controlled configuration files, as temperature changes may require seasonal re-tuning.
Environmental Hardening for Heated Chambers
Enclosure temperatures can exceed 60°C for ABS printing, pushing consumer sensors beyond their rated operating ranges. Heat-related drift affects PIR sensitivity, ultrasonic sound speed, and microwave oscillator frequencies. Select industrial-rated components when possible, or implement active cooling using miniature 5V blower fans that activate only when temperatures exceed sensor limits.
Electromagnetic interference from stepper motors and heater PWM signals can swamp sensitive sensor inputs. Route sensor cables perpendicular to motor wires, use ferrite beads on both ends, and implement software filtering that ignores readings during motor current spikes. For ultrasonic sensors, the enclosure’s acoustic environment changes with temperature and humidity—some advanced users mount a DHT22 sensor alongside their ultrasonic module and apply real-time compensation formulas in their firmware.
Mounting Strategies and Positioning Optimization
Sensor placement determines detection effectiveness more than any other factor. The golden rule: mount sensors where they can see the action but not the heat. For PIR sensors, position them at enclosure top corners angled downward, keeping them at least 15cm from heated beds and 10cm from hotends. This placement detects human approach and large print movements while avoiding direct thermal radiation.
Ultrasonic sensors require rigid mounting to the enclosure frame, not the panels, to prevent vibration coupling. Position them to monitor the print volume at a 30-45 degree angle from vertical, reducing direct reflections from the bed surface. Microwave sensors excel when mounted externally on the enclosure roof, shooting downward through acrylic or glass. Always design adjustable mounts—what works for a 100mm calibration cube may fail for a 300mm tall vase mode print. Use swivel ball mounts or sliding T-slot attachments to reposition sensors without drilling new holes.
Programming Custom Automation Logic
Off-the-shelf solutions rarely match your specific workflow requirements. Writing custom scripts unlocks the true potential of motion sensors. In Python for OctoPrint, implement state machines that track print progress and only enable certain sensors during specific phases—disable bed-shift detection during initial layers when adhesion checks are common, but enable maximum sensitivity during overhangs where failures typically occur.
For Klipper users, Jinja2 templates in g-code macros enable conditional logic based on sensor states. Create macros that automatically reduce print speed when unexpected motion is detected, giving you time to intervene before a full pause. Implement hysteresis in your code: require two consecutive sensor triggers within a time window before acting, filtering out single-event noise. Log all sensor events with timestamps to a circular buffer in RAM, dumping to SD card only when triggers occur, preserving storage while maintaining diagnostic capability.
Safety Protocols and Fail-Safe Design Philosophy
Motion sensors for 3D printers must fail safe, not just fail operational. Design your system assuming sensors will eventually malfunction. Implement watchdog timers that require periodic “all-clear” signals from sensors; if a sensor stops reporting, treat it as a triggered event. Use normally-closed relay logic where possible, so a broken wire stops the print rather than disabling protection.
Create redundancy through sensor diversity: pair a PIR sensor for broad detection with an ultrasonic sensor for precise bed monitoring. Require both sensors to agree before resuming a paused print, preventing automatic restart on a single sensor clearing. Document your safety assumptions and test them regularly using a “red team” approach—intentionally create failure conditions to verify your system responds correctly. Keep mechanical failsafes like thermal fuses and smoke detectors as primary protection; motion sensors should augment, not replace, these essential safety devices.
Cost-Benefit Analysis: Budget vs. Premium Approaches
DIY motion sensing exists on a spectrum from $2 PIR modules to $50 radar systems with machine learning. Budget builds using basic PIR sensors and direct GPIO wiring deliver 80% of the value for 20% of the cost, perfect for printers in occupied spaces where human presence is the primary concern. The main limitation is detection granularity—you’ll catch catastrophic failures but might miss subtle layer shifts.
Premium approaches justify their cost through advanced features: microwave sensors that work through tinted acrylic, time-of-flight arrays that map the entire print volume in 3D, or camera systems running TensorFlow Lite models that classify failure modes. Consider your printer’s value and location. A $200 sensor system makes sense for a $3,000 printer running unattended in a garage, but represents overkill for a $200 printer on your desk. Calculate the break-even point based on failed print costs: if you average one failed print per month at $15 in filament and time, a $50 sensor system pays for itself in three months.
Troubleshooting Common DIY Motion Sensor Issues
Even well-planned installations encounter issues. Intermittent triggering often stems from ground loops—ensure your sensor shares a common ground with your control board, but avoid ground wires that create loops with motor circuits. False positives during bed heating typically indicate PIR sensors too close to the bed; the solution isn’t just distance, but also adding a baffle or using sensors with fresnel lens modifications to narrow the detection cone.
If ultrasonic sensors report constant maximum distance, check for loose mounting or soft materials absorbing sound waves. A quick test: place a rigid ruler at known distances and verify linear response. Microwave sensors triggering on filament spool rotation require sensitivity adjustment or repositioning to change the Doppler angle relative to the spool axis. When wireless sensors drop off the network, don’t just blame WiFi—check for insufficient power supply decoupling causing brownouts during motor moves. A 470µF capacitor across sensor power pins often solves mysterious disconnections.
Future-Proofing Your Motion Detection Architecture
Technology evolves rapidly, but good architecture lasts. Design your sensor system with modularity: use standard connectors like JST-XH or Dupont headers, and create interchangeable sensor modules that plug into a central hub. This approach lets you upgrade from PIR to microwave without rewiring your entire enclosure. Implement abstraction layers in your code—write sensor drivers that expose a common “motion detected” interface, allowing you to swap hardware with a single configuration change.
Standardize on communication protocols with broad support. MQTT over TCP/IP offers maximum flexibility, while I2C provides simple wired connectivity. Avoid proprietary protocols that lock you into specific ecosystems. Design for sensor fusion from the start: even if you begin with one sensor, architect your system to accept multiple inputs and implement voting logic later. This foresight enables seamless integration of future technologies like mmWave radar or thermal imaging arrays without complete redesign.
Frequently Asked Questions
What’s the easiest motion sensor to install for complete beginners?
A basic 5V PIR sensor module with adjustable sensitivity offers the simplest installation. Connect three wires (power, ground, signal) directly to your Raspberry Pi’s GPIO pins and configure through OctoPrint’s Enclosure Plugin. No soldering required with Dupont jumper wires, and you can achieve basic print pausing within an hour.
Can motion sensors work reliably with any enclosure material?
Microwave radar sensors penetrate acrylic, glass, and wood effectively, while PIR sensors require a clear infrared window—avoid tinted or coated glass. Ultrasonic sensors need direct line-of-sight and struggle with soft materials like foam insulation inside enclosures. Metal enclosures block all sensor types except magnetic contact sensors, requiring external mounting or penetration with sealed glands.
How do I prevent false triggers from normal printer vibrations?
Mount sensors to the printer frame rather than enclosure panels to decouple from fan vibrations. Implement software debouncing requiring two triggers within 500ms. For PIR sensors, add physical masks to limit the field of view away from cooling fans. Set detection thresholds to ignore movements smaller than 5mm, which filters most vibration while catching actual print shifts.
Will motion sensors interfere with my printer’s electronics or print quality?
Properly installed sensors with shielded cables and adequate decoupling capacitors won’t affect print quality. Microwave sensors operate at 2.4GHz or 5.8GHz, far from stepper driver frequencies. Keep sensor wiring away from heater and motor cables, and never share power rails without filtering. A $2 ferrite bead on each cable end eliminates most interference concerns.
What’s the typical power consumption impact on my printer’s PSU?
A single PIR sensor adds about 0.1W (50µA at 5V) during standby and 0.3W when triggered—negligible for any 3D printer PSU. Ultrasonic sensors draw 0.5-1W continuously, while microwave sensors consume 0.5-1.5W. Even four sensors total rarely exceed 5W, less than a typical LED strip. For battery-powered wireless sensors, expect 2-6 months life on a 18650 cell with conservative sleep modes.
Can I use multiple sensors for redundancy without conflicts?
Absolutely, and you should for safety-critical applications. Connect each sensor to a separate GPIO pin and implement voting logic in software. A common pattern: pause if any two of three sensors trigger, or if one sensor triggers consistently for over 2 seconds. Use different sensor technologies (e.g., PIR + ultrasonic) to reduce correlated failure modes. Ensure each sensor has independent power regulation to prevent cascading failures.
How far should I position sensors from the active print area?
PIR sensors work best 20-40cm from the print bed, angled to cover the volume without seeing the bed heater directly. Ultrasonic sensors need 10-30cm clearance to avoid near-field blind spots and multipath interference. Microwave sensors can mount 50-100cm away, even outside the enclosure, due to their penetration capability. Always test detection at your printer’s maximum Z-height to avoid dead zones on tall prints.
Do I need coding experience to set up automation with motion sensors?
Basic configurations using OctoPrint plugins require no coding—just web UI configuration. For custom logic, beginner-level Python or simple g-code macros suffice for most use cases. Copy-paste examples from community forums cover 90% of typical needs. Advanced machine learning detection requires serious programming skills, but that’s unnecessary for basic safety and automation. Start simple and iterate as your comfort grows.
Are wireless sensors reliable enough for safety-critical pause functions?
Use wireless sensors for monitoring and notifications, but rely on wired connections for immediate pause triggers. WiFi latency variability (50-500ms) can allow significant print damage. If you must go wireless, use ESP-NOW protocol for sub-10ms latency or Zigbee with direct binding to your controller. Always implement local failsafe behavior where loss of wireless signal pauses the print after a short timeout.
Can motion sensors distinguish between normal print head movement and actual print failures?
Basic sensors cannot—they detect all motion. The intelligence comes from your software logic comparing sensor events against expected g-code movements. Advanced implementations track the timing of motion triggers and flag patterns that don’t match the printer’s commanded path. For true failure detection, combine motion sensing with camera-based visual analysis or accelerometer data from the print head. Motion sensors excel at detecting unexpected stops or shifts, while cameras better identify quality issues like layer separation.