Thatmorning smoothie residue lurking in your bottle threads? It’s not just gross—it’s potentially hazardous. Reusable water bottles have become our daily hydration companions, yet most of us are unknowingly hosting microbial parties in those seemingly clean containers. The difference between a bottle that lasts for years and one that becomes a health risk often comes down to one critical factor: your cleaning strategy.
Smart dishwashing for reusable water bottles isn’t about running them through a cycle and hoping for the best. It’s a systematic approach that balances material science, microbiology, and practical know-how. Whether you’re dealing with a protein shaker that smells like a gym sock or a pricey insulated bottle you’re afraid to damage, this guide will transform your cleaning routine from guesswork into a precise, bottle-preserving protocol.
Top 10 Smart Dishwashers for Reusable Water Bottles
Detailed Product Reviews
1. Copco Water Bottle with Chug Lid, Reusable, BPA Free Plastic, Dishwasher Safe, Perfect for Travel, School, Outdoors, and Gym, Hydra 16.9oz, Set of 2, Light Blue & Gray
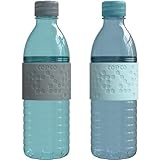
Overview: The Copco Hydra set delivers two 16.9oz reusable bottles in light blue and gray, designed for active lifestyles. Crafted from BPA-free Tritan plastic, these bottles feature a unique twistable body that accommodates ice cubes and fruit infusions, making hydration both practical and enjoyable throughout your day.
What Makes It Stand Out: The standout feature is the innovative chug lid combined with the twistable midsection, allowing easy access for cleaning and customization. The textured non-slip sleeve provides secure grip during workouts or commutes, while the spill-resistant design ensures confidence when tossed into bags. Dishwasher-safe construction simplifies maintenance, though the cap requires hand washing.
Value for Money: At $25.44 for two ($12.72 each), these bottles represent solid mid-range value. The durable Tritan construction justifies the investment over cheaper alternatives, potentially lasting years while reducing disposable plastic waste. Comparable single bottles often cost $15-20, making this set economical for families or multi-location use.
Strengths and Weaknesses: Strengths include versatile ice/fruit infusion capability, comfortable ergonomic design, true portability across settings, and reliable spill resistance. Weaknesses involve the relatively modest 16.9oz capacity for heavy hydration needs, the hand-wash-only cap adding maintenance steps, and potential scratching of clear plastic over time. The twist mechanism, while innovative, may wear with excessive use.
Bottom Line: Ideal for everyday users seeking reliable, versatile hydration solutions for work, school, or light outdoor activities. The two-pack offers excellent flexibility, though athletes requiring larger volumes may need to refill frequently.
2. Copco Hydra 16.9oz Water Bottle, Set of 2 - Non-Slip Sleeve & BPA-Free Tritan Plastic - Dishwasher Safe, Reusable Plastic To Go Bottle - Leak-Proof, Spill-Proof, Portable Water Bottle (Aqua & Mint)

Overview: This Copco Hydra twin-pack offers the same trusted 16.9oz design in refreshing aqua and mint colors. Built from BPA-free Tritan plastic, these bottles prioritize portability and everyday functionality for users who need consistent hydration across multiple locations without sacrificing style.
What Makes It Stand Out: The color-coordinated duo provides aesthetic appeal while maintaining the signature twistable body for easy cleaning and fruit infusion. The non-slip sleeve ensures grip security during active use, and the spill-proof lid delivers reliable performance in transit. The lightweight construction makes them virtually unnoticeable in bags until needed.
Value for Money: Priced at $23.57 ($11.79 per bottle), this set offers slightly better value than its light blue/gray counterpart. The durable Tritan material and dishwasher-safe body (top rack) provide long-term utility that outweighs initial cost. For households needing two bottles, this undercuts buying individual premium bottles by 30-40%.
Strengths and Weaknesses: Strengths include the attractive color pairing, versatile twist design for customization, proven leak-proof performance, and comfortable handling. Weaknesses mirror other Hydra models: limited 16.9oz capacity, hand-wash requirement for caps, and susceptibility to cosmetic scratches. The lid’s hinge may loosen over extended use, potentially affecting seal integrity.
Bottom Line: Perfect for couples, siblings, or individuals wanting a coordinated set for home and office use. The vibrant colors add personality while delivering dependable performance for moderate daily hydration needs.
3. Copco Hydra 16.9oz Water Bottle, Set of 2 - Non-Slip Sleeve & BPA-Free Tritan Plastic - Dishwasher Safe, Reusable To Go Bottle - Leak-Proof, Spill-Proof, Portable Water Bottle (Purple & Light Purple)

Overview: The purple-themed Copco Hydra set provides two 16.9oz bottles designed for seamless integration into busy lifestyles. Using BPA-free Tritan plastic with a twistable body, these bottles enable personalized hydration with ice or fruit additions while maintaining the brand’s commitment to durability and convenience.
What Makes It Stand Out: The elegant purple gradient offers sophisticated aesthetics uncommon in utility bottles. The twist-apart design remains the key differentiator, allowing thorough cleaning impossible in single-mold bottles. The textured sleeve provides exceptional grip even with wet hands, while the spill-proof lid mechanism demonstrates thoughtful engineering for active users.
Value for Money: At $24.31 ($12.16 per unit), this set positions itself in the sweet spot between budget and premium options. The Tritan construction ensures resistance to odors and stains, preserving freshness longer than standard plastics. Compared to purchasing two separate bottles of similar quality, customers save approximately 25% while gaining color-matched versatility.
Strengths and Weaknesses: Strengths include the premium color scheme, innovative twist-clean design, reliable leak-proofing, and dishwasher-safe bodies. Weaknesses involve the smaller capacity requiring frequent refills for active individuals, the manual cap cleaning requirement, and potential degradation of the sleeve’s texture over months of use. The clear plastic may develop cloudiness if frequently washed with harsh detergents.
Bottom Line: An excellent choice for style-conscious users seeking functional hydration partners for work, school, or light fitness activities. The purple aesthetic particularly appeals to those wanting subtle elegance in their everyday carry.
4. MILTON Travel Water Bottle – 1Pcs Reusable Sports Bottle with Easy Open Close Lid and Leakproof Neck – Food Grade Plastic Water Bottles for Adults and Kids, School, Gym

Overview: MILTON’s single-serving travel bottle delivers essential hydration functionality at an unbeatable price point. Designed for both adults and children, this compact bottle emphasizes simplicity and durability, offering straightforward leakproof performance without unnecessary complexity for everyday use.
What Makes It Stand Out: The remarkable $4.99 price tag makes this the most accessible reusable bottle in its class. The unbreakable food-grade plastic construction withstands drops and rough handling, making it particularly suitable for children’s school use. The space-saving design, available in square or round profiles, maximizes packing efficiency in crowded bags and lunchboxes.
Value for Money: Exceptional value defines this offering. At under five dollars, it costs less than a week’s worth of disposable bottles while providing indefinite reuse. While lacking premium materials like Tritan, the food-grade plastic delivers adequate safety and durability for the cost-conscious consumer. Single-bottle purchase eliminates waste for solo users.
Strengths and Weaknesses: Strengths include the ultra-affordable pricing, genuine leakproof performance, kid-tough durability, and versatile shape options. Weaknesses involve unspecified plastic type beyond “food-grade,” potential for retaining odors over time, and basic aesthetic appeal. The single-bottle quantity offers less value for families, and the capacity isn’t specified, likely ranging 12-16oz.
Bottom Line: Perfect for budget-minded individuals, parents seeking kid-safe bottles, or anyone wanting a no-frills backup bottle. While not premium, it exceeds expectations for its price and serves as an ideal entry point into reusable hydration.
5. GearTek Tritan Clear Water Bottle | No Markings 32oz Sports Water Bottle | Leak Proof Re-Usable Flip Top Plastic Drinks Bottles for School, Office, Gym, Cycling, Exams (Clear-32oz)

Overview: GearTek’s 32oz bottle addresses specific needs with its exam-friendly clear design and substantial capacity. Constructed from BPA-free Tritan plastic, this bottle eliminates measurement markings to comply with exam regulations while providing all-day hydration for students, athletes, and professionals.
What Makes It Stand Out: The no-markings design uniquely serves exam environments where prohibited items are restricted. The safety-locked flip-top lid prevents accidental opening, while the included strap and carabiner enable versatile attachment to bags or belts. The generous 32oz capacity reduces refill frequency, supporting sustained focus during long sessions.
Value for Money: At $11.99 for a 32oz Tritan bottle, this offers impressive value—costing less per ounce than most premium 16-20oz alternatives. The UK brand backing provides quality assurance, and the accessory package adds utility typically requiring separate purchases. For exam-takers and heavy hydrators, the specialized design justifies every penny.
Strengths and Weaknesses: Strengths include the exam-compliant design, large capacity, leak-proof locking lid, portable accessories, and durable Tritan construction. Weaknesses involve potential bulkiness for smaller hands or cup holders, the single-bottle limitation compared to multi-packs, and clear plastic’s tendency to show scratches and wear more visibly. The flip-top hinge may require periodic cleaning to prevent mold.
Bottom Line: Highly recommended for students facing standardized tests, cyclists needing large volumes, or anyone prioritizing capacity and security. The specialized features make it a standout choice despite being a single-bottle purchase.
6. REDUCE WaterWeek 14 oz Tritan Reusable Water Bottles - Includes 5 Leak Proof Bottles and Fridge Tray - BPA Free and Dishwasher Safe

Overview:
The REDUCE WaterWeek system delivers five 14-ounce Tritan reusable bottles complete with a convenient fridge tray, creating an organized hydration solution for busy households. These BPA-free bottles are built for daily use, offering a structured approach to preparing drinks for school, work, or sports activities throughout the week.
What Makes It Stand Out:
This isn’t just a bottle—it’s a complete organizational system. The included fridge tray keeps all five bottles neatly stored and ready to grab, eliminating morning chaos. Made from premium Tritan plastic, these bottles resist odors and stains while maintaining crystal clarity. The leak-proof design ensures mess-free transport in lunch bags or backpacks.
Value for Money:
At $30.99 for five bottles ($6.20 each), this set offers excellent value for families or individuals who batch-prepare beverages. Purchasing individual bottles of similar quality would cost significantly more, and the added fridge tray provides organization that generic bottles lack. It’s a cost-effective alternative to daily disposable bottles.
Strengths and Weaknesses:
Strengths include the convenient tray system, durable Tritan construction, leak-proof reliability, dishwasher-safe convenience, and perfect 14-ounce size for kids’ lunches. Weaknesses are the fixed 14-ounce capacity which may be insufficient for adults needing more hydration, and the set commitment—you can’t purchase a single bottle if you only need one or two.
Bottom Line:
The REDUCE WaterWeek system excels for families and meal-preppers seeking organization. If you need multiple reliable bottles and value fridge storage convenience, this set delivers outstanding functionality. For solo users or those wanting larger capacity, individual alternatives may suit better.
7. MILTON Travel Water Bottle – 1Pcs Reusable Sports Bottle with Easy Open Close Lid and Leakproof Neck – Food Grade Plastic Water Bottles for Adults and Kids, School, Gym

Overview:
The MILTON Travel Water Bottle is a single-serving reusable sports bottle designed for maximum portability. Crafted from food-grade plastic with a secure, easy-open lid, this 10-16 ounce bottle targets active users needing reliable hydration for school, gym, or daily commutes without adding bulk or weight.
What Makes It Stand Out:
Versatility shines through its shape options—square bottles maximize lunchbox space while round versions offer ergonomic grip. The “unbreakable” construction truly withstands drops and rough handling, making it exceptionally kid-friendly. The leak-proof neck design prevents spills better than many competitors at this price point.
Value for Money:
At just $5.69, this bottle delivers remarkable affordability. It’s cheap enough to purchase multiple for different uses or family members without financial strain. Compared to disposable bottles, it pays for itself within a week of regular use, and its durability ensures months of reliable service.
Strengths and Weaknesses:
Strengths include ultra-lightweight portability, genuine leak-proof performance, space-saving square option, impressive drop resistance, and budget-friendly pricing. Weaknesses involve the basic plastic construction that may retain odors over time, lack of insulation for temperature control, and relatively small capacity options. The clear plastic also shows scratches readily.
Bottom Line:
For budget-conscious buyers needing dependable hydration gear for kids or travel, the MILTON bottle is a standout choice. It sacrifices premium features for core functionality and durability. If you want simple, effective, and nearly disposable-priced reusability, this delivers exceptional value.
8. purifyou 40oz / 32oz / 22oz / 12oz Borosilicate Glass Water Bottle with Time & Volume Markers, Silicone Sleeve, Stainless Steel Lid | Reusable Glass Bottle for Water & Juice (22oz Iced Coffee)
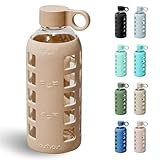
Overview:
The purifyou Glass Water Bottle elevates daily hydration with premium borosilicate glass construction, time-marked measurements, and protective silicone sleeve. Available in multiple sizes from 12 to 40 ounces, this bottle targets health-conscious consumers wanting to avoid plastics while tracking water intake throughout busy days.
What Makes It Stand Out:
The integrated time and volume markers transform this from mere container to motivational hydration coach. The combination of medical-grade borosilicate glass, stainless steel lid, and vibrant silicone sleeve creates a premium aesthetic while ensuring durability. It maintains beverage purity without any plastic aftertaste, appealing to purists.
Value for Money:
At $14.99 for the 22-ounce version, this bottle sits in the sweet spot for glass alternatives. Comparable glass bottles with fewer features cost $20+, making this an accessible entry into premium hydration. The included warranty and care guide add value, while durability offsets initial investment versus replacing cheaper bottles.
Strengths and Weaknesses:
Strengths include pure taste preservation, motivational tracking markers, excellent leak resistance, protective sleeve, dishwasher safety, and stylish appearance. Weaknesses are glass’s inherent fragility despite reinforcement, heavier weight than plastic, unsuitability for carbonated drinks, and need to remove sleeve for thorough cleaning. The narrow opening may complicate adding ice.
Bottom Line:
The purifyou bottle suits health-focused users prioritizing taste purity and hydration tracking. If you appreciate glass’s clean experience and want motivational features, this is an excellent mid-priced choice. For rugged outdoor use or extreme portability, consider lighter plastic alternatives instead.
9. MILTON Travel Water Bottle – 1Pcs Reusable Sports Bottle with Easy Open Close Lid and Leakproof Neck – Food Grade Plastic Water Bottles for Adults and Kids, School, Gym

Overview:
The MILTON Travel Water Bottle offers identical features to its sibling product but at an even more aggressive price point. This single reusable sports bottle provides the same food-grade plastic construction, leak-proof lid system, and versatile shape options for users seeking minimalist hydration solutions.
What Makes It Stand Out:
At $4.79, it represents one of the most affordable entry points into reliable reusable bottles without sacrificing core functionality. The “unbreakable” design remains genuinely kid-proof, while the choice between space-saving square and ergonomic round shapes lets users optimize for their specific needs.
Value for Money:
This price is exceptional—under $5 for a genuinely reusable, leak-proof bottle. It’s practically disposable in cost but durable enough for months of daily use. For families equipping multiple children or individuals wanting backup bottles for different locations, the value proposition is unmatched in the market.
Strengths and Weaknesses:
Strengths include unbeatable affordability, lightweight portability, proven leak-proof performance, impressive impact resistance, and practical shape options. Weaknesses mirror the standard MILTON trade-offs: basic plastic may absorb odors, no thermal insulation, clear material shows wear, and limited capacity range. The ultra-low price may raise longevity questions, though performance suggests durability.
Bottom Line:
If budget is your primary concern, the $4.79 MILTON bottle is nearly impossible to beat. It delivers essential features with surprising reliability. For cost-effective hydration across multiple locations or for rough-use scenarios where loss is possible, this is the smart choice. Premium users should look elsewhere.
10. BEAUTAIL Collapsible Water Bottles 20.6oz 2 Pack, Silicone Foldable Portable Travel Water Bottle, BPA-Free Reusable Leakproof for Travel Camping Hiking Cycling Yoga Sports Outdoor (Darkblue+Pink)
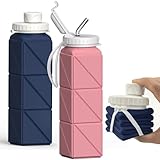
Overview:
The BEAUTAIL Collapsible Water Bottles 2-pack introduces innovative space-saving design through flexible silicone construction. Each 20.6-ounce bottle collapses via a twist-to-fold mechanism, making them ideal for travelers, hikers, and gym-goers who need hydration on demand but minimal bulk when empty.
What Makes It Stand Out:
The satisfying twist-and-fold mechanism is genuinely innovative—transforming a full-size bottle to pocketable in seconds. The two-pack offers versatility: a screw-top for pure water and straw-equipped version for easy sipping during activity. This combination addresses different drinking preferences in one purchase.
Value for Money:
At $13.99 for two bottles ($7 each), the pricing is fair for specialized collapsible design. While more expensive than basic rigid bottles, the space-saving benefit justifies the premium for frequent travelers. The dual-lid approach essentially provides two distinct products for the price of one.
Strengths and Weaknesses:
Strengths include exceptional portability when collapsed, two functional lid styles, reliable leak-proof seal, BPA-free silicone safety, and fun usability. Weaknesses involve silicone’s tendency to retain flavors, lack of rigidity when partially full, cleaning challenges in crevices, and 20.6-ounce capacity may be insufficient for long excursions. The folding mechanism requires learning.
Bottom Line:
BEAUTAIL excels for space-conscious users prioritizing portability over capacity. If you need bottles that virtually disappear in your bag when empty, this 2-pack delivers. For daily office use or maximum durability, traditional rigid bottles remain superior. Perfect travel companions for the right user.
Why Proper Bottle Cleaning Matters More Than You Think
Your water bottle’s dark, moist environment is essentially a five-star resort for bacteria. Every sip leaves behind microscopic traces of saliva, food particles, and beverage residue that create biofilms—slimy microbial communities that cling to surfaces and resist basic rinsing. These aren’t just harmless water spots; they’re thriving ecosystems where E. coli, staphylococcus, and mold spores can multiply exponentially within 24 hours.
The Hidden Biofilm Problem
Biofilms are the enemy of clean bottles. These protective layers act like force fields for bacteria, making them up to 1,000 times more resistant to standard cleaning methods than free-floating microbes. The issue isn’t just the presence of bacteria—it’s that you’re creating super-colonies that withstand your half-hearted washing attempts. Proper cleaning physically disrupts these films before they establish permanent residency in your bottle’s microscopic surface imperfections.
Bacteria, Mold, and Microbial Growth Hotspots
The threads where your lid screws on represent the most contaminated area of any bottle, harboring 60% more bacteria than the interior base. Straw mechanisms, flip-top spouts, and rubber gaskets create additional protected zones where moisture gets trapped. Understanding these microbial hotspots fundamentally changes how you approach cleaning—it’s not about splashing soapy water around, but systematically targeting these architectural vulnerabilities.
Understanding Your Bottle’s Anatomy
Before you can clean effectively, you need to think like a materials scientist. Every component of your bottle responds differently to heat, chemicals, and mechanical action. Treating a glass bottle like stainless steel or a plastic lid like silicone is where most cleaning disasters begin.
Material Matters: Plastic, Stainless Steel, Glass, and More
Polypropylene plastics (recycling code #5) can typically withstand dishwasher temperatures up to 110°C, while Tritan copolyester claims dishwasher safety but may develop micro-scratches that harbor bacteria over time. Stainless steel’s Achilles heel is its vacuum seal—subjecting double-wall insulated bottles to intense heat can compromise the seal and destroy insulation properties. Glass bottles are chemically inert but vulnerable to thermal shock; sudden temperature changes can cause cracking, especially in bottles with silicone sleeves that insulate unevenly.
Lid Complexity: Straws, Spouts, and Seals
Modern bottle lids are engineering marvels with up to seven separate components: main cap, drinking spout, straw valve, silicone gasket, spring mechanism, locking clip, and vent hole. Each piece requires individual attention. The straw valve, typically a slit silicone membrane, traps liquid and requires specific brush penetration. Gaskets need removal and separate cleaning to prevent mold growth in the compression groove where they seat.
The Often-Neglected Base and Threads
The bottle’s base often features a concave design that pools water during washing, while the threads create a helical pathway for bacteria to colonize. These areas require targeted mechanical cleaning—spray jets and casual hand washing rarely penetrate the thread valleys effectively. The thread angle and pitch vary between manufacturers, affecting how debris accumulates and how thoroughly you can clean them.
Dishwasher-Safe vs. Hand-Wash Only: Decoding the Labels
That dishwasher-safe symbol doesn’t tell the whole story. It’s a legal minimum standard, not a guarantee of longevity or optimal cleanliness. The distinction between “top rack only” and “fully dishwasher safe” represents critical temperature and water pressure differences that can make or break your bottle.
What “Dishwasher Safe” Really Means
The designation typically means a product won’t melt or deform during a standard cycle, but says nothing about repeated exposure effects. Most manufacturers test for 50-100 cycles—roughly a year of weekly washing. Beyond that, plastic fatigue, seal degradation, and coating delamination become real risks. For daily users, “dishwasher safe” might mean “safe for occasional sanitization, but hand wash for daily maintenance.”
The Temperature Tolerance Spectrum
Dishwashers typically reach 60-65°C during normal cycles and 70-75°C on sanitizing settings. Stainless steel handles this easily, but plastic components start experiencing molecular changes around 65°C. The real danger zone is the heating element, which can exceed 200°C during the drying phase. Bottles that fall and rest against this element can melt instantly, while even proximity can cause localized warping of thin plastic components.
When Hand Washing Is Non-Negotiable
Powder-coated bottles, decorative finishes, and bottles with painted measurement markings should never see the inside of a dishwasher. The caustic detergent and high-pressure spray strip these finishes, leaving bare metal that can rust or leach. Similarly, any bottle with a copper or aluminum component in the lid mechanism requires hand washing—these metals corrode in dishwasher environments, creating pits that trap bacteria and compromise functionality.
The Smart Dishwashing Protocol
Throwing your bottle in the dishwasher haphazardly is like putting a delicate sweater through a heavy-duty wash—it might survive, but it won’t thrive. A systematic approach ensures both cleanliness and longevity.
Pre-Rinse Best Practices
Never put a bottle with leftover beverage into the dishwasher. Sugary drinks caramelize under heat, creating stubborn films. Dairy products curdle and adhere to surfaces. Pre-rinse with cold water first—hot water can set protein residues. For sticky residues, a 30-second shake with a tablespoon of uncooked rice and water acts as an abrasive pre-cleaner that reaches where your fingers can’t.
Disassembly: The Key to Deep Cleaning
Separate every removable component: lid from bottle, gasket from lid, straw from spout. This isn’t overkill—it’s the only way to eliminate trapped liquid in the gasket groove and straw connection points. For flip-top lids, release the spring mechanism if possible; otherwise, hold it open during washing to expose the hinge area. Place small parts in a mesh laundry bag or closed dishwasher basket to prevent them from falling through the rack.
Rack Positioning Strategies for Maximum Cleaning
Position bottles upside-down at a 45-degree angle on the top rack, ensuring the opening faces the spray arm. This angle allows water to enter and drain freely while preventing pooling. Never wedge bottles tightly—the spray jets need clearance to create turbulence inside. Place lids and small components in the cutlery basket or a dedicated small-parts container, positioning them so openings face upward for maximum water penetration.
Detergent Selection and Dosage
Standard dishwasher detergents are formulated for food grease, not beverage residues. They’re overly caustic for daily bottle washing and can leave chemical odors. Consider using half the recommended dose or switching to a milder, fragrance-free detergent specifically designed for sensitive items. Avoid pods—they dispense too much detergent for the small volume of a bottle wash. Powder detergents allow precise dosing and rinse more completely from bottle interiors.
Hand Washing Like a Pro
Machine washing might seem convenient, but expert-level hand washing achieves superior results with less wear. The key is technique, not elbow grease.
The Two-Basin Method Explained
Fill one basin with hot, soapy water (60°C is optimal—hot enough to cut residue but not scald your hands) and a second basin with clean hot water for rinsing. Submerge the disassembled bottle components in the soapy water for 3-5 minutes to loosen biofilms. This soaking phase does 80% of the work. Never wash in a single basin where you’re constantly reintroducing removed debris to your clean components.
Brush Selection: Size, Bristle Type, and Reach
A quality bottle brush should reach the bottom with 2-3 inches to spare and have a diameter that contacts the sides without forcing. Nylon bristles are standard, but silicone bristles resist bacterial colonization better and don’t scratch. The brush tip should have a tapered or angled design to clean the curved bottom transition where debris accumulates. For threads, use a dedicated small brush—an old toothbrush works, but a thread-specific brush with angled bristles cleans the helical grooves more effectively.
The Power of Effervescent Cleaning Tablets
For deep cleaning without scrubbing, effervescent tablets designed for dentures or water bottles create a bubbling action that lifts stains and kills microbes. Drop one into a filled bottle and let it sit for 30 minutes. The fizzing action reaches every surface, including straw interiors and thread valleys. This method is particularly effective for removing the invisible biofilm layer that causes that “off” taste even after visual cleaning.
Targeting Stubborn Contamination
Different beverages create different cleaning challenges. Understanding the chemistry of each stain type leads to targeted solutions rather than aggressive scrubbing that damages surfaces.
Eliminating Coffee and Tea Stains
Tannin stains from coffee and tea bond to bottle surfaces through oxidation. Standard soap won’t touch them. Create a paste with baking soda and a few drops of hydrogen peroxide (3% solution). Apply to stained areas, let sit for 15 minutes, then scrub gently. The peroxide oxidizes the stain molecules while the baking soda provides gentle abrasion. For stainless steel, a denture tablet overnight soak works wonders without the abrasion risk.
Tackling Protein Shake Residue
Protein powder contains denatured whey and casein that coagulate when exposed to heat, creating a sticky, smelly film. Never use hot water initially—cold water rinse first to remove the bulk. Then fill with warm (not hot) water and add a teaspoon of enzyme-based laundry detergent. Let sit for an hour; the enzymes break down protein structures. Follow with standard washing. This approach prevents the “permanent sour milk” smell that ruins shaker bottles.
Removing Mineral Deposits and Hard Water Scale
White vinegar dissolves calcium carbonate deposits, but straight vinegar can damage certain plastics and rubber gaskets. Use a diluted solution—one part vinegar to three parts water—and limit exposure to 30 minutes. For stainless steel, you can use a stronger solution and heat it slightly (never boil). The key is thorough rinsing afterward; residual vinegar creates an acidic environment that promotes new bacterial growth. In areas with extremely hard water, consider using citric acid instead—it’s more effective and less corrosive to components.
The Drying Dilemma: Why It Matters
A bottle that’s cleaned but not dried properly is like a washed car left in the rain—pointless. Moisture is the enemy, and how you dry matters as much as how you wash.
Air Drying vs. Towel Drying: The Hygiene Perspective
Towel drying introduces lint and potential bacteria from the towel itself, especially if it’s not perfectly clean. Air drying is superior, but only if done correctly. Standing a bottle upright traps moisture; laying it horizontally pools water at the curve. The optimal position is upside-down on a raised drying rack that allows air circulation through the opening. For lids, separate all components and dry them disassembled—never reassemble while damp.
The Role of Drying Racks and Bottle Trees
Dedicated bottle drying trees with vertical prongs allow bottles to drain completely while maintaining airflow. The best designs include prongs of varying diameters to accommodate different bottle openings without touching the interior surfaces. For travel, consider a collapsible silicone drying mat with raised ridges that keeps bottle openings elevated. Avoid wooden drying racks in humid environments—they develop mold that can transfer to your freshly cleaned bottles.
Odor Elimination Strategies
That persistent plastic or metallic smell isn’t “just how bottles are”—it’s volatile organic compounds from bacterial metabolism or material breakdown. Eliminating it requires more than soap.
The Baking Soda Deep Clean Method
Baking soda neutralizes acidic odor compounds rather than masking them. For severe odors, create a concentrated solution—two tablespoons per cup of warm water—and fill the bottle completely. Let it sit overnight, shaking occasionally. The extended contact time allows the sodium bicarbonate to penetrate micro-scratches where odor molecules hide. For stainless steel, you can add a tablespoon of coarse salt and shake vigorously to create an abrasive slurry that scours the passive oxide layer where odors adhere.
Vinegar’s Role in Deodorizing and Sanitizing
Distilled white vinegar kills about 80% of mold species and most odor-causing bacteria. The technique matters: fill the bottle halfway with vinegar, seal, and shake vigorously to coat all surfaces. Then fill completely and let stand for 20 minutes. The initial coating ensures the interior surface contacts the acid immediately, while the full fill prevents air pockets where microbes survive. Always rinse with a baking soda solution afterward to neutralize the acid and prevent corrosion.
Deep Cleaning and Sanitization Protocols
Regular cleaning removes visible dirt, but periodic sanitization eliminates the invisible microbial load. Knowing when and how to sanitize extends your bottle’s safe use life.
When to Sanitize vs. Regular Clean
Sanitize weekly if you use your bottle daily for anything other than plain water. After illness, sanitize after every use for three days. Bottles used for sports drinks, juice, or dairy need sanitizing every 2-3 uses. The telltale sign is a slick feeling on the interior that persists after washing—that’s biofilm, and it requires sanitization-level intervention.
Boiling Water Technique for Heat-Resistant Bottles
Only glass and stainless steel bottles without plastic components can handle boiling water. Bring water to a rolling boil, remove from heat, then fill the bottle completely. Let stand for 3 minutes—any longer risks damaging seals when you eventually reassemble. The rapid temperature change kills most pathogens, but the technique’s effectiveness depends on heat penetration to all surfaces. For narrow-mouth bottles, use a funnel to ensure the boiling water contacts the entire interior at once.
The Freezer Method for Odor Removal
For stainless steel bottles, a 24-hour freeze can eliminate odors by slowing bacterial metabolism to a standstill and making odor molecules less volatile. Empty the bottle, leave the cap off, and place it in the freezer. The cold doesn’t kill most bacteria, but it puts them in stasis and makes subsequent cleaning more effective. This method works best as a pre-treatment before a deep clean, not as a standalone solution.
Maintenance and Longevity
Cleaning is reactive; maintenance is proactive. The difference determines whether your bottle lasts six months or six years.
Seal and Gasket Care
Silicone gaskets degrade with exposure to heat, ozone, and certain detergents. Remove gaskets weekly and inspect for stretching, cracking, or permanent compression. A gasket that’s lost its elasticity won’t seal properly, leading to leaks and reduced thermal performance. Apply a tiny amount of food-grade silicone grease to gaskets monthly—this prevents drying and cracking while maintaining flexibility. Store spare gaskets in a sealed bag away from UV light; they have a shelf life even when unused.
Inspecting for Wear and Micro-Cracks
Hold your empty bottle up to a bright light and rotate it slowly, looking for fine cracks in plastic or crazing in powder coatings. These micro-fissures harbor bacteria that resist cleaning and can lead to structural failure. For stainless steel, check the rim where you drink—repeated contact can create microscopic pits that rust. Use a magnifying glass monthly; catching damage early prevents drinking from a compromised container.
Storage Best Practices Between Uses
Never store bottles with the lid sealed, even when clean. Trapped humidity creates a micro-ecosystem for mold. Store bottles disassembled, with the lid off and upside-down in a well-ventilated area. For long-term storage, place a paper towel inside to absorb ambient moisture and leave the lid completely separate. If storing multiple bottles, don’t nest them—the trapped air becomes stagnant and promotes growth.
Common Mistakes That Ruin Your Bottle
Even well-intentioned cleaning can destroy your bottle if you’re making these critical errors. Avoiding them is as important as proper technique.
The Over-tightening Problem
Cranking the lid down after cleaning creates excessive pressure on threads and gaskets, causing premature wear and micro-cracks that trap bacteria. Tighten just until you feel resistance, then a quarter-turn more. For insulated bottles, over-tightening compresses the gasket unevenly, creating gaps that compromise the vacuum seal. The bottle should feel secure, not welded shut.
Using Bleach and Harsh Chemicals
Chlorine bleach attacks stainless steel’s protective chromium oxide layer, causing pitting corrosion. It also degrades plastic polymers, making them brittle and more porous. While bleach sanitizes effectively, it’s overkill that damages materials. The residual chlorine taste can persist for weeks, and the chemical reaction creates harmful byproducts when mixed with organic residues. Stick to food-safe sanitizers or heat-based methods.
The Dishwasher Heating Element Hazard
Bottles that fall through the rack and rest against the heating element during the dry cycle can melt in seconds. Even if they don’t melt, proximity to the element creates intense localized heating that warps plastic and compromises vacuum seals. Always secure bottles in the rack, and consider disabling the heated dry cycle when washing bottles. The energy savings is a bonus.
Travel and On-the-Go Cleaning Solutions
Business trips and hikes don’t excuse poor hygiene. Portable cleaning solutions ensure your bottle stays safe even when you’re miles from your kitchen.
Portable Cleaning Brushes and Tools
Collapsible silicone brushes with detachable heads pack flat and dry quickly, preventing bacterial growth in the brush itself. Look for designs with integrated thread cleaners—a small, angled brush at the handle end specifically for cleaning lid grooves. Magnetic brush sets that store inside the bottle are clever but can scratch interiors; silicone-coated magnets are essential. Ultraviolet-C light wands offer chemical-free sanitizing on the go, but require 60+ seconds of direct exposure per surface area to be effective.
Hotel Room Hacks for Bottle Hygiene
No brush? No problem. Add a handful of ice cubes and a spoonful of salt to your bottle with a splash of water. Shake vigorously for two minutes—the ice acts as an abrasive that scours without scratching. For sanitizing, request a coffee maker carafe from room service, fill it with boiling water from the in-room coffee maker, and use it to sanitize your bottle. The carafe’s spout provides controlled pouring that reduces burn risk.
Environmental Considerations
Your cleaning choices have environmental impacts beyond water usage. Understanding these trade-offs helps you make sustainable decisions.
Water Usage: Dishwasher vs. Hand Washing
Modern Energy Star dishwashers use as little as 11 liters per cycle but require you to wait for a full load to be efficient. Hand washing a single bottle can use 5-10 liters if you let the tap run. The environmental winner depends on your habits: if you’re washing one bottle daily, a targeted hand wash with basin water is more efficient. If you’re running a dishwasher anyway, adding bottles has negligible additional impact.
Microplastic Concerns with Repeated Washing
Every dishwasher cycle releases microplastics from plastic bottles and components. Research shows that after 50 cycles, some plastic bottles release measurable microplastic particles into the wash water. These particles then enter wastewater systems and eventually ecosystems. Stainless steel and glass eliminate this concern entirely. If you use plastic bottles, hand washing with soft brushes significantly reduces microplastic shedding compared to the abrasive action of dishwasher jets.
Troubleshooting Guide
Even perfect technique sometimes fails. Knowing how to diagnose and fix problems prevents premature bottle retirement.
Cloudy Film Development
A persistent cloudy film that’s visible when dry but disappears when wet is typically mineral scale from hard water, not soap residue. Soak in a citric acid solution (1 tablespoon per cup of water) for 30 minutes. If the film is greasy and water-beading on the surface, it’s a biofilm that requires enzyme cleaner. The test: wipe with a vinegar-soaked cloth. If it clears immediately, it’s mineral; if it remains, it’s biological.
Persistent Odors After Cleaning
If odors return within hours of cleaning, you’re dealing with bacterial colonization in micro-cracks or the lid mechanism. Disassemble completely and soak all parts in a 3% hydrogen peroxide solution for one hour. The peroxide penetrates deeper than other cleaners and oxidizes odor molecules at their source. If the smell persists, the bottle may have internal damage that’s unreachable—time to replace it.
Damaged Threads and Leaking Issues
Cross-threaded or stripped threads often cause leaks that seem like seal problems. Inspect threads under magnification. If you see flattened or missing thread peaks, no amount of cleaning will fix the leak. For minor thread damage, a food-grade thread sealant tape can provide a temporary fix, but this is a replacement indicator. Leaks from the base typically mean the vacuum seal is compromised—this isn’t repairable and creates a condensation risk that promotes external mold growth.
Frequently Asked Questions
How often should I clean my reusable water bottle?
Clean daily with soap and water if you use it for anything other than plain water. For water-only bottles, a thorough cleaning every 2-3 days is sufficient, but rinse and air dry daily. Sanitize weekly regardless of contents. After consuming sugary drinks, dairy, or sports beverages, clean immediately—within two hours—to prevent biofilm establishment. During hot weather or if the bottle sits in a warm car, increase frequency as heat accelerates bacterial multiplication.
Can I put my stainless steel bottle in the dishwasher?
Only if the manufacturer explicitly states it’s dishwasher safe and you place it on the top rack away from the heating element. Double-wall vacuum insulated bottles are particularly vulnerable—dishwasher heat can compromise the vacuum seal, destroying insulation properties. Even “dishwasher safe” stainless steel bottles will last longer with hand washing. If you do machine wash, remove all plastic components first and disable the heated dry cycle.
What’s the black stuff in my bottle lid?
That’s likely black mold (Aspergillus niger) or mildew thriving in trapped moisture. It appears in gasket grooves, straw interiors, and thread valleys. It’s not necessarily toxic, but it can trigger allergies and indicates inadequate cleaning. Disassemble the lid completely and soak all parts in a vinegar solution, then scrub with a small brush. Replace the gasket if mold has penetrated the material—surface cleaning won’t suffice once it’s embedded.
Why does my bottle still smell after washing?
Persistent odors mean biofilm remains or bacteria have colonized micro-scratches. Soap alone can’t remove the protective slime layer. Try an enzyme cleaner to break down the biofilm matrix, followed by a sanitizing step. For plastic bottles, the smell may be from material degradation—plasticizers breaking down create a permanent chemical odor that indicates it’s time to replace the bottle. Stainless steel odors usually mean incomplete drying or bacterial colonization in the lid components.
Is it better to hand wash or use dishwasher?
For longevity, hand washing wins. You control temperature, pressure, and chemical exposure. For sanitization, a dishwasher’s high heat is superior—but only for truly dishwasher-safe items. The best hybrid approach: hand wash daily for maintenance, then run through a dishwasher sanitizing cycle weekly if the bottle is rated for it. This balances cleanliness with material preservation. Never use the dishwasher for bottles with decorative finishes, measurement markings, or delicate components.
Can I use bleach to clean my bottle?
Never. Bleach is corrosive to stainless steel, degrades plastic polymers, and leaves harmful residues. It can create toxic chlorine gas when mixed with organic matter. For sanitizing, use food-safe alternatives: hydrogen peroxide, vinegar, or heat. If you absolutely must use bleach (for example, after exposure to contaminated water), use a maximum of 1 teaspoon per liter of water, soak for 2 minutes only, then rinse at least five times with fresh water and air dry completely. Even then, this is a last resort, not a routine practice.
How do I clean the straw in my bottle?
Use a dedicated straw brush—a long, thin brush that fits through the entire straw length. Run it through with soapy water at least three times, twisting as you go to scour all interior surfaces. Pay special attention to the valve end, where residue accumulates. For silicone straws, you can boil them for 3 minutes for deep sanitization. Hard plastic straws with built-in valves require brush cleaning only—heat can warp the valve mechanism. Let straws dry completely on a vertical stand before reassembly.
Why is my dishwasher safe bottle warping?
“Dishwasher safe” doesn’t mean “any dishwasher, any cycle.” Warping occurs from proximity to the heating element, overly hot sanitizing cycles, or poor-quality plastic. Check your water heater temperature—if it’s set above 60°C, your dishwasher may be running hotter than standard. Move bottles to the top rack, secure them so they can’t fall, and skip the heated dry cycle. If warping continues, the plastic formulation is subpar—replace with a higher-quality bottle or switch to stainless steel.
How do I remove tea stains from my bottle?
Tea stains are oxidized tannins that bind to surfaces. For stainless steel, fill with hot water and add two denture cleaning tablets. Let sit overnight. For plastic, use a baking soda and hydrogen peroxide paste, applying it directly to stains and letting it sit for 30 minutes before scrubbing. Avoid chlorine-based stain removers—they damage materials. Prevention helps: rinse tea bottles immediately after use before tannins have time to oxidize and set.
Can I boil my water bottle to sanitize it?
Only if it’s 100% stainless steel or glass with no plastic components. Boiling can warp plastic lids, damage seals, and compromise vacuum insulation. For stainless steel bottles, remove all plastic parts first, then submerge in boiling water for exactly 3 minutes—longer exposure risks metal fatigue. For glass bottles, place them in cold water and bring to a boil gradually to prevent thermal shock. Never boil double-wall bottles—the trapped air expands and can rupture the seal.