Temperature control has always been the invisible hand guiding great beer from grain to glass. In 2026, that hand is getting a high-tech upgrade. Home brewers are no longer limited to basic dial thermometers or even early-generation digital probes. The latest wave of hot-temperature sensors brings laboratory-grade precision into your garage brewery, with response times measured in milliseconds, wireless connectivity that actually works through stainless steel vessels, and calibration stability that lasts for years, not months.
But here’s the challenge: not all sensors are created equal, and the marketing hype around “smart brewing technology” can obscure what actually matters. Whether you’re building an automated HERMS system, upgrading your boil kettle, or simply tired of second-guessing your mash readings, understanding the underlying technology will save you money, frustration, and batches of mediocre beer. This guide cuts through the buzzwords to equip you with the knowledge to evaluate any temperature sensor on the market—today or in 2026.
Top 10 Hot-Temperature Sensors for Home Brewing
Detailed Product Reviews
1. 12" SS Dial Thermometer Homebrewing Brew Kettle Brew Pot

Overview: This stainless steel dial thermometer is a straightforward analog solution for homebrewers who need reliable temperature monitoring during the brewing process. The 12-inch probe length allows it to reach deep into standard brew kettles, while the integrated stainless clip secures it to the kettle rim. With a temperature range of 0-220°F, it covers all essential brewing stages from mashing to boiling.
What Makes It Stand Out: The simplicity of this device is its greatest asset. No batteries, no apps, no connectivity issues—just a direct, mechanical reading you can glance at during your brew day. The substantial probe length ensures accurate readings even in large batches, and the stainless steel construction withstands the acidic, wet environment of brewing without corrosion.
Value for Money: At $10.99, this represents one of the most affordable entry points into proper temperature monitoring. While digital controllers can cost 5-10 times more, this basic thermometer delivers the core functionality needed for consistent brewing. It’s ideal for beginners testing the hobby or experienced brewers wanting a reliable backup.
Strengths and Weaknesses: Pros include zero power requirements, durable stainless construction, easy-to-read dial, and unbeatable price. Cons involve manual monitoring only (no alarms), potential clip compatibility issues with non-standard kettle rims, lack of data logging, and the need to physically check readings throughout the process.
Bottom Line: This thermometer is perfect for budget-conscious homebrewers who prioritize simplicity and reliability over automation. While it won’t replace a digital controller for fermentation, it’s an essential kettle tool that performs its single job admirably without unnecessary complexity.
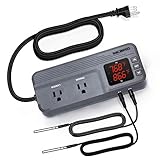
2. Inkbird WiFi ITC-308 Digital Temperature Controller Thermostat Remote Monitoring Controlling Home Brewing Fermentation Breeding Incubation Greenhouse

Overview: The Inkbird ITC-308 transforms temperature management from passive monitoring to active control. This WiFi-enabled device serves as an intelligent intermediary between your heating/cooling equipment and the environment, making it invaluable for fermentation chambers, keezer builds, and brewing applications. The dual relay system automatically toggles heating and cooling sources to maintain precise setpoints.
What Makes It Stand Out: Remote monitoring via the Inkbird app provides peace of mind during critical fermentation periods. The dual relay outputs allow simultaneous control of both a heater and refrigerator, while programmable high/low temperature alarms prevent costly batch losses. The plug-and-play design eliminates complex wiring—simply plug your devices into the controller.
Value for Money: Priced at $49.99, this controller delivers professional-grade automation at a fraction of industrial controller costs. Competing smart controllers often exceed $100, making the ITC-308 exceptional value for homebrewers serious about temperature stability. The potential savings from preventing even one ruined batch justifies the investment.
Strengths and Weaknesses: Pros include intuitive app interface, reliable dual-output control, comprehensive alarm system, easy calibration, and broad compatibility. Cons are limited to 2.4GHz WiFi only (no 5GHz), 1100W maximum load restriction, and dependence on internet connectivity for remote features.
Bottom Line: For homebrewers ready to upgrade from manual monitoring, the ITC-308 is arguably the best value smart controller available. It strikes an ideal balance between functionality, reliability, and affordability, making it a cornerstone device for building a temperature-controlled fermentation system.
3. Temperature Sensor S9 XS90 500,Compatible for Jura, Coffee Machine Steam Hot Water Boiler Induction(Green 59177)

Overview: This OEM-compatible NTC thermistor sensor is a precision component designed specifically for Jura automatic coffee machines. It monitors boiler temperature with exacting accuracy, ensuring water stays within the optimal 195-205°F range for espresso extraction. The sensor directly influences brewing quality by preventing temperature fluctuations that cause under-extraction or bitter, over-extracted coffee.
What Makes It Stand Out: Unlike generic replacements, this sensor is engineered for perfect compatibility with Jura’s control systems. The NTC thermistor technology provides rapid, accurate temperature feedback, enabling the machine’s PID algorithm to make micro-adjustments. This precision translates to consistent shot quality and efficient energy management by preventing unnecessary heating cycles.
Value for Money: At $76.52, this sensor represents significant savings compared to official Jura parts (often $120+). For a malfunctioning machine producing subpar coffee, this investment restores performance at a fraction of replacement cost. The energy savings from proper temperature regulation can offset the price over the component’s lifespan.
Strengths and Weaknesses: Pros include exact OEM specifications, durable construction, immediate improvement in coffee quality, and energy efficiency. Cons involve high price relative to generic sensors, Jura-only compatibility, and installation requiring technical skill or professional service. The specialized nature means no versatility for other applications.
Bottom Line: If your Jura machine suffers from temperature inconsistency or error codes related to heating, this sensor is a worthwhile investment. While expensive for a small component, it delivers precise performance that generic alternatives cannot match, essentially giving your premium coffee machine a new lease on life.
4. DROK 10K Temperature Sensor Probe 3pcs, 1 Meter Waterproof Temp Sensor Probe, Stainless Steel 3950 NTC Temp Sensor Probe, Digital Temperature Transmitter Extension Cable

Overview: This value-pack of three NTC temperature probes offers versatility for DIY temperature monitoring projects. Each probe features a 1-meter PVC cable terminating in a waterproof stainless steel sensor housing, suitable for immersion in liquids or placement in humid environments. With a 10K ohm resistance at 25°C and 3950 beta value, these probes integrate easily with Arduino, Raspberry Pi, or commercial controllers.
What Makes It Stand Out: The three-probe package enables multi-point monitoring at an unbeatable price point. The -25°C to 125°C range covers everything from freezer monitoring to mash temperature tracking. The waterproof rating and stainless steel construction allow direct immersion in wort or water without concern for corrosion or short circuits.
Value for Money: At $6.99 for three probes, this is exceptional value—under $2.50 per sensor. Individual probes of similar quality typically cost $5-8 each. For brewers building a HERMS system or monitoring multiple fermentation chambers, this pack provides essential components at minimal cost.
Strengths and Weaknesses: Pros include incredible affordability, waterproof construction, generous cable length, wide temperature range, and broad controller compatibility. Cons involve requiring a separate controller or microcontroller, potential calibration variations between probes, basic accuracy compared to platinum RTDs, and limited to 10 mA current.
Bottom Line: These probes are perfect for hobbyists and homebrewers undertaking DIY temperature control projects. While they need a controller to function, their quality and price make them ideal for building custom monitoring systems. Buy them for the versatility and keep spares on hand—at this price, they’re disposable if damaged.
5. HiQltyla Home Brewing Distilling Dial Thermometer for Brew Kettle Pot, 3.2" Dial, Stainless Steel - 4" Probe Stem

Overview: This professional-grade analog thermometer bridges the gap between basic dial thermometers and expensive digital systems. Designed specifically for brewing and distilling, it features a substantial 3.2-inch diameter dial with dual Celsius/Fahrenheit scales and a 4-inch threaded probe that installs permanently in kettle walls. The 1/2" NPT threading ensures secure, leak-free mounting in standard kettle fittings.
What Makes It Stand Out: The oversized dial provides exceptional readability from across the brew space, eliminating squinting at small displays. The threaded installation creates a permanent, stable solution unlike clip-on models that can shift during stirring. Factory calibration with a reset adjustment knob allows fine-tuning for accuracy, while the stainless steel body and glass lens withstand harsh brewing environments and cleaning chemicals.
Value for Money: At $17.99, this thermometer costs more than basic clip-ons but delivers superior durability and convenience. The permanent installation saves time each brew day, and the robust construction should last years. Compared to digital panel-mount thermometers ($40+), it offers excellent value for brewers wanting reliability without electronic complexity.
Strengths and Weaknesses: Pros include large, clear display, secure threaded mounting, dual temperature units, pre-calibrated accuracy, and durable stainless/glass construction. Cons involve the 4-inch probe being shorter than some kettle depths, requiring a kettle with 1/2" NPT port, manual reading only, and the included nut’s rough casting finish.
Bottom Line: This thermometer is an excellent upgrade for serious homebrewers with properly equipped kettles. It combines analog reliability with professional features, making it ideal as a primary kettle thermometer. The permanent installation and large display make brew days smoother, justifying the modest price premium over basic models.
6. Smart Wireless Temperature Sensor/Humidity Sensor Wide Range (-22 to 158 Degrees) for Fridge Monitoring Pet Cage/Tank Monitoring, Smartphone Alerts, Compatible with Alexa IFTTT - Hub Included

Overview: The YoLink Smart Wireless Temperature/Humidity Sensor offers a specialized monitoring solution using LoRa technology instead of conventional WiFi. Designed for challenging environments like refrigerators, pet cages, and tanks, this system includes a hub and provides smartphone alerts for temperature fluctuations. Its unique wireless protocol allows it to function where standard sensors fail, making it ideal for remote or enclosed spaces that would block traditional signals.
What Makes It Stand Out: The LoRa-based system delivers exceptional 1/4-mile open-air range while consuming minimal power, enabling years of operation between battery changes—an enormous advantage over WiFi sensors requiring frequent recharging. Unlike Zigbee or Z-Wave alternatives, it penetrates metal enclosures like refrigerators and mailboxes without signal degradation. The included hub offers both ethernet and WiFi connectivity options, with a true plug-and-play setup via QR code scanning that gets you operational within minutes.
Value for Money: At $37.99 including the hub, this kit represents remarkable value compared to purchasing a $2,000+ smart refrigerator. The multi-year battery life eliminates ongoing costs, while the system’s versatility across numerous applications—from monitoring a child’s nursery to securing a chicken coop—maximizes your investment. Competing WiFi sensors might cost less initially but require more frequent battery replacements and often fail in metal enclosures, making this economical long-term.
Strengths and Weaknesses: Strengths include extreme range, exceptional battery longevity, reliable metal penetration, effortless installation, and broad compatibility with Alexa and IFTTT. The dedicated hub ensures stable connectivity independent of your home network’s quality. Weaknesses involve the requirement for a proprietary hub (though it’s included), limited Alexa functionality (temperature only, no humidity), inability to trigger Alexa routines, and the need for a separate weatherproof model for true outdoor applications.
Bottom Line: This sensor system excels for users needing reliable monitoring in challenging environments where WiFi fails. Perfect for refrigerators, remote outbuildings, or metal enclosures, its long-range capability and multi-year battery life justify the investment. While Alexa integration has limitations, the core monitoring functionality is outstanding.
7. Stainless Steel Thermowell, Weldless Temperature Sensor with Plastic Cap 1/2inch NPT Threads for Temperature Sensors for Homebrew Brewing Beer Fermenter

Overview: This Stainless Steel Thermowell provides essential protection for temperature sensors in homebrewing and other process systems. Featuring 1/2-inch NPT threads and a plastic cap, this weldless design allows brewers to install temperature probes directly into fermenters and kettles without welding. The thermowell creates a barrier between your sensitive instrumentation and harsh process conditions, enabling safe removal for calibration or replacement while maintaining system integrity.
What Makes It Stand Out: The 201 stainless steel construction offers excellent corrosion resistance and thermal conductivity at an accessible price point. The precisely machined threads provide a superior seal that’s genuinely effective against water intrusion—a critical feature when dealing with liquid fermentation. Its weldless design makes it compatible with standard brewing vessels and allows for straightforward installation without permanent modifications, appealing to DIY homebrewers who value flexibility.
Value for Money: At $13.59, this thermowell represents inexpensive insurance for your temperature instrumentation. Replacing a damaged probe can cost $20-50, making this protective barrier a wise investment. While premium 304 stainless steel thermowells exist at higher prices, this 201-grade unit provides adequate durability for typical homebrewing applications where extreme chemical corrosion is minimal. The ability to remove sensors without draining your vessel saves both time and product.
Strengths and Weaknesses: Strengths include clear, deep threads ensuring leak-proof installation, reliable 201 stainless steel construction, effective thermal conductivity, and the practical advantage of sensor removal without process disruption. The weldless design suits most homebrew setups. Weaknesses involve the 201-grade stainless being less corrosion-resistant than 304-grade for aggressive environments, the plastic cap potentially degrading over time, and being sold as a single unit rather than a multi-pack for larger systems.
Bottom Line: An excellent entry-level thermowell for homebrewers seeking reliable sensor protection without premium costs. The quality threading and weldless design make installation straightforward, though those brewing highly acidic beverages might consider upgrading to 304 stainless steel for maximum longevity.
8. Meprotal 2pcs 1/2NPT Thermowell Weldless Temperature Sensor Stainless Steel Thermowell with Nylon Cable Gland for Homebrew Brewing Beer Fermenter 100mm Rod Length

Overview: The Meprotal 2-pack Thermowell set delivers dual sensor protection for homebrewing enthusiasts running multiple fermentation vessels or monitoring different batch stages. Each unit features 100mm stainless steel rods with 1/2-inch NPT threads and includes nylon cable glands for secure probe installation. This economical package allows brewers to equip two separate systems simultaneously, whether managing a brew kettle and fermenter or monitoring primary and secondary fermentation.
What Makes It Stand Out: Getting two complete thermowells for under $13 represents exceptional value, effectively halving the per-unit cost compared to individual purchases. The included nylon cable glands are a thoughtful addition that many competitors sell separately, providing better probe stabilization and an extra sealing layer. The 100mm rod length suits standard homebrew vessels perfectly, while the precise dimensional specifications (6mm ID, 8mm OD) ensure compatibility with common temperature probes.
Value for Money: At $12.99 for two units, this package offers unbeatable value—less than $6.50 per thermowell. Individual thermowells typically retail for $8-15 each, making this set ideal for expanding brew systems or replacing worn components. The added cable glands, which normally cost $2-4 each, further enhance the proposition. For brewers scaling up operations or maintaining backup equipment, this dual-pack minimizes cost while maintaining quality.
Strengths and Weaknesses: Strengths include outstanding quantity value, quality stainless steel construction, precise threading, included cable glands, and clear dimensional specifications for compatibility planning. The 100mm length fits most homebrew applications. Weaknesses are minimal but include unspecified stainless steel grade (likely 201, less robust than 304), potential over-length for shallow vessels, and the lack of individual packaging if only one unit is needed immediately.
Bottom Line: This two-pack delivers exceptional value for homebrewers needing multiple monitoring points. The quality construction and bonus cable glands make it a smart purchase for both new setups and system expansions. Just verify the 100mm length suits your specific vessels before ordering.
9. Inkbird ITC-608T Temperature Controller with Dual Temperature Sensor AC Dual Stage Outlet Thermostat with 12 Period Time Stage 1800W ETL Listed
Overview: The Inkbird ITC-608T is a professional-grade temperature controller offering dual-stage, dual-sensor capability for demanding applications like homebrewing, fermentation, and greenhouse management. ETL-listed for safety and rated at 1800W, this unit can simultaneously control heating and cooling devices while providing sophisticated programming options. Its versatility extends beyond simple temperature control into humidity management and time-based staging, making it suitable for complex process automation.
What Makes It Stand Out: ETL certification distinguishes this from cheaper controllers lacking safety validation, crucial when handling 1800W loads. The dual-sensor design allows monitoring two zones or implementing sophisticated control logic, while the 12-period time stage function enables automated temperature profiles—ideal for step mashes or diurnal cycling. Unlike basic controllers, it preserves settings during power outages and offers compressor delay protection, preventing equipment damage.
Value for Money: At $51.99, this controller delivers professional features at a fraction of industrial controller costs (often $150+). The dual-stage capability effectively replaces two single-stage units, while the ETL certification provides peace of mind that budget alternatives lack. For serious homebrewers or growers requiring reliable automation, the robust feature set justifies the premium over $25-35 basic controllers. The 1800W capacity handles most residential equipment without issue.
Strengths and Weaknesses: Strengths include ETL safety certification, high power capacity, versatile operating modes, dual-sensor capability, power-loss memory retention, and compressor delay protection. The interface is intuitive for the feature set. Weaknesses involve the higher price point for casual users, no included humidity sensor (must be purchased separately), and potential feature overload for beginners wanting simple set-and-forget operation. The temperature range, while adequate, may limit some specialized applications.
Bottom Line: An outstanding choice for serious enthusiasts requiring reliable, safe, and sophisticated environmental control. The ETL listing and dual-stage capability make it worth the investment for critical applications like fermentation or greenhouse management, though hobbyists with simple needs may find it overly complex.
10. 1/2 inch NPT Thermowell, Stainless Steel Thermowell Weldless Temperature Sensors for Beer fermenter Homebrew Boiler

Overview: This 1/2-inch NPT Thermowell provides fundamental sensor protection for budget-conscious homebrewers seeking a no-frills solution. Constructed from 201 stainless steel with a 12.1cm rod length, this weldless unit installs easily into standard brewing vessels without permanent modification. It serves the essential function of shielding temperature probes from damage while allowing removal for maintenance without disrupting your brew.
What Makes It Stand Out: At $8.89, this is among the most affordable thermowells available without sacrificing core functionality. The straightforward design focuses on essential features: decent threads, adequate length for most kettles, and reliable stainless steel construction. For brewers needing simple protection for a single probe in moderate conditions, this unit delivers the basics without premium pricing. The 0.51-inch rod diameter accommodates standard temperature sensors commonly used in homebrewing.
Value for Money: This thermowell offers exceptional value for those prioritizing cost savings. While $2-5 cheaper than mid-range alternatives, it maintains the critical protective function that prevents far more expensive sensor damage. The 201 stainless steel, though not top-tier, suffices for typical brewing environments. For beginners testing equipment or building a starter system, this price point removes financial barriers to proper sensor protection. However, the minimal cost savings may not justify missing features like cable glands or multi-pack discounts.
Strengths and Weaknesses: Strengths include the lowest price point, functional 201 stainless construction, standard NPT threading compatibility, and adequate length for common brewing vessels. The weldless design preserves equipment integrity. Weaknesses involve basic 201-grade steel less suitable for highly corrosive environments, lack of included sealing accessories, potentially thicker rod diameter limiting some probe fits, and minimal quality assurances compared to branded alternatives.
Bottom Line: A solid budget choice for entry-level homebrewers needing basic sensor protection. While lacking frills, it performs its core function reliably. Consider upgrading to higher-grade steel or accessorized packages if brewing acidic beverages or requiring multiple units, but for simple beer brewing, this offers unbeatable economy.
The Evolution of Temperature Monitoring in Home Brewing
The home brewing renaissance of the 2010s gave us affordable digital thermometers. The 2020s introduced Bluetooth connectivity and basic data logging. Now, 2026 represents a convergence point where professional-grade sensor technology has finally trickled down to the consumer price point while gaining intelligence that even commercial breweries are adopting.
Why 2026 Represents a Tipping Point
Three factors are reshaping the landscape. First, the semiconductor shortage’s end has enabled manufacturers to integrate more powerful microcontrollers directly into probe heads, processing data at the source rather than transmitting raw signals. Second, the Matter smart home standard has solved the interoperability nightmare—your temperature sensor now talks seamlessly to your pump controller, heating element, and phone without proprietary hubs. Third, advances in thermal epoxy and probe metallurgy mean sensors survive the corrosive, high-vibration environment of a rolling boil far longer than their predecessors.
Core Temperature Ranges in Home Brewing
Before evaluating sensors, you must understand the thermal battlegrounds they’ll face. Each brewing stage demands different performance characteristics.
Mash Temperature Precision (145-162°F)
Mash temperature control is where ±0.5°F accuracy separates award-winning beers from “just okay” ones. Beta-amylase thrives at 145-149°F for fermentable wort, while alpha-amylase dominates at 158-162°F for body. A sensor with slow response time or poor immersion characteristics will read average temperature, missing hot spots that denature enzymes or cool zones that leave starch unconverted. In 2026, look for sensors with multiple measurement points along the probe shaft—these eliminate the guesswork of single-point readings in thick grain beds.
Boiling and Whirlpool Management (212°F+)
Boil kettle sensors face their own torture test: cavitation from violent bubbling, protein scorching, and the thermal shock of post-boil whirlpool additions. Here, response time matters less than durability and the ability to withstand 250°F+ occasional overshoots. The sensor must also resist wort stone buildup and clean easily with caustic brewery wash. For whirlpool hops and kettle souring, you’ll want a sensor positioned to read true wort temperature, not the steam layer or kettle wall temperature.
Critical Sensor Specifications Decoded
Manufacturers love to splash impressive numbers on packaging. Here’s what actually matters for brewing outcomes.
Accuracy: Understanding ±0.1°F vs ±0.5°F
That accuracy rating is meaningless without context. It’s typically specified at a single temperature point (usually 32°F or 212°F) under laboratory conditions. For brewing, you need to know the “accuracy over range” specification—how the sensor performs across the entire 145-250°F spectrum. A sensor rated ±0.1°F at 212°F might drift to ±0.8°F at 150°F. Platinum RTDs generally maintain tighter linearity across the brewing range than thermocouples. In 2026, insist on seeing the full-range accuracy chart, not just the headline number.
Response Time: From Reading to Reality
Response time (T90—the time to reach 90% of final reading) becomes critical during transitions. When you step-mash, a 5-second response time means you’re already at the next rest temperature before your sensor confirms the previous step. For HERMS and RIMS systems, sub-2-second response times enable tighter PID loop control, reducing temperature overshoot by up to 40%. However, ultra-fast sensors in boil kettles can be a curse, reacting to every bubble and giving you jittery, unusable data. The sweet spot for boil monitoring is 3-5 seconds, which smooths out noise while catching genuine temperature changes.
Durability in Harsh Brewing Environments
Your sensor lives in a world of caustic cleaners, acidic wort, thermal cycling, and physical abuse. Probe construction determines lifespan. Look for 316L stainless steel shafts (not the cheaper 304), hermetically sealed cable transitions, and strain relief that prevents wire fatigue. The internal sensing element should be potted in thermally conductive epoxy rated for continuous 300°F+ exposure. In 2026, some manufacturers are using ceramic-filled polymers that conduct heat better while providing superior electrical isolation, extending sensor life beyond 5,000 brewing hours.
Primary Sensor Technologies Compared
Three technologies dominate the 2026 market, each with distinct advantages.
Platinum RTDs: Precision and Stability
Resistance Temperature Detectors using platinum wire offer unmatched long-term stability. Their resistance-temperature relationship is nearly linear, making them ideal for the precise calculations brewing software demands. A 100Ω Pt1000 sensor (the “1000” denotes resistance at 0°C) provides higher resolution than the older Pt100 standard, crucial for detecting tiny mash temperature gradients. The downside? RTDs require more sophisticated excitation circuitry, which historically meant expensive transmitters. In 2026, integrated RTD-to-digital converters inside the probe head have eliminated this cost penalty, bringing Pt1000 sensors into the sub-$50 range.
Thermocouples: J, K, and T-Type for Brewing
Thermocouples generate voltage from the Seebeck effect where two dissimilar metals meet. For brewing, Type T (copper-constantan) offers the best accuracy in the 0-400°F range and superior corrosion resistance. Type K (chromel-alumel) handles higher temperatures but suffers from oxidation and drift. The key advantage of thermocouples is their ruggedness and instant response—the junction can be welded directly to the probe tip, creating a nearly indestructible sensor. However, they require cold-junction compensation, and their microvolt-level signals are prone to electrical noise from nearby heating elements. Modern thermocouple amplifiers have solved most noise issues, but you must ensure the probe uses shielded, twisted-pair wiring.
Digital Thermometer Chips: The New Wave
Emerging in 2026 are sensors integrating the entire measurement chain—sensing element, ADC, microcontroller, and wireless radio—into a single 3mm chip embedded in the probe tip. These use bandgap temperature references or tiny thermistor arrays, offering ±0.2°F accuracy with 1-second response times. Their magic lies in on-board linearization and calibration tables stored in flash memory. Because they output digital data, they’re immune to analog signal degradation. The trade-off is maximum temperature (most top out at 250°F) and potential failure modes—when they die, the entire probe is dead, unlike replaceable RTD elements.
Smart Connectivity Standards for 2026
The “smart” label gets slapped on everything. Here’s what connectivity actually delivers for brewers.
Wireless Protocols: Beyond Bluetooth
Bluetooth 5.3 solved range and pairing issues, but it still requires your phone to be present. WiFi 6E sensors now connect directly to your router, feeding data to the cloud even when you’re at the homebrew shop. The real game-changer is Thread, the mesh-networking protocol behind Matter. Thread sensors create a self-healing network—if one probe can’t reach your hub directly, it hops through another sensor. This eliminates dead zones in basement breweries. Look for sensors that support multiple protocols simultaneously, falling back from WiFi to Thread to Bluetooth as needed.
Integration with Brewing Software
A sensor is only as smart as the software it feeds. In 2026, the best sensors expose RESTful APIs and support MQTT messaging, allowing integration with Brewfather, BeerSmith, and custom Node-RED dashboards. Check if the manufacturer provides an open API or locks you into their app. The gold standard is bidirectional control—your brewing software doesn’t just read temperature; it adjusts your PID controller setpoints automatically based on recipe stages. Ensure the sensor’s firmware supports over-the-air updates, as brewing software evolves rapidly.
Data Logging and Recipe Reproducibility
Local data logging with 1-second granularity is non-negotiable. Cloud sync is a bonus, but your sensor should store at least 24 hours of data internally in case your network hiccups. More importantly, look for sensors that tag data with batch IDs and recipe versions. When you nail that perfect IPA, you want to know exactly what temperature profile you used, not just “around 152°F.” Some 2026 sensors include pressure-compensated temperature readings, correcting for altitude and atmospheric pressure changes that affect boiling point—crucial for brewers above 3,000 feet.
Physical Design and Installation Requirements
A perfect sensor that doesn’t fit your kettle is useless. Physical design determines real-world usability.
Probe Length and Immersion Physics
The probe must reach the thermal center of your wort, not just touch the vessel wall. For a 15-gallon kettle, that means at least 4 inches of immersion. Too short, and you’ll read wall temperature, which lags behind wort temperature by 5-10°F during heating. Too long, and the probe flexes, eventually cracking the seal. The optimal stiffness comes from 6mm diameter probes—thick enough to resist bending, thin enough to avoid excessive thermal mass that slows response. For mash tuns, consider adjustable-depth probes with locking compression fittings, letting you fine-tune immersion based on grain bed depth.
Sealing and Ingress Protection
IP67 rating (dust-tight, immersion-proof) is the minimum for any sensor that’ll see spray from hoses or condensation during chilling. The weak point is always the cable-to-probe transition. Look for molded strain relief with internal O-rings and epoxy potting that extends at least 1 inch into the cable jacket. In 2026, some premium sensors use glass-to-metal seals borrowed from aerospace, creating a hermetic barrier that withstands repeated autoclave cycles. If you kettle-sour or use aggressive cleaners, verify the seal materials—EPDM O-rings degrade with phosphoric acid, while Viton handles it but costs more.
Mounting Solutions for Kettles and Fermenters
Tri-clamp probes dominate new kettles, offering sanitary, tool-free installation. But most homebrew rigs still use NPT-threaded ports. The best sensors include both 1/2" NPT and tri-clamp adapters in the box. For retrofitting kettles without ports, look for sensors with integrated weldless bulkheads featuring dual O-rings and a compression plate that distributes clamping force. Some 2026 designs use rare-earth magnets embedded in a sanitary sheath, allowing temporary placement inside the kettle—perfect for testing locations before committing to a permanent port.
Power Management and Battery Life
Wireless sensors are convenient until they die mid-boil. Power strategy matters.
Rechargeable lithium batteries are standard, but their performance plummets above 140°F. Sensors designed for mash tuns should use high-temperature LiSOCl2 cells rated for 185°F continuous operation. For boil kettle sensors, consider thermoelectric generators that harvest heat from the wort itself—2026 models can power the sensor indefinitely above 180°F, using a small rechargeable cell only during startup. Solar-assisted sensors with tiny photovoltaic strips along the cable are emerging for fermenter monitoring. Whatever the power source, insist on a low-battery warning that gives at least 48 hours notice, not 10 minutes.
Calibration Protocols for Consistent Results
Every sensor drifts. The question is how easily you can correct it.
Ice Bath and Boiling Point Checks
The two-point calibration method remains gold standard. Your sensor should support single-point offset and two-point slope adjustments directly from its app. For ice bath calibration, use distilled water with crushed ice—tap water minerals lower the freezing point. At boiling, account for altitude—water boils at 203°F in Denver, not 212°F. The best 2026 sensors include barometric pressure sensors and automatically calculate the correct boiling point for your elevation, eliminating manual lookup tables.
Traceable Calibration Certificates
If you’re entering competitions or scaling to nano-brewery status, NIST-traceable calibration certificates matter. Some manufacturers now embed a digital certificate in the sensor’s memory, verifiable via blockchain. This sounds like overkill until you need to prove your mash never exceeded 162°F for a style-sensitive lager. The certificate should show calibration data at at least five points across the brewing range, not just 32°F and 212°F.
Budget Tiers: What to Expect at Each Price Point
Price correlates with performance, but the curve flattened in 2026.
Entry-Level ($25-40): Expect a single-point RTD or thermocouple with Bluetooth connectivity, ±0.5°F accuracy, and basic app logging. These are perfect for brewers upgrading from dial thermometers. You’ll compromise on probe durability and cloud features, but the core measurement will be solid.
Mid-Range ($40-70): This is the sweet spot. Pt1000 RTDs with ±0.2°F accuracy, WiFi/Thread connectivity, local data logging, and open APIs. Probes use 316L steel and proper sealing. These sensors match commercial quality from five years ago.
Premium ($70-120): Multi-point sensing arrays, integrated pressure compensation, thermoelectric power generation, and aerospace-grade sealing. You’re paying for longevity and features that matter only if you brew weekly or run an automated system. For most home brewers, the mid-range delivers 90% of the performance at half the price.
Future-Proofing Your Temperature Monitoring Setup
Technology moves fast. Here’s how to avoid obsolescence.
Choose sensors with firmware update capability and manufacturers with a track record of supporting legacy products. The Thread protocol future-proofs connectivity—it’s backed by Apple, Google, and Amazon, ensuring ecosystem support for a decade. Opt for sensors with modular probe heads; if the electronics become outdated, you can replace just the head while keeping the installed probe shaft. Finally, demand data export in open formats (CSV, JSON) not proprietary binaries. Your brewing data belongs to you, not the sensor company.
Troubleshooting Common Sensor Issues
Even the best sensors misbehave. Know the warning signs.
Erratic readings during heating: Usually electrical noise from the heating element. Ensure your sensor uses shielded cable and the shield is grounded at one end only. Try a ferrite bead on the cable near the controller.
Slow response after cleaning: Caustic residue insulates the probe tip. Soak in hot water with a mild acid (Star San) to dissolve deposits. Never scrub the probe with abrasives—it creates micro-scratches that trap soil.
Drifting readings: Calibrate monthly if you brew weekly. If drift exceeds 0.5°F between calibrations, the sensing element is degrading. For RTDs, this often means moisture ingress. For thermocouples, junction contamination.
Connectivity drops: WiFi sensors near boiling kettles suffer from condensation in antenna housings. Store the sensor in a warm, dry place between brews. Thread mesh networks self-heal, but only if you have at least three devices—consider adding a cheap repeater node.
Frequently Asked Questions
1. Can I use a food-grade meat thermometer for brewing? While technically possible, meat thermometers lack the accuracy (±2°F typical) and durability for brewing. Their probes aren’t sealed against caustic cleaners, and most max out at 200°F, below boiling. Invest in a purpose-built brewing sensor for consistent results.
2. How often should I calibrate my temperature sensor? Calibrate before each brew day if you’re pursuing competition-level consistency. For casual brewing, monthly calibration suffices. Always recalibrate after dropping the probe or exposing it to temperature extremes beyond its rating.
3. What’s the ideal probe placement in a mash tun? Position the tip 2-3 inches above the false bottom, centered horizontally. This avoids direct heat from below and cold spots near walls. For large tuns, use two sensors: one in the center and one near the wall to monitor temperature stratification.
4. Do I need a separate sensor for my HLT, mash tun, and boil kettle? Ideally, yes. Each vessel operates in different temperature regimes and requires different probe lengths. However, a single high-quality sensor with quick-disconnect fittings can be moved between vessels if you’re on a tight budget—just allow time for temperature stabilization after each move.
5. Are wireless sensors reliable enough for automated systems? In 2026, absolutely. Thread and WiFi 6E sensors maintain 99.9% uptime. The key is having a backup: configure your controller to shut off heat if sensor data stops for more than 30 seconds. Never trust any single sensor with safety-critical functions.
6. Can I immerse the entire sensor, including the cable, in wort? No. Only the stainless steel probe shaft is food-safe and heat-resistant. The cable transition and connector must remain dry. Immersing the cable will destroy the sensor and contaminate your beer with plastic compounds. Look for sensors with clear “max immersion” markers.
7. What’s the difference between a sensor and a transmitter? The sensor is the element that measures temperature (RTD, thermocouple). The transmitter converts that measurement into a readable signal (analog voltage, digital data). In modern probes, they’re integrated into one unit. For DIY controllers, you might buy a separate sensor and connect it to your own transmitter board.
8. How do I clean my temperature probe without damaging it? Wipe with a soft cloth and PBW solution, then rinse. For stubborn deposits, soak in hot Star San. Never exceed 180°F during cleaning—rapid thermal cycling from boiling to ice water shortens lifespan. Always air-dry before storage to prevent moisture ingress.
9. Will a more expensive sensor make my beer taste better? Not directly, but it enables repeatability. The best beer you ever made becomes your house standard only if you can replicate the exact temperature profile. A $80 sensor that lasts 5 years and holds calibration is cheaper than ruining two batches with a $30 sensor that drifts.
10. What’s the future beyond 2026 for brewing sensors? Expect infrared array sensors that map entire vessel temperature without immersion, AI-driven predictive control that adjusts heating before temperature deviates, and biodegradable probe tips for zero-waste brewing. The fundamentals—accuracy, durability, and connectivity—will remain paramount, but how we achieve them will keep evolving.