Transforming your outdoor space after dark requires more than just flipping a switch. Today’s low-voltage landscape lighting systems offer sophisticated control, energy efficiency, and breathtaking effects that were once reserved for high-end commercial installations. When you pair these systems with smart timers, you’re not just illuminating pathways—you’re creating a dynamic, responsive environment that adapts to your lifestyle, enhances security, and slashes energy costs without sacrificing an ounce of ambiance.
But here’s the challenge: not all low-voltage spotlights with smart timers are created equal. The market is flooded with options that promise convenience yet deliver headaches, from connectivity issues to premature failure in harsh weather. Whether you’re a DIY enthusiast planning your first installation or a seasoned homeowner looking to upgrade an existing system, understanding the nuances of these technologies will save you hundreds of dollars and countless hours of frustration. This comprehensive guide will walk you through everything you need to know to make an informed decision that balances performance, longevity, and seamless smart home integration.
Top 10 Low-Voltage Outdoor Spotlights with Smart Timers
Detailed Product Reviews
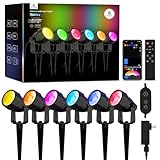
1. ANGELHALO Smart Landscape Spotlights, Low Voltage IP65 Waterproof Outdoor Spotlights Compatible with APP/Voice/Alexa Control, Color Changing Lights for Yard Garden Pathway Lawn, 6 Pack
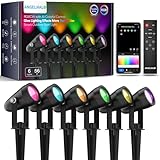
Overview: These smart RGB landscape spotlights deliver vibrant color-changing effects for outdoor spaces. The six-pack system offers app and voice control via Alexa, making it easy to customize lighting for holidays, parties, or everyday ambiance. With 16 million color options and music sync capabilities, they transform gardens, pathways, and yards into dynamic displays. The IP65 waterproof rating and die-cast aluminum construction ensure durability across seasons.
What Makes It Stand Out: The quadruple control method (app, remote, control box, voice) provides unmatched flexibility. The DIY mode with music synchronization creates immersive outdoor entertainment experiences. The thickened aluminum alloy housing exceeds typical plastic fixtures, while the IP65 rating handles extreme temperatures. Installation is tool-free—simply stake into ground. The system works directly with 120VAC, eliminating transformer complexity for quick setup.
Value for Money: At $13.16 per spotlight, this kit sits in the mid-range smart lighting category. The robust metal construction and comprehensive control options justify the premium over budget plastic alternatives. However, the direct 120VAC requirement limits integration with existing low-voltage systems, potentially requiring additional waterproofing for the adapter in wet climates. For users starting fresh, it eliminates transformer costs.
Strengths and Weaknesses: Pros: Exceptional color vibrancy and customization; multiple intuitive control methods; durable aluminum build; true weatherproofing; simple installation. Cons: Not compatible with low-voltage transformers; adapter requires separate waterproof cover for outdoor use; limited to 2.4GHz WiFi; no individual light addressing.
Bottom Line: Ideal for homeowners seeking plug-and-play smart color effects without existing low-voltage infrastructure. Best for seasonal decorating and entertainment-focused landscapes where individual light control isn’t critical. Skip if you need transformer compatibility or per-fixture customization.
2. EDISHINE 50FT Christmas Smart Low Voltage Landscape Spotlights, 300LM RGBW Color Changing Landscpae Lighting, APP Control Alexa & Google Home, IP67 Waterproof Outdoor Spot Lights for Yard Garden
Overview: This four-pack of budget-friendly smart spotlights offers RGBW color mixing with dedicated warm white mode, delivering 300 lumens per fixture. The 50-foot span provides flexible placement for gardens and pathways. Controlled via the Dewenwils app or voice assistants, it features 12 scene modes and music sync. The IP67 rating surpasses typical IP65 offerings, ensuring superior moisture protection.
What Makes It Stand Out: The remarkable $5 per-unit cost makes this the entry-level smart lighting champion. IP67 waterproofing handles submersion better than competitors. The adjustable cylindrical heads allow precise beam direction, while customizable spacing between lights adapts to any layout. The warm white mode provides practical everyday illumination beyond decorative colors, making it more versatile than RGB-only systems.
Value for Money: Unbeatable pricing for smart RGBW lighting. At under $20 for four lights, it’s perfect for budget-conscious buyers or experimental installations. The IP67 rating and aluminum construction punch above the price class. However, the 300-lumen output may disappoint for highlighting large trees or structures. No included transformer adds hidden costs, and long-term durability at this price point remains unproven.
Strengths and Weaknesses: Pros: Incredible affordability; superior IP67 waterproofing; warm white functionality; flexible installation spacing; adjustable heads. Cons: Low brightness (300LM); transformer not included; plastic components likely despite aluminum claims; limited scene options compared to premium brands; 2.4GHz WiFi only.
Bottom Line: Perfect for first-time smart lighting users or supplemental accent lighting. The IP67 rating and warm white mode add unexpected value. Choose this for small gardens or holiday decorating on a tight budget, but invest in a quality transformer and expect modest brightness.
3. SURAIELEC 300W Wi-Fi Low Voltage Landscape Transformer with 2 Zones, 2.4GHz Smart Outdoor Low Voltage Transformer, Astronomial Timer, 120V to 12V/15V AC, Stainless Steel, ETL Listed

Overview: This 300W smart transformer serves as the command center for professional low-voltage lighting systems. Converting 120V AC to 12V/15V AC, it powers multiple fixtures while offering independent dual-zone control. The SMART LIFE app enables remote scheduling, including astronomical timers that sync with local sunrise/sunset. ETL-listed safety features and stainless steel construction ensure reliable, weatherproof operation for years.
What Makes It Stand Out: Dual-zone independence allows different schedules and brightness levels for front and back yards simultaneously—a feature rarely found in consumer transformers. The astronomical timer eliminates manual seasonal adjustments. The toroidal core design runs quieter and cooler than laminated cores. Built-in circuit protection with auto-reset prevents overload damage. Stainless steel housing resists rust in coastal or humid environments better than painted steel alternatives.
Value for Money: At $109.99, it’s competitively priced for a smart transformer with zoning capabilities. Comparable units without WiFi cost $60-80, making the $30 premium for app control and astronomical timing worthwhile. The 240W recommended load limit (80% of 300W) is standard for safety but reduces usable capacity. Factor in additional costs for lights and wiring—this is a system foundation, not a complete kit.
Strengths and Weaknesses: Pros: True dual-zone control; intelligent astronomical timer; robust stainless construction; ETL safety certification; quiet toroidal core; circuit breaker protection. Cons: Lights not included; 2.4GHz WiFi only; 240W practical load limit reduces capacity; setup requires electrical knowledge; app occasionally disconnects.
Bottom Line: Essential purchase for serious low-voltage lighting installations. The zoning and astronomical features justify the cost for medium-to-large properties. Ideal for homeowners wanting automated, professional-grade control. Skip if you need a simple plug-and-play solution or have only a few lights.
4. APPECK Low Voltage Landscape Lights, Smart RGBW Color Changing Landscape Lighting with APP Control, IP65 Waterproof Outdoor Spotlights for Garden Yard Outside Decoration, 8 Pack

Overview: This eight-pack system elevates smart landscape lighting with individual fixture control and 111+ built-in scenes. Each RGBW spotlight offers 16 million colors plus 3000K warm white, controllable via Smart Life app, remote, or voice assistants. The system supports per-light customization, allowing complex patterns and effects across your entire yard. IP65-rated aluminum construction handles typical outdoor conditions while maintaining a sleek profile.
What Makes It Stand Out: Individual light addressing enables unprecedented creativity—program each fixture with unique colors, brightness, and timing for professional-looking displays. The massive scene library includes holiday themes, color waves, and chasing effects. The Smart Life app integrates with broader smart home ecosystems beyond just lighting. Eight lights cover larger properties without immediate expansion needs. The tunable warm white provides practical illumination alongside decorative effects.
Value for Money: At $12.50 per fixture, this kit offers premium features at mid-range pricing. Individual control typically requires expensive proprietary systems costing $25+ per light. The extensive scene library saves hours of manual programming. However, the IP65 rating (vs. IP67) may limit lifespan in flood-prone areas. The 2.4GHz limitation and potential WiFi congestion with eight devices should be considered. No transformer included adds $40-80 to total cost.
Strengths and Weaknesses: Pros: Individual fixture addressing; 111+ professional scenes; RGBW flexibility; good value for advanced features; scalable eight-light kit. Cons: IP65 not IP67; complex setup for novices; 2.4GHz only; transformer not included; app learning curve; no physical zone grouping.
Bottom Line: Best choice for tech-savvy users wanting maximum creative control. The individual addressing and scene library enable professional results. Perfect for large properties, holiday enthusiasts, or those integrating with existing Smart Life devices. Avoid if you prefer simple operation or have poor WiFi coverage outdoors.
5. All-in-One Low Voltage Landscape Lighting, Dusk to Dawn Transformer Timer, Waterproof Spotlights, Dimmable LED Outdoor Landscaping Lights Kit for Yard Backyard Tree House 24V Warm White 4 Pack
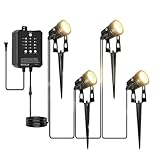
Overview: This complete kit simplifies landscape lighting with four warm white spotlights and an integrated 24W transformer featuring a photocell sensor. The plug-and-play design requires no separate purchases or complex wiring. Emitting 2700K warm white light equivalent to 30W halogen while consuming 80% less power, these dimmable fixtures highlight architectural features, trees, and pathways. The IP65 rating and aluminum construction ensure durability from -4°F to 130°F.
What Makes It Stand Out: The all-in-one design eliminates compatibility guesswork—transformer, lights, and connectors are perfectly matched. The dusk-to-dawn photocell provides true automation without app dependency. Five brightness levels and 270° adjustable heads offer professional customization. The 24V system improves efficiency and reduces voltage drop over long runs compared to 12V systems. The hidden Pro design with compact fixtures disguises easily behind landscaping.
Value for Money: Exceptional value at $45.99 for a complete system. Purchasing components separately would cost $60-80. The integrated photocell timer saves $20-30 compared to smart plugs or timers. Energy efficiency pays for itself within two years versus halogen. The two-year replacement guarantee demonstrates manufacturer confidence. However, warm white-only output limits decorative options, and the 24V system reduces third-party light compatibility.
Strengths and Weaknesses: Pros: Complete kit—no extras needed; true plug-and-play; dusk-to-dawn automation; energy efficient; professional adjustability; excellent warranty. Cons: No color changing; not smart home compatible; 24V limits expansion options; transformer capacity restricts adding lights; basic timer lacks scheduling flexibility.
Bottom Line: Perfect for homeowners wanting reliable, maintenance-free warm white lighting without technical complexity. Ideal for accent lighting, security, and curb appeal. The all-in-one value and warranty make it foolproof. Choose this for simplicity and reliability; avoid if you desire color effects or smartphone control.
6. DEWENWILS 200W Smart Low Voltage Landscape Transformer, Waterproof, Schedule and Timer, Compatible with Alexa and Google Home, 120V AC to 12V AC for LED Landscape Lights, Outdoor Lighting, ETL Listed

Overview: The DEWENWILS 200W Smart Transformer brings intelligent control to outdoor lighting, converting 120V AC to 12V AC while offering WiFi connectivity and voice command integration with Alexa and Google Home. This ETL-listed unit handles substantial lighting loads up to 200 watts, making it suitable for medium to large landscape installations including spotlights, pathway lights, and water features.
What Makes It Stand Out: Five timer modes—including schedule, circulate, random, countdown, and manual—provide exceptional automation flexibility. The vacation mode enhances security by simulating occupancy. Its robust metal housing delivers IP-level weatherproofing against rain, snow, and dust, while built-in overload protection automatically cuts power when current exceeds safe thresholds.
Value for Money: At $95.99, this transformer sits competitively between basic mechanical timers and high-end commercial units. The smart features justify the premium over non-connected models, offering convenience that traditional photocell timers cannot match. For homeowners wanting app-based control without professional installation costs, it delivers strong ROI.
Strengths and Weaknesses: Strengths include seamless voice control, comprehensive timer options, durable weatherproof construction, and reliable overload protection. The 3.3-foot power cord offers flexible placement. Weaknesses include 2.4GHz WiFi limitation (no 5GHz support) and requirement for Dewenwils app authorization before Alexa/Google integration, which adds a setup step.
Bottom Line: This smart transformer excels for tech-savvy homeowners seeking automated landscape lighting. Its blend of safety, durability, and intelligent features makes it a worthwhile investment for medium-scale outdoor lighting projects.
7. SURAIELEC 300W Smart Landscape Lighting Transformer, 2.4 Ghz Wi-Fi Low Voltage Outdoor Light Timer for Spotlight, Pathway Light, Alexa & Google Assistant Compatible, Astronomical Timer, ETL Listed

Overview: The SURAIELEC 300W Smart Transformer represents a premium solution for extensive landscape lighting systems, converting 120V to dual 12V/15V AC outputs. This ETL-listed unit supports up to 300 watts of LED or halogen fixtures and integrates with Smart Life app, Alexa, and Google Assistant for comprehensive remote management.
What Makes It Stand Out: The astronomical timer automatically syncs on/off times with local sunrise/sunset, eliminating seasonal adjustments. Multi-tap outputs allow 15V selection for long wire runs, preventing voltage drop issues. The stainless steel NEMA 3R enclosure provides superior weather resistance and security with its lockable design.
Value for Money: Priced at $103.99, the premium is justified by 50% more capacity than standard 200W units and professional-grade features. The astronomical timer alone saves significant manual programming time. For large properties requiring stable voltage over distance, the multi-tap functionality delivers tangible performance benefits that cheaper alternatives lack.
Strengths and Weaknesses: Strengths include high wattage capacity, voltage selection flexibility, robust stainless construction, and intelligent astronomical scheduling. The memory function preserves settings after outages. The primary weakness is synchronous control—all outputs operate together, preventing independent zone control. The 2.4GHz-only WiFi may also challenge some network setups.
Bottom Line: Ideal for larger landscapes needing reliable, intelligent automation. The SURAIELEC 300W justifies its price through professional features, durable build, and set-it-forget-it astronomical timing that serious landscape lighting demands.
8. DEWENWILS 60W WiFi Low Voltage Transformer, 120V AC to 12V DC, Smart Outdoor Low Voltage Landscape Transformer with Timer, Work with Alexa & Google Home, Weatherproof for Landscape Lights, ETL Listed

Overview: The DEWENWILS 60W WiFi Transformer offers an affordable entry into smart landscape lighting control, converting 120V AC to 12V DC for low-voltage LED systems. This compact ETL-listed unit provides app and voice control via Alexa and Google Assistant, targeting smaller outdoor lighting installations like deck lights, pool lights, and string lighting.
What Makes It Stand Out: Despite its budget price, it includes five timer modes: programmable, countdown, circulate, random, and astronomical. The DC output specifically suits LED installations requiring direct current, while auto-resetting overload protection prevents damage from short circuits. Its lightweight PC housing mounts easily and discreetly.
Value for Money: At $45.99, this is one of the most economical smart transformers available, costing less than many non-smart photocell models. For homeowners with modest lighting needs, it delivers premium automation features without the premium price. The DC compatibility adds value for specialized LED fixtures.
Strengths and Weaknesses: Strengths include exceptional affordability, comprehensive smart features, DC output versatility, and straightforward installation. The 3.3-foot cord provides decent placement flexibility. Weaknesses are the limited 60W capacity (unsuitable for large systems), plastic housing that may degrade faster than metal, and incompatibility with halogen lights. The 2.4GHz WiFi limitation also applies.
Bottom Line: Perfect for small-scale DC lighting projects where smart control is desired but budget is constrained. It punches above its weight in features though capacity limits restrict its application to modest installations.
9. WILAWELS 120W Low Voltage Landscape Transformer, Weatherproof Outdoor Low Voltage Transformer, 120V AC to 12V DC, Landscape Lighting Transformer with Timer and Photocell Sensor, ETL Listed A03LT06
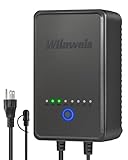
Overview: The WILAWELS 120W Transformer provides reliable, no-frills automation for landscape lighting through an integrated photocell sensor. This ETL-listed unit converts 120V AC to 12V DC, powering LED systems up to 120 watts with dusk-to-dawn functionality and multiple timing modes, prioritizing simplicity over smart connectivity.
What Makes It Stand Out: The detachable photocell with 6-foot cable allows optimal sensor placement, ensuring accurate dusk detection even when the transformer mounts in shaded areas. Four modes—Manual, Test, Auto Dusk-to-Dawn, and Countdown—offer flexible operation without requiring apps or WiFi. The visual Test Mode simplifies installation verification.
Value for Money: At $43.99, this transformer competes directly with basic mechanical timers while offering superior photocell automation. It eliminates ongoing costs associated with smart home ecosystems and avoids WiFi complexity. For users wanting reliable automatic operation without smartphone dependency, it represents excellent value.
Strengths and Weaknesses: Strengths include simple operation, effective photocell automation, ETL certification, built-in circuit protection, and memory function for settings retention. The competitive price and detachable sensor are notable advantages. Weaknesses include lack of remote/voice control, manual mode switching requiring physical access, and no scheduling beyond photocell/countdown. It’s less flexible than smart alternatives.
Bottom Line: An excellent choice for straightforward, reliable dusk-to-dawn lighting control without smart home complexity. It delivers dependable performance for users prioritizing simplicity and affordability over advanced features.
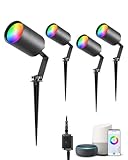
10. APPECK Landscape Lighting, RGBW Color Changing Low Voltage Landscape Lights with APP Control, IP65 Waterproof Outdoor Spotlights for Garden Yard Outside Decoration, 6 Pack
Overview: The APPECK RGBW Landscape Lighting Kit includes six color-changing spotlights designed for smart outdoor illumination. These IP65-rated fixtures deliver 16 million colors plus tunable warm white (3000K), controlled via Smart Life app, included remote, or voice commands through Alexa and Google Assistant, requiring a separate low-voltage transformer.
What Makes It Stand Out: Individual light control allows unique colors per fixture, creating dynamic effects impossible with single-color systems. Built-in 111 scene modes enable instant ambiance changes for holidays, parties, or daily moods. The IP65 rating ensures reliable operation in extreme temperatures (-4°F to 140°F) and heavy precipitation.
Value for Money: At $69.99 for six smart RGBW lights, the kit offers strong value compared to purchasing individual fixtures. The feature set rivals premium brands at a mid-range price point. However, the required separate transformer adds $40-100 to total system cost, which buyers must factor into budgeting.
Strengths and Weaknesses: Strengths include exceptional color versatility, multiple control methods, robust weatherproofing, and per-fixture customization. The remote provides backup control without app dependency. Weaknesses include transformer not included, 2.4GHz WiFi limitation, and complex timer setup confined to the app. The control box wiring could be more streamlined.
Bottom Line: Ideal for homeowners seeking decorative, color-rich landscape lighting with smart capabilities. The APPECK kit delivers impressive flexibility and durability, though plan for additional transformer costs and allow time for app configuration.
Understanding Low-Voltage Outdoor Lighting Systems
What Makes Low-Voltage Lighting Ideal for Outdoor Use
Low-voltage lighting operates at 12 volts instead of the standard 120 volts, making it inherently safer for outdoor applications where moisture and physical damage are constant concerns. The reduced voltage eliminates the risk of serious electric shock, allows for simpler installation without deep burial requirements, and provides remarkable flexibility in fixture placement. Unlike line-voltage systems that require conduit and licensed electrician work, low-voltage setups use transformers to step down household current, creating a user-friendly ecosystem that most homeowners can install themselves.
The real magic happens when you combine this safety and flexibility with LED technology. Modern low-voltage spotlights consume a fraction of the power of halogen predecessors while delivering superior brightness and color rendering. A typical 5-watt LED spotlight can produce the same luminous output as a 50-watt halogen bulb, representing a 90% reduction in energy consumption. This efficiency isn’t just about lower electric bills—it means smaller transformers, thinner cables, and the ability to power more fixtures on a single run without voltage drop issues.
The Role of Smart Timers in Modern Landscape Lighting
Smart timers have revolutionized how we interact with outdoor lighting. Gone are the days of manual dial timers that lose accuracy and require constant adjustment for seasonal daylight changes. Today’s smart timers use Wi-Fi, Bluetooth, or proprietary mesh networks to connect with your smartphone, enabling precise scheduling, real-time adjustments, and integration with broader smart home ecosystems.
The intelligence extends beyond simple on/off scheduling. Advanced units incorporate astronomical clocks that automatically adjust to sunrise and sunset times based on your GPS coordinates. Some systems learn your usage patterns and suggest optimizations, while others respond to weather data, dimming lights during overcast days to save energy or brightening them during clear nights for enhanced security. This level of automation transforms static lighting into a responsive system that works silently in the background, adapting to both your habits and environmental conditions.
Key Benefits of Smart Timer Integration
Energy Efficiency and Cost Savings
Smart timers optimize energy consumption through multiple layers of intelligence. Astronomical scheduling ensures lights only operate during true darkness, eliminating waste from manual timers set to generic “dusk to dawn” intervals that don’t account for seasonal variations. Zone-based control lets you illuminate only areas in use rather than blasting light across your entire property. Dimming capabilities can reduce power consumption by an additional 40-60% during low-traffic hours while maintaining ambient security lighting.
The financial impact compounds over time. A typical 10-fixture system running 6 hours nightly consumes roughly 180 watts with traditional LEDs. Add smart dimming and precise scheduling, and you can reduce that to 100 watts or less, saving $50-75 annually depending on your electricity rates. Over a 10-year LED lifespan, that’s $500-750 in savings—often more than the initial cost premium of the smart timer itself.
Enhanced Security and Automation
Smart timers create the illusion of occupancy through randomized scheduling and vacation modes that vary lighting patterns nightly. Integration with security cameras and motion sensors triggers spotlight bursts when movement is detected, startling potential intruders while providing clear visibility for camera footage. Some systems can flash specific zones in emergency situations, creating a visual alarm system that complements traditional audio alerts.
The automation extends to practical daily routines. Pathway lights can automatically brighten as you arrive home, triggered by geofencing that detects your smartphone’s proximity. Garden lights can sync with irrigation systems, illuminating just-watered areas to prevent accidental evening walks through wet grass. Pool and water feature lighting can coordinate with filtration cycles, creating synchronized displays that enhance nighttime aesthetics.
Customization and Convenience
The ability to create scenes and schedules from your phone eliminates the trek to the garage to adjust a manual timer. Hosting a dinner party? Activate “Entertainment Mode” with warmer color temperatures and reduced brightness for ambiance. Expecting guests? “Welcome Mode” can illuminate the driveway and entry path at 100% brightness. Holiday seasons allow for color-changing effects and special schedules without rewiring or adding separate controllers.
Voice control through Alexa, Google Assistant, or Siri adds another layer of convenience. “Turn on backyard lights” becomes a simple command while your hands are full of groceries. Integration with smart switches and sensors creates complex conditional logic: lights can turn on at sunset only if someone is home, or brighten when the garage door opens after dark.
Essential Features to Evaluate Before Buying
Brightness Levels and Lumen Output
Don’t be fooled by wattage equivalents—lumens tell the real story. A quality low-voltage spotlight should produce 300-600 lumens for accent lighting and 700-1200 lumens for security applications. Look for fixtures with adjustable lumen output, allowing you to fine-tune brightness after installation. This flexibility proves invaluable when you realize that what looked perfect on paper creates harsh shadows or light pollution in reality.
Consider the lumen maintenance rating (L70, L80, L90), which indicates how long the LED will maintain a percentage of its initial brightness. An L70 rating of 50,000 hours means the light will still produce 70% of its original lumens after 50,000 hours of operation. Higher quality fixtures maintain brightness longer, while cheaper alternatives can lose 30% of their output within the first two years.
Color Temperature and CRI Considerations
Color temperature, measured in Kelvin (K), dramatically affects mood and functionality. 2700K-3000K creates warm, inviting light perfect for residential ambiance. 4000K-5000K delivers crisp, white light ideal for security and task lighting. The best systems offer adjustable color temperature (tunable white), letting you shift from warm evening glow to bright security lighting on demand.
Color Rendering Index (CRI) measures how accurately colors appear under artificial light compared to natural sunlight. A CRI of 90+ is essential for showcasing landscaping, architectural features, or outdoor art. Lower CRI values (70-80) make greens look muddy and reds appear brown, diminishing the visual impact of your carefully curated outdoor space. Always verify both color temperature range and CRI specifications before purchasing.
Beam Angle and Light Distribution
Beam angle determines how light spreads from the fixture. Narrow beams (15-25 degrees) create dramatic accent lighting for statues, trees, or architectural columns. Medium beams (25-45 degrees) work well for shrubbery and garden beds. Wide beams (45-60 degrees) provide gentle wash lighting for walls and broad plantings. Adjustable beam angles offer maximum versatility, letting you reconfigure lighting effects without moving fixtures.
Pay attention to beam uniformity and edge sharpness. Quality optics produce clean, even light pools without hot spots or harsh cutoffs. Some advanced fixtures offer interchangeable lenses or built-in adjustment mechanisms that let you modify beam spread in the field. This adaptability proves crucial when plants grow or when you redesign landscaping elements.
Build Quality and Weather Resistance Ratings
Outdoor fixtures face relentless assault from UV radiation, temperature extremes, moisture, and physical impact. Solid brass or copper fixtures develop attractive patinas and can last decades, while powder-coated aluminum offers excellent corrosion resistance at lower weight and cost. Composite materials work for budget installations but may become brittle after prolonged sun exposure.
The IP (Ingress Protection) rating system quantifies weather resistance. IP65 indicates dust-tight construction with protection against water jets—suitable for most landscape applications. IP67 offers temporary submersion protection, ideal for low-lying areas prone to flooding. IP68 signifies continuous submersion capability for water feature lighting. Don’t settle for IP44 or lower ratings, which only protect against splashing and won’t withstand pressure washing or severe storms.
Smart Timer Technologies Decoded
Wi-Fi vs. Bluetooth Connectivity
Wi-Fi timers connect directly to your home network, offering control from anywhere with internet access. They integrate seamlessly with cloud services and voice assistants but consume more power and can strain weak Wi-Fi signals at the far reaches of your property. Look for dual-band (2.4GHz and 5GHz) compatibility to avoid congestion on crowded 2.4GHz networks.
Bluetooth timers consume less power and maintain reliable connections within 30-50 feet of your phone but lack remote access when you’re away from home. Some hybrid systems use Bluetooth for initial setup and local control, with an optional Wi-Fi bridge for remote access. This approach balances power efficiency with convenience, though it adds another component to purchase and maintain.
Hub-Based vs. Standalone Systems
Hub-based systems centralize control through a single gateway device, reducing individual fixture costs and creating a more robust mesh network. The hub manages all scheduling, scenes, and integrations, allowing simpler, less expensive fixtures. However, if the hub fails, your entire system goes dark. Proprietary hubs may also limit compatibility with third-party devices.
Standalone systems embed smart technology directly in each fixture or transformer, eliminating the hub single point of failure. Each unit operates independently, so one failure won’t affect the others. This approach costs more per fixture but offers greater reliability and flexibility. Mixing brands becomes easier, though managing multiple apps can create a fragmented user experience.
Protocol Compatibility: Matter, Zigbee, and Z-Wave
The smart home landscape is evolving rapidly, with the new Matter standard promising universal compatibility. Matter-enabled devices work across Apple HomeKit, Google Home, Amazon Alexa, and Samsung SmartThings without proprietary hubs. While still emerging in landscape lighting, Matter support indicates a future-proof investment.
Zigbee and Z-Wave remain popular for their low power consumption and mesh networking capabilities. Zigbee offers higher data rates for complex lighting effects, while Z-Wave provides longer range and better wall penetration. Both require hubs but integrate with most major smart home platforms. Verify your existing hub’s compatibility before committing to a protocol-specific system.
Installation Fundamentals
Transformer Sizing and Selection
Your transformer is the heart of the system, converting 120V household current to safe 12V low-voltage power. Calculate total wattage by adding all fixture wattages and multiplying by 1.25 to account for inrush current and future expansion. A 200-watt transformer powers roughly 15-20 typical 5-8 watt LED spotlights with room for growth.
Look for transformers with built-in smart timer modules, multiple common taps for voltage adjustment, and robust surge protection. Multi-tap transformers (12V, 13V, 14V, 15V) let you compensate for voltage drop on long cable runs by boosting voltage at the source. Smart transformers should offer manual override switches and clear LED status indicators for troubleshooting.
Cable Gauge and Voltage Drop Prevention
Voltage drop causes dim, yellowish light at the end of long cable runs. For runs up to 50 feet, 16-gauge cable suffices for most residential applications. Extend beyond 50 feet or power more than 150 watts, and you need 14-gauge or 12-gauge cable to maintain consistent brightness. The “loop” or “T” wiring method—running cable from both ends or the middle—reduces voltage drop compared to daisy-chaining all fixtures in series.
Calculate voltage drop using the formula: (Length × Wattage × 2) / (Cable Constant × Voltage). If the result exceeds 1.5 volts, upgrade your cable gauge or split the run. Many smart timer apps now include voltage drop calculators that suggest optimal wiring configurations based on your specific layout, taking the guesswork out of installation planning.
Layout Planning for Optimal Coverage
Sketch your property and identify focal points: specimen trees, architectural features, pathways, and gathering spaces. Place spotlights 6-12 inches from the target object for dramatic uplighting, angling the beam 30-45 degrees to minimize glare. Avoid placing fixtures where they’ll be directly visible, as the light source itself creates harsh hot spots that ruin the effect.
Create lighting zones based on function and usage patterns. Separate security lighting from ambiance lighting, and group fixtures by area (front yard, backyard, driveway). This zoning allows independent control through your smart timer, enabling different schedules and brightness levels for each zone. Use a lux meter app on your smartphone to measure light levels during test placement, aiming for 5-10 lux for ambient lighting and 20-50 lux for task and security areas.
Smart Home Integration Capabilities
Voice Assistant Compatibility
Seamless voice control requires deep integration, not just basic on/off commands. Look for systems that support dimming, color temperature adjustment, and scene activation through natural language: “Alexa, set backyard lights to 50% warm white” should work without complex routine setup. Verify that the skill or action is natively developed by the lighting manufacturer rather than a third-party workaround, as native integration offers more reliable performance and faster response times.
Consider the “local execution” capability, where voice commands process on your network rather than routing through cloud servers. This feature ensures your lights respond during internet outages and reduces latency from 2-3 seconds to near-instantaneous. Check product specifications for “local control” or “offline functionality” support.
Creating Automation Routines and Scenes
Advanced smart timers allow conditional logic beyond simple scheduling. Create routines like “If motion detected on front camera after 11 PM, brighten driveway lights to 100% for 5 minutes, then return to 20%.” Use geofencing to trigger welcome lighting when your phone enters the property. Integrate with weather services to automatically adjust brightness during fog or rain for improved visibility.
Scene creation should offer granular control over fade times, allowing smooth transitions between settings. A 3-5 second fade prevents jarring light jumps when activating evening scenes. Look for systems that support cross-fading between scenes, gradually shifting from “Dinner Party” to “Late Night Security” over 30 minutes as guests depart.
Multi-Platform Synchronization
If you use multiple smart home platforms (e.g., HomeKit for personal devices and Alexa for family access), ensure your lighting system bridges both ecosystems without conflict. Some smart timers support simultaneous connections to multiple platforms, while others require choosing a primary ecosystem. The best systems maintain state synchronization across platforms—dimming lights through Alexa immediately reflects the change in HomeKit and vice versa.
Check for IFTTT (If This Then That) or direct API access for custom integrations. This flexibility lets you connect landscape lighting to unconventional triggers like cryptocurrency price alerts (“Blink lights if Bitcoin drops below $30,000”) or sports scores (“Flash team colors when the home team scores”). While niche, these capabilities indicate a robust, open platform that won’t limit future creativity.
Power Efficiency and LED Performance
Understanding True Wattage Consumption
LED power ratings can be misleading. A “5-watt” spotlight might actually consume 5.8 watts due to driver inefficiencies. This difference seems minor until you’re powering 20 fixtures and exceed your transformer’s capacity. Look for “system wattage” or “input wattage” specifications rather than LED chip ratings. Quality fixtures include efficient drivers that maintain power factor above 0.9, reducing wasted energy and preventing transformer overload.
Smart timers themselves consume standby power—typically 1-3 watts for Wi-Fi models and less than 1 watt for Bluetooth or Zigbee versions. In a large system with multiple smart components, this vampire draw can add $10-20 annually to your electric bill. Choose systems with aggressive sleep modes that reduce standby consumption to milliwatts when inactive.
Lumens Per Watt: The True Efficiency Metric
The lumens-per-watt (LPW) ratio reveals real-world efficiency. Entry-level LEDs achieve 80-100 LPW, while premium chips exceed 150 LPW. This difference means a 150 LPW fixture produces the same light as a 100 LPW fixture while using 33% less power. Over a 10-fixture system running 6 hours nightly, that translates to 60 watts saved, or about $30 annually.
High LPW ratings often correlate with better heat management, as efficient LEDs generate less waste heat. Excessive heat degrades LED lifespan and color quality. Look for fixtures with thermal management features like heat sinks, ceramic substrates, or active cooling in high-power models. The best smart timers monitor fixture temperature and automatically dim overheating units to prevent permanent damage.
Durability and Weatherproofing Standards
Material Selection: Pros and Cons
Solid brass fixtures weigh more and cost 2-3 times aluminum alternatives, but they develop a protective patina that can last 30+ years. The material won’t corrode in salt-air environments, making it ideal for coastal properties. Machined brass threads maintain their integrity through countless adjustments, unlike stripped aluminum fittings.
Powder-coated aluminum offers excellent value, with marine-grade coatings providing 10-15 year lifespans in most climates. Ensure the coating is UV-stabilized and applied via electrostatic deposition for uniform coverage. Composite and polymer fixtures resist corrosion completely and work well in modern architectural settings, but they can become brittle after a decade of sun exposure and typically carry shorter warranties.
IP Rating System Explained
The IP rating’s first digit measures dust protection (0-6), while the second measures water protection (0-9). IP65 fixtures withstand dust and water jets from any direction, sufficient for most landscape applications. IP67 handles temporary immersion up to 1 meter, important for fixtures in flood-prone areas. IP68 allows continuous submersion beyond 1 meter, necessary for pond and fountain lighting.
Pay attention to cable entry points and connection seals. A fixture rated IP65 can fail if cable connections aren’t equally protected. Look for systems with IP68-rated connectors and gel-filled wire nuts that maintain seal integrity even if the connection is submerged. Some premium systems use magnetic connectors that automatically seal when mated, eliminating the weak point of threaded connections.
Expected Lifespan and Warranty Coverage
LED lifespan ratings (L70, L80, L90) indicate when brightness degrades to a percentage of original output. A 50,000-hour L70 rating means the LED maintains 70% brightness after 50,000 hours—roughly 11 years of nightly use. However, this assumes optimal operating conditions. Poor heat management, voltage fluctuations, or moisture intrusion can cut lifespan by 60-70%.
Warranty terms reveal manufacturer confidence. Look for 5-year warranties on fixtures and 3-year warranties on smart timer modules. Be wary of lifetime warranties that exclude electronics or prorate coverage after the first year. Read fine print for exclusions: coastal corrosion, lightning damage, and improper installation often void coverage. The best warranties include advance replacement programs that ship new units before you return failed ones, minimizing downtime.
Advanced Smart Features That Add Value
Astronomical Timing and GPS Sync
Astronomical timers calculate sunrise and sunset times for your exact location using GPS coordinates, automatically adjusting throughout the year. This precision eliminates the gradual drift of manual timers and accounts for daylight saving time changes. The best systems sync weekly with internet time servers, ensuring accuracy within seconds.
Some advanced timers incorporate civil, nautical, and astronomical twilight definitions. Civil twilight (sun 0-6 degrees below horizon) provides enough ambient light for security cameras, while astronomical twilight (sun 12-18 degrees below horizon) represents true darkness. Being able to trigger different lighting zones at these distinct thresholds creates nuanced automation impossible with simple photocells.
Dynamic Dimming and Color Changing
True dynamic dimming adjusts brightness in 1% increments rather than coarse 10-20% steps. This granularity lets you fine-tune lighting to exactly 3.7 lux for subtle pathway illumination. Look for timers that support logarithmic dimming curves, which match human eye sensitivity—small changes at low brightness levels and larger changes at high levels feel more natural.
Color-changing capabilities extend beyond RGB party effects. Tunable white (2700K-6500K) supports circadian rhythm lighting, gradually shifting from cool, energizing morning light to warm, relaxing evening tones. Some systems simulate candlelight flicker or moonlight shimmer for special effects. Ensure the timer can store these complex sequences locally, so they continue running even if your Wi-Fi fails.
Motion Sensors and Adaptive Lighting
Integrated PIR (passive infrared) sensors detect body heat, triggering lights when people approach. Advanced systems use dual-tech sensors combining PIR with microwave detection, reducing false triggers from animals or moving branches. Adjustable sensitivity zones let you ignore movement beyond 20 feet while responding to activity within 10 feet.
Adaptive brightness learns your usage patterns and automatically adjusts. If you typically arrive home at 6:15 PM, the system gradually brightens the driveway starting at 6:10 PM. If no motion is detected by 7 PM, it dims to save energy. Some systems integrate with smart doorbells, brightening entry lighting when the doorbell rings after dark, then returning to previous levels after a set duration.
Troubleshooting Common Smart Timer Issues
Connectivity Dropouts and Solutions
Wi-Fi timers often disconnect due to weak signals at the transformer location. Install a Wi-Fi extender or mesh node in your garage to boost signal strength. Some systems support external antenna modifications, allowing you to position a high-gain antenna indoors while the timer remains weather-protected outdoors. Check for firmware updates that improve reconnection logic—early versions often fail to reconnect after router reboots.
Bluetooth systems suffer from range limitations and phone-dependent operation. If your timer becomes unreachable, clear your phone’s Bluetooth cache and re-pair. For persistent issues, disable Wi-Fi on your phone during pairing to force a clean Bluetooth connection. Some timers support Bluetooth mesh networking, where each fixture acts as a repeater, extending range across large properties.
Voltage Drop and Flickering
Flickering often indicates voltage drop below the LED driver’s minimum operating voltage. Measure voltage at the last fixture on a run—it should be within 1 volt of the first fixture. If it’s lower, upgrade cable gauge or split the run. Some smart timers include voltage monitoring that alerts you when fixtures receive insufficient power, pinpointing problems before they cause permanent driver damage.
Inrush current from multiple LEDs turning on simultaneously can also cause flickering. Quality smart timers include soft-start functionality, ramping voltage over 0.5-1 seconds to prevent current spikes. If flickering occurs randomly, check for loose connections—especially wire nuts that have corroded or weren’t properly twisted. Dielectric grease in connections prevents moisture intrusion that causes intermittent faults.
Factory Reset and Re-pairing Procedures
When all else fails, factory resets often resolve corrupted settings. Most smart timers use a specific power-cycle sequence: turn off power for 5 seconds, on for 2 seconds, off for 5 seconds, then on and hold a reset button for 10 seconds. Consult documentation—incorrect sequences can enter diagnostic modes or wipe firmware.
After resetting, re-pairing requires careful sequence. Power on the timer first, wait for it to enter pairing mode (usually indicated by a blinking LED), then initiate discovery from your app. Pairing with the timer too close to your router can cause commissioning failures—stand at least 10 feet away to avoid signal overload. Some systems require temporarily disabling 5GHz Wi-Fi during pairing to force 2.4GHz connection, which many timers exclusively use.
Maintenance Best Practices
Seasonal Cleaning and Lens Care
Mineral deposits and organic debris reduce light output by 20-40% over a season. Clean lenses quarterly using a soft brush and mild soap solution. Avoid harsh chemicals or pressure washers that can damage seals. For stubborn hard water stains, use a 50/50 vinegar-water solution applied with a microfiber cloth. Clean fixtures when cool—spraying cold water on hot lenses can cause thermal shock and cracking.
Check and tighten all adjustment screws during cleaning. Vibration from wind and lawn equipment gradually loosens fixtures, causing them to drift from aimed positions. Apply a small dab of thread-locking compound to critical adjustments to prevent movement while still allowing future repositioning. Inspect cable connections for corrosion, especially in coastal areas where salt air accelerates oxidation.
Winterization and Weather Protection
In freeze-thaw climates, water intrusion into fixtures and connectors expands when frozen, cracking housings and compromising seals. Before first freeze, verify all fixtures are draining properly—remove and shake them to ensure no water is trapped inside. Elevate transformers above potential snow drifts and ensure ventilation isn’t blocked by ice formation.
Smart timer electronics are vulnerable to extreme cold. Most operate reliably down to -4°F (-20°C), but prolonged exposure below 0°F can cause LCD displays to fail and Wi-Fi chips to malfunction. Install timers in sheltered locations or use insulated enclosures. Some premium units include internal heaters that activate below freezing, maintaining operational reliability at the cost of slightly higher standby power consumption.
Firmware Updates and Security Patches
Smart timers require regular updates to patch security vulnerabilities and add features. Enable automatic updates but schedule them during daytime hours to avoid unexpected nighttime outages. Some systems allow staging updates, letting you test new firmware on a single zone before rolling out system-wide.
Security is critical—unpatched timers can become entry points for home network attacks. Change default passwords immediately, use WPA3 Wi-Fi encryption, and create a separate IoT network for lighting devices. Disable remote access features you don’t use, and review device logs monthly for suspicious connection attempts. Some enterprise-grade timers support VPN connections, adding an extra security layer for remote management.
Budget and Value Considerations
Total Cost of Ownership Analysis
The sticker price only tells part of the story. A $50 smart spotlight with 150 LPW efficiency and a 10-year warranty costs less over its lifetime than a $25 fixture with 80 LPW efficiency and a 2-year warranty. Factor in energy savings: the efficient fixture saves $3-5 annually in electricity, paying back the $25 price difference in 5-7 years while continuing to save money for the remainder of its longer lifespan.
Include installation costs in your analysis. Systems requiring proprietary connectors or complex programming may need professional installation at $75-125 per hour. DIY-friendly systems with magnetic connectors and app-based setup guides save hundreds in labor costs. However, professional installation often includes system design services, warranty support, and code compliance verification that justify the expense for complex projects.
DIY vs. Professional Installation
DIY installation works for simple systems with 5-10 fixtures and clear transformer placement. Most homeowners can complete basic layouts in a weekend using plug-and-play connectors. Challenges arise with voltage drop calculations, complex zone wiring, and smart home integration troubleshooting. If your property requires trenching under driveways or has extensive hardscaping, professional installation prevents costly mistakes.
Professional installers bring design expertise that elevates results from functional to spectacular. They understand photometrics—how light interacts with surfaces—and can predict how your specific plantings and architecture will look when illuminated. Many offer maintenance contracts that include seasonal adjustments, bulb replacements, and firmware updates, ensuring your system performs optimally year after year.
Hidden Expenses to Anticipate
Cable burial requires conduit in some jurisdictions, adding $1-2 per linear foot. Transformer mounting pads or posts cost $30-80. Smart home hubs compatible with your chosen protocol run $50-150 if you don’t already own one. Professional-grade wire connectors and waterproof junction boxes add $2-5 per connection but prevent failures that cost more to repair later.
Don’t forget the cost of your time. Programming complex scenes and troubleshooting connectivity issues can consume 5-10 hours initially. App subscriptions are another hidden cost—some manufacturers charge $3-10 monthly for advanced features like astronomical timing or multi-user access. Verify whether premium features require ongoing payments or are included in the purchase price.
Safety and Electrical Code Compliance
National and Local Code Requirements
The National Electrical Code (NEC) Article 411 governs low-voltage lighting. Transformers must be UL 1838 listed for landscape use, not general-purpose low-voltage transformers. Cable burial depth requirements vary: direct burial cable needs 6 inches in non-traffic areas and 18 inches under driveways, though local codes may be stricter. Conduit provides mechanical protection and may be required near utilities or in commercial installations.
GFCI protection is mandatory for all 120V transformer connections. Use weather-resistant GFCI outlets with “in-use” covers that protect plugs from moisture. Hardwired transformers require GFCI protection in the breaker panel. Some jurisdictions mandate AFCI/GFCI combination protection for outdoor circuits. Always pull permits for new 120V circuits, even if low-voltage wiring doesn’t require inspection.
GFCI and Overload Protection
Transformers should include built-in circuit breakers or fuses on the low-voltage side. This protection prevents cable overheating if a short occurs and protects the transformer from damage. Magnetic breakers reset automatically after cooling, while thermal fuses require replacement. Some smart transformers include electronic protection that disconnects individual zones, isolating faults without shutting down the entire system.
Test GFCI outlets monthly using the test button. Outdoor outlets exposed to weather can fail silently, leaving you unprotected. If your transformer repeatedly trips the GFCI, don’t just reset it—investigate. Moisture in connections, damaged cable insulation, or failing LED drivers can leak small currents to ground that accumulate over time. Smart timers with leakage current monitoring can detect these issues before they become dangerous.
Proper Cable Burial and Protection
Direct burial cable features rugged insulation rated for underground use, but physical protection prevents accidental damage from digging, aerating, or rodent chewing. Install warning tape 6 inches above buried cable to alert future excavators. In planting beds, route cables through PVC conduit where annual cultivation occurs. Near trees, use flexible conduit to accommodate root growth without crushing cables.
Cable connections must be waterproof. Twist-on wire nuts filled with dielectric grease work for temporary installations but fail within 2-3 years. Heat-shrink tubing with internal adhesive creates permanent, waterproof seals. Premium systems use gel-filled underground splice kits that maintain IP68 ratings even when buried directly. Never bury connections without protection—moisture wicks through wire strands, traveling feet from the connection point to corrode fixtures and timers.
Professional Design Techniques
Layering Light: Ambient, Task, and Accent
Professional lighting design combines three layers. Ambient lighting provides overall illumination at 1-3 lux, typically from wide-beam spotlights washing walls or shining through tree canopies. Task lighting delivers 10-20 lux for specific functions: pathway navigation, grilling, or stair safety. Accent lighting creates drama at 50+ lux, highlighting specimen plants, water features, or architectural details.
Smart timers orchestrate these layers independently. Ambient lighting might run from dusk until 11 PM, then dim to 20% for security. Task lighting activates only when motion is detected or when you manually trigger “Cooking Mode.” Accent lighting runs on a separate schedule, perhaps illuminating a fountain only on weekend evenings. This layering creates depth and prevents the “runway” effect of uniformly bright path lights.
Strategic Placement: Uplight, Downlight, Cross-light
Uplighting from ground level creates dramatic shadows and emphasizes texture. Place spotlights 6-12 inches from the target, angling upward at 30-45 degrees. Avoid aiming directly at windows or neighboring properties—use shielded fixtures or lower brightness to prevent light trespass. Downlighting from trees or eaves simulates moonlight, casting natural-looking shadows. Install downlights 15-20 feet high, aiming through branches to create dappled patterns.
Cross-lighting illuminates objects from two opposing angles, reducing harsh shadows and revealing three-dimensional form. This technique works beautifully for statues and textured walls. Smart timers with zone control let you fade cross-lights in opposite directions, creating dynamic effects that make static sculptures appear to move. Experiment with timing offsets of 0.5-1 seconds between fixtures for subtle animation.
Avoiding Common Design Pitfalls
The most common mistake is over-lighting. Start with fewer fixtures than you think you need—it’s easier to add light than remove it. Use the “20% rule”: install fixtures at 80% of your planned quantity, live with it for two weeks, then add the final 20% only where truly necessary. This approach saves money and prevents light pollution.
Avoid uniform spacing along paths. Instead, light decision points: intersections, steps, and direction changes. Leave dark stretches between lit areas—your eyes adapt, and the contrast makes the journey more interesting. Never place path lights directly opposite each other, which creates a “runway” effect. Instead, stagger them in a zigzag pattern, spacing 8-10 feet apart for 2-foot-wide paths and 12-15 feet for wider walkways.
Future-Proofing Your Investment
Modular Systems and Expandability
Choose systems with standardized connectors and open protocols that allow mixing brands. Proprietary systems may offer polished integration but lock you into a single ecosystem, forcing complete replacement if the manufacturer discontinues support. Look for transformers with 25-50% unused capacity and multiple output taps, allowing you to add fixtures without replacing the entire power supply.
Modular smart timer designs let you upgrade the control module without replacing the transformer. Some systems use removable timer cartridges—swap a basic Bluetooth timer for an advanced Wi-Fi model in minutes. This upgradability extends system life and lets you adopt new technologies without rewiring. Verify that fixture connectors are industry-standard or use widely available adapters to prevent obsolescence.
Emerging Technology Standards
Matter standard adoption will transform smart lighting over the next 2-3 years. Early Matter-compatible devices may command a premium but ensure interoperability with future smart home platforms. Thread networking, which Matter uses for low-power devices, creates self-healing mesh networks that are more reliable than Wi-Fi for outdoor applications where signal strength fluctuates.
Power over Ethernet (PoE) lighting is emerging for low-voltage applications. PoE delivers both power and data through a single cable, eliminating separate transformer and communication wiring. While currently limited to commercial installations, residential PoE lighting systems will likely appear within 5 years, offering centralized UPS backup and precise individual fixture control. Consider installing conduit sized for future Ethernet cables when burying low-voltage cable now.
Upgrade Path Planning
Document your installation thoroughly: photograph cable routes, note transformer settings, and save all manuals and firmware versions. This documentation makes future upgrades painless. Store a few spare fixtures and connectors—manufacturers discontinue models, and having matching spares ensures consistent appearance if you need replacements.
Plan for LED module replacement rather than entire fixture replacement. Quality fixtures allow swapping the LED engine while keeping the housing and mount. This approach costs 40-60% less than full fixture replacement and reduces installation labor. Ask manufacturers about LED module availability and cost before purchasing—some budget fixtures use sealed designs that require complete replacement when LEDs fail.
Frequently Asked Questions
1. Can I add smart timers to my existing low-voltage lighting system, or do I need to replace everything?
Most existing systems can be upgraded by replacing the transformer with a smart transformer or adding a smart timer module between your current transformer and fixtures. However, compatibility depends on your fixtures’ voltage requirements and connection type. Systems using standard 12V AC MR16 bulbs typically upgrade seamlessly, while proprietary LED arrays may require new fixtures. Always verify voltage compatibility and connector types before purchasing upgrade components.
2. How do smart timers handle power outages and do I need to reset everything when power returns?
Quality smart timers include non-volatile memory that preserves schedules and settings during outages. Most automatically resume normal operation within 1-2 minutes of power restoration, syncing time from the internet or internal battery-backed clocks. Premium units feature supercapacitors that maintain timekeeping for up to 7 days without power, ensuring astronomical schedules remain accurate. However, you may need to manually resync with your smart home hub if the outage exceeded the device’s offline timeout period.
3. What’s the realistic wireless range for controlling smart outdoor spotlights, and how can I extend it?
Wi-Fi timers typically require a signal strength of -70 dBm or better, which usually means within 100 feet of your router with minimal obstructions. Bluetooth range is 30-50 feet line-of-sight. To extend range, install a Wi-Fi mesh node in your garage, use a timer with external antenna capability, or choose a hub-based system that creates its own mesh network where each fixture acts as a repeater. Powerline adapters with Wi-Fi access points can also bring network connectivity to detached garages or far corners of large properties.
4. Will smart timers work in extreme cold climates where temperatures regularly drop below -20°F?
Most consumer smart timers are rated for -4°F to 122°F operation. Below -4°F, LCD displays may freeze and Wi-Fi chips can fail to transmit. For extreme cold, install timers in insulated enclosures or choose commercial-grade units rated for -40°F. Some premium models include internal heaters that activate below freezing, maintaining operational temperature. Alternatively, mount the timer in a heated garage and run low-voltage cable to outdoor fixtures, keeping sensitive electronics protected while lights operate normally in harsh conditions.
5. How much energy do smart timers actually save compared to photocell or manual timers?
Smart timers with astronomical scheduling save 15-20% over photocells by eliminating false triggers from overcast days and adjusting precisely to actual sunset/sunrise times. Compared to manual timers set to generic “dusk to dawn” intervals, savings reach 30-40% through seasonal adjustments and zone-based scheduling. Adding motion-triggered dimming and adaptive brightness can push total savings to 50-60% versus always-on lighting. For a typical 10-fixture system, this translates to $40-80 annual savings, meaning the smart timer pays for itself in 2-3 years.
6. Can I integrate smart outdoor spotlights with my existing security cameras and alarm system?
Yes, through several methods. Most smart timers support IFTTT, allowing you to create applets like “If camera detects motion, then brighten lights.” Systems with local API access enable direct integration with DVR/NVR systems that support HTTP triggers. For professional security systems, look for timers with dry contact inputs that connect directly to alarm panel outputs. The most seamless integration comes from all-in-one platforms like Alarm.com or proprietary ecosystems where cameras, lights, and sensors communicate through a unified hub, enabling complex rules like “If alarm is armed away and camera 1 detects person, flash all lights and record video.”
7. What’s the difference between constant voltage and constant current LED drivers, and which works better with smart timers?
Constant voltage drivers (12V or 24V) power parallel-connected LEDs, making them compatible with standard low-voltage transformers and smart timers. They’re flexible but suffer from brightness variations if voltage drops along the cable run. Constant current drivers regulate amperage to each LED, ensuring uniform brightness regardless of minor voltage fluctuations, but require specialized timers that can handle current regulation. For most residential smart timer applications, constant voltage systems offer better compatibility and easier troubleshooting. If you choose constant current fixtures, verify your smart timer supports current-controlled output or use an external driver with 0-10V dimming control.
8. How do I prevent my smart outdoor lights from being hacked or accessed by unauthorized users?
Start by changing default passwords and using WPA3 encryption on your Wi-Fi network. Create a separate VLAN or guest network for IoT devices, isolating them from computers and personal data. Disable remote access unless you truly need it—many systems allow local control without cloud connectivity. Enable two-factor authentication on your lighting app account. Regularly check for firmware updates and install them within 30 days of release. Some enterprise-grade timers support certificate-based authentication and VPN connections, offering bank-level security. Finally, review device logs monthly for unknown IP addresses or connection attempts, and disable UPnP on your router to prevent external devices from automatically opening ports.
9. Can smart timers control both LED and halogen fixtures on the same system?
Technically yes, but it’s problematic. Halogen bulbs have high inrush current—up to 10 times their operating wattage when cold—which can overload smart timer relays not designed for such loads. The voltage drop characteristics differ significantly, making consistent brightness difficult across mixed loads. Additionally, halogen’s shorter lifespan (2,000 vs. 50,000 hours) means frequent bulb changes and associated labor. If you must mix them, use a separate transformer and timer for halogen fixtures, or choose a smart timer with high inrush capacity relays (rated for 200% of total load). The better approach is to replace halogen with LED retrofits that maintain the same color temperature and beam angle while providing smart timer compatibility.
10. What should I do if my smart timer loses connection to my phone but the lights still follow their schedule?
This indicates a partial connectivity failure—local timer memory is working, but cloud or direct communication is disrupted. First, try controlling the lights from another device on the same network to isolate whether the issue is your phone or the timer. If multiple devices can’t connect, power-cycle the timer and your router. Check if the timer’s IP address changed (enable DHCP reservation in your router settings to prevent this). If the timer connects via a hub, ensure the hub is online and within range. For Wi-Fi timers, verify that your router hasn’t auto-switched to a channel the timer doesn’t support (many only work on channels 1-11). As a last resort, perform a soft reset that preserves schedules while clearing network settings, then re-pair without doing a full factory reset.