Transforming your house into a truly intelligent home requires more than just smart bulbs and voice assistants—it demands precise environmental awareness. Temperature monitoring sits at the heart of comfort, energy efficiency, and property protection, yet many smart home enthusiasts struggle with flaky cloud-dependent sensors that stop working when the internet hiccups. Enter MQTT-enabled temperature sensors: the unsung heroes of reliable, local-first Home Assistant automations. These compact powerhouses communicate directly with your MQTT broker, delivering real-time data without relying on proprietary hubs or external servers.
Whether you’re orchestrating a sophisticated multi-zone climate control system, building leak detection sentinels for your vacation home, or simply want to know if your garage freezer is acting up, understanding what separates exceptional MQTT temperature sensors from mediocre ones will save you countless hours of troubleshooting and frustration. This comprehensive guide dives deep into the technical considerations, strategic placement strategies, and advanced automation patterns that will elevate your Home Assistant setup from basic to brilliant—without locking you into specific product ecosystems.
Top 10 MQTT-Enabled Temperature Sensors for Home Assistant
Detailed Product Reviews
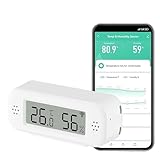
1. LinknLink Thermometer and Hygrometer eTHS, WiFi Smart Temperature and Humidity Monitor Sensor, APP Phone Alert, TH2MQTT Home Assistant, Compatible with Alexa Google Home, No Hub Required

Overview: The LinknLink eTHS is a WiFi-enabled environmental sensor designed for smart home enthusiasts seeking accurate temperature and humidity monitoring. Featuring Swiss-made Sensirion sensor technology, it delivers professional-grade accuracy with temperature precision within ±0.54°F and humidity within ±2%RH. The device directly connects to 2.4G WiFi networks without requiring an additional hub, making it an accessible entry point for Home Assistant integration.
What Makes It Stand Out: The standout feature is native TH2MQTT support for Home Assistant, allowing seamless automation without cloud dependency. Data refreshes every 2 seconds for real-time responsiveness, and the generous 3-year free data storage exceeds most competitors. The ability to export full historical data to Excel provides excellent record-keeping for environments like greenhouses, wine cellars, or server rooms.
Value for Money: At $19.99, this sensor punches above its weight class. Competing devices with similar accuracy and Home Assistant MQTT support typically cost $30-40. The elimination of a hub saves additional expenses, while the free long-term data storage removes subscription fees that competitors often charge.
Strengths and Weaknesses: Strengths include exceptional accuracy, rapid data refresh, robust Home Assistant integration, and unparalleled free data storage. The WiFi connection ensures reliable remote access without Bluetooth range limitations. Weaknesses include 2.4G-only WiFi support (no 5G), potential complexity for non-technical users, and reliance on cloud services for app functionality despite MQTT capability.
Bottom Line: Ideal for Home Assistant users and smart home tinkerers, the LinknLink eTHS offers professional monitoring capabilities at a consumer price. While casual users may find simpler options, the accuracy, integration flexibility, and long-term data storage make it a top choice for serious environmental monitoring.
2. WiFi Thermometer Hygrometer: Smart Temperature and Humidity Sensor, Real-time Monitor, App Notification, Digital Indoor Temperature Sensor, Compatible with Alexa/Google Home(1Pack)

Overview: This budget-friendly WiFi sensor provides essential temperature and humidity monitoring through the widely-used Tuya/Smart Life ecosystem. Designed for plug-and-play simplicity, it measures temperature from -10°C to 60°C and humidity from 0-99% RH, making it suitable for everyday indoor applications like baby rooms, pet areas, and wine storage. The device integrates seamlessly with Alexa and Google Assistant for convenient voice queries.
What Makes It Stand Out: The sensor’s primary advantage is its ultra-compact design with multiple mounting options—flat placement, hanging, wall-mounting, or magnetic attachment. This versatility allows monitoring in tight spaces like cigar boxes, guitar cases, or drawers. The Tuya/Smart Life app enables smart scene automation, triggering devices like fans or dehumidifiers based on environmental thresholds.
Value for Money: At $14.99, this is one of the most affordable WiFi environmental sensors available. It delivers core smart home functionality without the premium price tag of specialized devices. While accuracy is modest (±5% RH), it’s sufficient for general household use where absolute precision isn’t critical.
Strengths and Weaknesses: Strengths include unbeatable price, easy 2-minute setup, broad voice assistant compatibility, and flexible installation. The Tuya ecosystem offers extensive device interoperability. Weaknesses include lower humidity accuracy compared to premium sensors, 2.4G WiFi limitation, dependency on cloud services, and lack of advanced protocols like MQTT for local control.
Bottom Line: Perfect for smart home beginners or those needing simple, affordable monitoring in multiple locations. While not suitable for precision-critical applications, its low cost and easy integration make it an excellent value for general household use and basic automation scenarios.
3. Smart Wireless Temperature Sensor/Humidity Sensor Wide Range (-22 to 158 Degrees) for Fridge Monitoring Pet Cage/Tank Monitoring, Smartphone Alerts, Compatible with Alexa IFTTT - Hub Included

Overview: This specialized sensor leverages LoRa technology to solve a critical problem: monitoring extreme environments where WiFi fails. With an impressive temperature range of -22°F to 158°F and the ability to transmit through metal boxes, refrigerators, and across multiple floors, it’s engineered for challenging monitoring scenarios. The included hub creates a dedicated low-power network with up to 1/4 mile open-air range.
What Makes It Stand Out: LoRa’s exceptional penetration and range make this uniquely suitable for fridge/freezer monitoring, outdoor barns, chicken coops, and metal mailboxes—applications where standard WiFi sensors simply don’t work. Battery life spans years rather than months, eliminating frequent maintenance. The system includes a hub with both Ethernet and WiFi connectivity options for flexible installation.
Value for Money: At $37.99 including a hub, the price is justified for its specialized capabilities. While significantly more expensive than basic WiFi sensors, it replaces costly appliance-specific monitors and prevents thousands in potential food spoilage or equipment damage. The long-term battery savings and reliability add further value.
Strengths and Weaknesses: Strengths include unparalleled range, excellent obstacle penetration, extreme temperature tolerance, multi-year battery life, and included hub. It excels in livestock, refrigeration, and remote monitoring. Weaknesses include higher upfront cost, limited Alexa support (temperature only, no routines), IFTTT restrictions, and potential overkill for simple indoor room monitoring.
Bottom Line: Essential for anyone needing reliable monitoring in challenging environments. Whether protecting a freezer full of food, monitoring a pet habitat, or managing agricultural spaces, this LoRa system’s reliability and range justify its premium price. Not recommended for basic room monitoring where WiFi sensors suffice.
4. MONIGEAR Network Temperature Humidity Monitor, THERMOMETER, Environmental Sensor, Supports MQTT, BACnet, SNMP, Modbus TCP, PoE Power Supply

Overview: The MONIGEAR environmental sensor is a professional-grade monitoring solution built for IT infrastructure, commercial buildings, and advanced smart home installations. Supporting industrial protocols including MQTT, BACnet, SNMP, and Modbus TCP simultaneously, it integrates seamlessly with enterprise systems, Home Assistant, AWS, and Azure IoT platforms. Power over Ethernet (PoE) provides reliable, centralized power and network connectivity.
What Makes It Stand Out: This device stands apart with its multi-protocol support and enterprise security features, including SNMP v1/v2/v3 and SNMP Trap v2c/v3. Unlike consumer sensors, it can feed data to multiple systems concurrently—ideal for facilities requiring both building management integration and cloud analytics. The graphical configuration tool works across Windows, Linux, and macOS, simplifying deployment.
Value for Money: At $71.99, this is a professional tool, not a consumer gadget. For commercial applications requiring BACnet or SNMP, it’s remarkably affordable compared to traditional building sensors costing hundreds. For home users, it’s overpriced unless you specifically need its advanced protocol support and PoE convenience.
Strengths and Weaknesses: Strengths include robust multi-protocol support, PoE power, enterprise-grade security, simultaneous multi-system integration, and reliable email alerts. The configuration tool and remote upgrade capability ease maintenance. Weaknesses include complexity unsuitable for beginners, lack of wireless flexibility, no built-in display, and price point prohibitive for casual users.
Bottom Line: An exceptional value for professionals managing server rooms, commercial buildings, or sophisticated Home Assistant setups requiring industrial protocol support. Home users should only consider this if they need PoE convenience or specific protocol compatibility. For standard smart home monitoring, simpler and cheaper alternatives exist.
5. MONIGEAR Indoor Air Quality Monitor, 3-in-1 Temperature Humidity CO2 Sensor, AWS/Azure/Tuya IoT with PoE, LCD Display, Protocol: MQTT, BACnet, SNMP, Modbus TCP, Home Assistant Ready, Email/IFTTT alarm

Overview: This professional 3-in-1 environmental monitor adds CO2 detection (0-2000ppm) to the comprehensive protocol support of its sibling product, creating a complete air quality solution for commercial and health-conscious residential spaces. With ±0.3°C temperature accuracy and ±3% humidity precision, it delivers laboratory-grade measurements while supporting MQTT, BACnet, SNMP, and Modbus TCP protocols for seamless integration with building management systems, Home Assistant, and major cloud platforms.
What Makes It Stand Out: The integrated CO2 sensor transforms this from a simple climate monitor to a critical health and productivity tool, essential for offices, schools, and homes focused on air quality. The LCD display provides at-a-glance readings without checking an app. PoE power ensures uninterrupted operation, while simultaneous multi-protocol support allows feeding data to HVAC systems, cloud analytics, and automation platforms concurrently.
Value for Money: At $90.99, this represents excellent value for commercial air quality monitoring, where standalone CO2 sensors often exceed $150. For residential users prioritizing air quality, it’s a premium but justified investment. The combination of CO2 monitoring, professional protocols, and PoE in one device eliminates the need for multiple separate sensors.
Strengths and Weaknesses: Strengths include comprehensive 3-in-1 monitoring, professional-grade accuracy, robust multi-protocol support, PoE convenience, local LCD display, and customizable email/IFTTT alerts. Weaknesses include the highest price in this comparison, complexity requiring technical knowledge, and potential feature overkill for basic temperature/humidity needs.
Bottom Line: Perfect for offices, schools, healthcare facilities, and health-focused smart homes needing reliable CO2 monitoring alongside temperature and humidity. The professional features and accurate sensors justify the cost for air quality-conscious users, though simpler sensors suffice for basic climate tracking.
6. Smart Digital Thermometer Hygrometer, WiFi Indoor Temperature & Humidity Sensor for Home Use, Mini Humidity Monitor with App Remote Monitoring, Data Export, Compatible with Alexa. 1 PCS
Overview: The Smart Digital Thermometer Hygrometer is an entry-level WiFi sensor designed for homeowners seeking basic environmental monitoring. This $14.99 device connects directly to 2.4GHz networks, eliminating the need for proprietary hubs while offering Smart Life app integration for remote monitoring.
What Makes It Stand Out: Its smart scene automation capabilities set it apart from basic monitors. You can trigger humidifiers or air conditioners automatically when readings exceed preset thresholds. The compact design supports both tabletop and wall mounting, making it versatile for any space. Alexa voice integration allows hands-free temperature checks, though data won’t display in the Alexa app.
Value for Money: At $14.99, this sensor undercuts many competitors while delivering core smart features. WiFi connectivity avoids the hidden costs of hub-based systems. While accuracy (±5% RH, ±1°C) isn’t lab-grade, it’s sufficient for home climate control and preventing mold or dryness issues.
Strengths and Weaknesses: Strengths include hub-free WiFi setup, smart scene creation, dual mounting options, and instant app alerts when conditions drift outside your comfort zone. The compact size fits discreetly anywhere. Weaknesses are the 2.4GHz-only limitation, moderate humidity accuracy, and limited Alexa integration (voice queries only). The Smart Life app, while functional, lacks the polish of premium alternatives.
Bottom Line: This sensor excels as an affordable entry point into smart home climate monitoring. Perfect for beginners wanting automated alerts and basic device triggers without investing in a hub ecosystem.
7. Chatthen Zigbee Temperature Sensor, Humidity Sensor Thermometer for House, Compatible with Alexa & Google Assistant, eWeLink APP for Remote Monitoring and Home Automation, ZigBee 3.0 Hub Required

Overview: The Chatthen Zigbee Temperature Sensor targets users with established smart home ecosystems requiring precise environmental data. At $12.99, it delivers professional-grade accuracy but requires a Zigbee 3.0 hub, making it ideal for those already invested in platforms like SmartThings or Hubitat.
What Makes It Stand Out: Exceptional ±0.3°C temperature accuracy and ±5%RH humidity precision put this sensor ahead of budget WiFi alternatives. Data refreshes every five minutes, providing near real-time monitoring. The eWeLink app offers six months of free cloud storage with exportable hourly data, perfect for tracking trends and identifying patterns in your home’s climate.
Value for Money: The $12.99 price is deceptive—factor in a $30-50 Zigbee hub for full functionality. For existing Zigbee users, it’s outstanding value. For newcomers, total cost approaches premium WiFi sensors. The accuracy justifies the investment for wine cellars, nurseries, or server rooms where precision matters.
Strengths and Weaknesses: Strengths include industry-leading accuracy, fast refresh rates, robust data logging, and reliable app notifications. The Zigbee protocol ensures stable, low-power operation. Weaknesses: mandatory hub requirement limits appeal, eWeLink app isn’t as intuitive as TUYA or Smart Life, and hourly data logging may miss rapid fluctuations.
Bottom Line: Best suited for smart home veterans with Zigbee infrastructure. If you already own a compatible hub, this sensor’s accuracy and data features are unbeatable at the price. Otherwise, consider hub-free alternatives.
8. Honeywell Home RCHTSENSOR-1PK, Smart Room Sensor works with T9/T10 WIFI Smart Thermostats

Overview: Honeywell’s Smart Room Sensor is a premium accessory designed exclusively for T9/T10 thermostat owners. At $32, it extends your HVAC system’s intelligence by monitoring temperature and humidity in specific rooms, enabling targeted comfort rather than whole-house averaging.
What Makes It Stand Out: Motion detection technology allows the sensor to prioritize occupied rooms, automatically adjusting your thermostat based on where people actually are. The ability to schedule bedroom temperature priority at night ensures optimal sleep conditions. This isn’t a standalone device—it’s an integrated ecosystem component that makes your Honeywell thermostat genuinely smart.
Value for Money: The $32 price is steep for a single sensor, but justified for T9/T10 users seeking room-level precision. Comparable multi-room HVAC zoning systems cost hundreds. However, zero compatibility with other brands makes it a niche purchase. For non-Honeywell owners, it’s literally worthless.
Strengths and Weaknesses: Strengths include seamless integration with Honeywell thermostats, intelligent motion-based room focusing, reliable scheduling features, and professional-grade build quality. It solves the classic “hot/cold room” problem elegantly. Weaknesses are extreme proprietary lock-in, high per-unit cost, and lack of standalone functionality. You cannot use this without a compatible Honeywell thermostat.
Bottom Line: If you own a Honeywell T9 or T10 thermostat, this sensor is a game-changing upgrade that delivers true room-by-room comfort control. For everyone else, it’s not an option—look to WiFi or Zigbee alternatives.
9. WiFi Hygrometer Thermometer Sensor: Smart Temperature Humidity Monitor, with Remote Monitor and TUYA APP Notification Alert, High Precision Indoor Thermometer No Hub Required, Work with Alexa (1-Pack)

Overview: This WiFi Hygrometer Thermometer Sensor delivers comprehensive smart features at a budget-friendly $12.99 price point. Operating on the versatile TUYA platform, it requires no hub and connects directly to 2.4GHz WiFi, making it accessible for smart home newcomers and veterans alike.
What Makes It Stand Out: The combination of hub-free operation, multi-platform support (Alexa, Google Home), and robust automation scenes distinguishes this sensor. You can create complex triggers like activating AC when temperature thresholds are exceeded or starting dehumidifiers based on humidity levels. The included two AAA batteries and low-power design ensure extended operation, with app alerts when power runs low.
Value for Money: At $12.99 with no hidden hub costs, this represents exceptional value. The two-year warranty exceeds industry standards, providing peace of mind. Competing sensors with similar feature sets typically cost $20-25, making this a smart financial choice for multi-room monitoring setups.
Strengths and Weaknesses: Strengths include true hub-free WiFi connectivity, versatile mounting options, voice control capabilities, comprehensive app features (graphs, history), and outstanding warranty coverage. The compact size fits anywhere from plant pots to cigar humidors. Weaknesses are 2.4GHz-only limitation, battery dependency requiring periodic replacement, and TUYA app’s learning curve for advanced automations.
Bottom Line: This sensor hits the sweet spot of affordability, features, and reliability. Ideal for most users wanting remote monitoring and smart automations without ecosystem lock-in or hub investments.
10. arre Temperature Humidity Air Pressure Sensor with Matter & Thread Support | Works with Apple Home HomeKit, Google Home, Samsung SmartThings & Amazon Alexa

Overview: The arre Temperature Humidity Air Pressure Sensor represents the next generation of smart home devices with Matter certification and Thread support. At $39.99, it’s the premium choice for tech enthusiasts seeking future-proof interoperability across Apple HomeKit, Google Home, Samsung SmartThings, and Alexa ecosystems.
What Makes It Stand Out: As one of the few Matter-certified environmental sensors, it eliminates platform lock-in while adding air pressure monitoring—a rare feature that helps predict weather changes and optimize HVAC efficiency. Thread connectivity provides mesh-network reliability and faster response times than traditional WiFi, with lower power consumption.
Value for Money: The $39.99 price is high compared to WiFi alternatives, but you’re investing in emerging standards. For multi-platform households, it replaces multiple ecosystem-specific sensors. However, you’ll need a Thread border router (Apple TV 4K, HomePod mini, Echo 4th Gen), adding potential hidden costs.
Strengths and Weaknesses: Strengths include universal Matter compatibility, Thread’s reliable mesh networking, three-in-one sensing capabilities, and true cross-platform flexibility. It’s built for the future smart home. Weaknesses are premium pricing, requirement for Thread border router, and limited availability of advanced features on some platforms as Matter matures.
Bottom Line: Perfect for early adopters and households mixing Apple, Google, and Amazon devices. If you value future-proofing and air pressure data, the premium is justified. For single-platform users, cheaper alternatives suffice.
Why MQTT Matters for Home Assistant Temperature Monitoring
The MQTT Advantage
MQTT isn’t just another wireless protocol—it’s a lightweight publish-subscribe messaging system designed specifically for constrained devices and unreliable networks. Unlike HTTP-based sensors that constantly ping your network with request-response cycles, MQTT sensors maintain a persistent connection and only transmit data when values change or at configurable intervals. This efficiency translates to dramatically lower power consumption, reduced Wi-Fi congestion, and near-instantaneous state updates in Home Assistant.
The decoupled architecture means your sensors don’t need to know anything about Home Assistant directly. They publish to topics like home/bedroom/temperature, and any subscriber (Home Assistant, Node-RED, or even mobile apps) can consume that data simultaneously. This flexibility becomes invaluable when you need to migrate your home automation platform or run parallel systems during transitions.
Home Assistant Integration Benefits
Home Assistant’s MQTT integration offers native discovery protocols that automatically create sensor entities without manual YAML configuration. When a sensor publishes its configuration to homeassistant/sensor/unique_id/config, Home Assistant instantly recognizes its capabilities, units, and device class. This plug-and-play experience doesn’t sacrifice power—you retain full control over entity naming, availability topics, and value templates.
Beyond discovery, MQTT sensors integrate seamlessly with Home Assistant’s automation engine. You can trigger actions based on temperature thresholds, rate-of-change conditions, or even sensor availability status. Combine this with MQTT’s retained messages feature, and your automations continue working with the last known value even after a broker restart, eliminating race conditions that plague other protocols.
Understanding MQTT Temperature Sensor Protocols
MQTT vs Zigbee vs Z-Wave
While Zigbee and Z-Wave dominate the mesh networking conversation, they introduce protocol translation layers that add complexity. Zigbee sensors require coordinators, potentially repeaters, and often rely on ZHA or Z2M bridges that may or may not support your specific device. MQTT sensors, particularly Wi-Fi-based ones, communicate directly with your broker over standard TCP/IP, eliminating single points of failure in your mesh.
That said, Zigbee sensors can become MQTT sensors through bridge devices like Zigbee2MQTT, offering the best of both worlds: mesh networking for hard-to-reach locations with MQTT’s clean abstraction layer. The key difference lies in control—native MQTT devices give you direct access to firmware settings, update intervals, and calibration offsets through web interfaces or MQTT commands, while bridged protocols often hide these parameters behind abstraction layers.
Wi-Fi vs Bluetooth MQTT Bridges
Bluetooth Low Energy (BLE) temperature sensors offer incredible battery life but require a bridge to connect to MQTT. These bridges—often ESP32-based—scan for BLE advertisements and republish them to MQTT topics. This architecture works brilliantly for refrigerator sensors or outdoor probes where changing batteries is impractical, but introduces a dependency on the bridge’s reliability.
Direct Wi-Fi MQTT sensors eliminate the middleman but consume more power. Modern deep-sleep implementations have narrowed this gap significantly, with some Wi-Fi sensors lasting 12-18 months on two AA batteries. The trade-off becomes network coverage versus battery convenience—Wi-Fi reaches farther than BLE, but your sensor needs sufficient signal strength to maintain its connection without draining power through constant reconnection attempts.
Key Features to Evaluate Before Buying
Accuracy and Calibration
Temperature accuracy specifications can be misleading. A sensor claiming ±0.5°C accuracy might achieve that only in a narrow 20-30°C range, with performance degrading at temperature extremes. Look for sensors that specify accuracy across their entire operating range, and pay attention to the temperature coefficient that indicates drift per degree outside calibration conditions.
Calibration capabilities separate professional-grade sensors from hobbyist devices. The best sensors expose MQTT topics for offset adjustment, allowing you to fine-tune readings against a reference thermometer without physical access to the device. Some even support multi-point calibration curves for applications like greenhouse monitoring where accuracy across a wide span is critical.
Temperature Range and Environmental Rating
Your use case dictates the required range. Indoor climate monitoring needs only -10°C to 50°C, but freezer monitoring demands -40°C capability, and attic sensors might require 85°C upper limits. Exceeding a sensor’s rated range doesn’t just reduce accuracy—it can permanently damage the device or cause immediate failure.
IP ratings tell only part of the environmental story. An IP65 rating protects against water jets but says nothing about condensation resistance or UV stability. For outdoor deployment, look for sensors with conformal coating on PCBs, hydrophobic vent membranes, and UV-stabilized enclosures. Indoor sensors near showers or kitchens benefit from splash-resistant designs that prevent humidity infiltration.
Power Source and Battery Life
Battery chemistry fundamentally impacts performance in temperature extremes. Lithium AA batteries maintain stable voltage down to -40°C, while alkaline batteries plummet below 0°C. Rechargeable Li-ion cells offer convenience but suffer reduced capacity in cold environments. Some premium sensors include supercapacitors to handle short-term power interruptions without rebooting.
Calculate realistic battery life using the sensor’s sleep current, wake time, and transmission power. A sensor waking every 60 seconds for 200ms with 100mA peak draw consumes far more power than one waking every 5 minutes for 50ms. The best sensors publish their battery voltage to MQTT, enabling predictive replacement automations that alert you weeks before failure.
Update Frequency and Latency
Rapid updates provide responsive automations but drain batteries. The sweet spot for climate control is 30-60 second intervals, while freezer monitoring can use 5-minute updates since temperature changes slowly. Look for sensors with adaptive reporting that increase frequency when temperatures change rapidly and slow down during stable periods.
Latency matters for safety-critical automations like pipe freeze prevention. Measure round-trip time from sensor wake to Home Assistant entity update—this should be under 500ms for reliable automation triggers. Some sensors support “push” mode where significant changes trigger immediate transmissions outside the normal interval, crucial for detecting rapid temperature drops.
Build Quality and Form Factor
A sensor’s physical design affects measurement accuracy. Enclosures that isolate the sensing element from PCB heat generation provide more stable readings. Wall-mounted sensors should have rear ventilation channels to prevent heat buildup against the surface. Probe-style sensors with external sensors excel for monitoring inside appliances while keeping electronics in a milder environment.
Consider installation flexibility. Sensors with magnetic backs, keyhole slots, and adhesive options adapt to more locations. Compact designs fit inside cramped equipment, while larger units accommodate bigger batteries for extended life. The presence of physical buttons for factory reset or mode changes simplifies troubleshooting without requiring MQTT commands.
Deep Dive into Sensor Specifications
Understanding Temperature Accuracy
Accuracy comprises three components: offset error, gain error, and non-linearity. Offset error is a constant deviation across the range—easily corrected with calibration. Gain error varies with temperature and requires slope adjustment. Non-linearity creates an S-shaped deviation curve that’s hardest to correct without multi-point calibration.
Sensor resolution (typically 0.1°C or 0.01°C) differs from accuracy. High resolution without accuracy is meaningless—a sensor might show two decimal places but only be accurate to ±1°C. For Home Assistant automations, 0.1°C resolution suffices since HVAC systems can’t respond to finer changes. The exception is scientific applications or trend analysis where high resolution reveals subtle patterns.
Humidity and Multi-Sensor Capabilities
Combined temperature/humidity sensors offer more automation possibilities but introduce complexity. Humidity sensors drift over time and require periodic recalibration. Capacitive humidity sensors age faster at high humidity (>80% RH), making them poor choices for bathrooms or tropical greenhouses without regular maintenance.
When evaluating multi-sensors, check if each measurement publishes to separate MQTT topics or as a JSON payload. Separate topics simplify Home Assistant configuration but increase network traffic. JSON payloads are more efficient but require template sensors to extract individual values. The best sensors support both modes, configurable via MQTT commands.
Pressure and Air Quality Sensors
Barometric pressure sensors enable weather prediction automations and altitude compensation for temperature readings. MEMS pressure sensors can detect altitude changes as small as 10cm, useful for multi-story homes. However, pressure sensors consume more power and may reduce battery life by 20-30%.
Air quality sensors (VOC, CO₂, PM2.5) often bundle with temperature sensors but have vastly different maintenance needs. VOC sensors require burn-in periods and age significantly in 2-3 years. CO₂ sensors using NDIR technology remain stable but cost more. Consider these as separate devices unless space constraints demand integration—dedicated air quality monitors typically outperform combo sensors.
Connectivity Considerations
Wi-Fi Signal Strength and Range
MQTT sensors need reliable Wi-Fi more than bandwidth. A sensor with -75dBm signal strength might connect intermittently, causing missed updates and rapid battery drain from reconnection attempts. Use Wi-Fi heat mapping tools to verify coverage in intended installation locations. Some sensors support external antennas, dramatically improving range at the cost of aesthetics.
2.4GHz vs 5GHz is a critical decision. Most battery sensors use 2.4GHz for better range and wall penetration. However, in congested Wi-Fi environments, 5GHz offers cleaner spectrum. Dual-band sensors provide flexibility but consume more power during band scanning. For outdoor sensors at range, 2.4GHz with external antennas often outperforms mesh protocols.
Ethernet vs Wireless
PoE-powered MQTT sensors eliminate power and connectivity concerns simultaneously. These devices suit permanent installations like server rooms or utility closets where running cable is feasible. PoE models often include UPS-backed power reliability and consistent connectivity, making them ideal for monitoring critical infrastructure.
Wireless sensors dominate residential use, but consider hybrid approaches. A PoE-powered MQTT gateway with wireless probes combines cable reliability with placement flexibility. This architecture centralizes power management while distributing sensors optimally. Some gateways support Power over Ethernet Plus (PoE+) to drive multiple probes or power relay modules for local control.
MQTT Broker Requirements
Your broker choice impacts sensor compatibility. Mosquitto remains the gold standard for Home Assistant, supporting all MQTT features sensors might use. However, cloud brokers like AWS IoT require TLS certificates and specific port configurations that some budget sensors don’t support. Local brokers provide lower latency and work during internet outages.
Broker performance matters with many sensors. A single sensor publishing every 30 seconds generates 2,880 messages daily. Fifty sensors create 144,000 messages, stressing low-power broker hardware. Use broker features like message persistence and QoS levels strategically—QoS 2 guarantees delivery but doubles message traffic. For temperature sensors, QoS 0 often suffices since missing one reading rarely impacts automations.
Power Management Strategies
Battery-Powered Options
Deep-sleep optimization separates premium sensors from power hogs. The best sensors consume <20µA in sleep, wake in <100ms, and transmit in <50ms. This efficiency yields multi-year battery life. Check if sensors publish wake duration metrics to MQTT—extended wake times indicate poor firmware optimization or weak Wi-Fi causing retries.
Battery chemistry choices affect performance. Lithium thionyl chloride batteries offer 10+ year life but at high cost and limited current output. Alkaline batteries provide adequate performance for most indoor sensors. For extreme cold, lithium iron disulfide (LiFeS₂) batteries outperform alkalines below -20°C. Some sensors include battery type configuration in firmware to optimize voltage monitoring accuracy.
USB and Hardwired Solutions
USB-powered sensors eliminate battery anxiety but introduce placement constraints. Look for sensors with USB-C connectors that support power delivery negotiation—this enables powering from modern PoE-to-USB adapters with battery backup. The best USB sensors include supercapacitors or small lithium cells to bridge power interruptions during brief outages.
Hardwired 12V or 24V sensors suit HVAC integration scenarios. These can tap into thermostat wiring or security system power, providing unlimited runtime. Verify the sensor’s voltage regulator efficiency—linear regulators waste power as heat, while switching regulators maintain efficiency across input voltage ranges. Some sensors support 9-36V wide-range inputs for industrial compatibility.
Solar and Energy Harvesting
Solar-powered MQTT sensors work for outdoor applications with adequate sunlight. However, most “solar” sensors are simply battery sensors with trickle-charging panels—they still require battery replacement every 2-3 years. True energy-harvesting sensors using supercapacitors can operate indefinitely but cost significantly more and require careful power budgeting.
Evaluate solar sensors by their minimum illuminance requirements and dark-runtime specifications. A sensor needing 200 lux minimum won’t work in shaded north-facing locations. The best outdoor sensors include battery voltage and charging current in MQTT telemetry, enabling automations that alert you when solar input becomes insufficient for seasonal placement adjustments.
Installation and Placement Best Practices
Indoor Placement Guidelines
Height matters for temperature accuracy. Mount sensors 4-5 feet high on interior walls, away from heat sources and direct sunlight. Avoid exterior walls that conduct cold, and stay clear of vents, windows, and doors that create drafts. For whole-home averaging, place sensors in central hallways rather than individual rooms—this reduces sensor count while providing representative data.
Consider the sensor’s thermal mass. Small sensors respond quickly to air temperature changes but are susceptible to transient drafts. Larger sensors with thermal mass average out fluctuations, providing smoother data for climate control. For automation triggers, fast response helps; for trend analysis, thermal mass reduces noise. Some sensors offer configurable filtering in firmware to simulate thermal mass digitally.
Outdoor and Weatherproofing
Direct sunlight falsifies readings by 5-15°C. Always mount outdoor sensors in radiation shields—passive shields using stacked plates work well in most climates, while aspirated shields with small fans provide research-grade accuracy in extreme sun. Position shields 4-6 feet above ground over natural surfaces, not concrete or asphalt.
Condensation kills electronics. Even IP67-rated sensors fail when internal humidity reaches dew point. Use desiccant packs inside enclosures, and ensure vent membranes allow pressure equalization without water ingress. Mount sensors at a slight angle to prevent water pooling around seals. In coastal areas, salt spray corrosion necessitates marine-grade enclosures regardless of IP rating.
Avoiding Measurement Errors
Avoid placing sensors near heat-generating electronics. A sensor mounted above a smart switch or near a Wi-Fi router reads 2-3°C high. Use thermal isolation pads or mount sensors on standoffs to create air gaps. For refrigerator monitoring, thread the probe through the door seal rather than placing the whole sensor inside—electronics heat generation affects readings.
Electromagnetic interference from motors and transformers can corrupt sensor readings or cause transmission failures. Keep sensors 3+ feet from HVAC equipment, washing machines, and fluorescent ballasts. If proximity is unavoidable, use sensors with shielded cables and ferrite chokes on power leads. Some industrial sensors publish RSSI and error counts to MQTT, helping diagnose interference issues.
Home Assistant Configuration Essentials
MQTT Discovery vs Manual Setup
MQTT Discovery automates entity creation but requires sensors to publish specific configuration payloads. Manually configured sensors give you complete control over entity IDs, availability templates, and value parsing. For advanced users, hybrid approaches work best: use discovery for initial setup, then override specific parameters in configuration.yaml for fine-tuning.
Discovery payloads should include device_class: temperature, unit_of_measurement: °C or °F, and state_class: measurement for proper Home Assistant statistics. Include expire_after to mark sensors unavailable when updates stop—critical for detecting dead batteries. The json_attributes_topic can expose battery voltage, signal strength, and uptime for monitoring sensor health.
Creating Automation Triggers
Temperature automations need hysteresis to prevent rapid cycling. Instead of triggering at exactly 22°C, use above: 22.5 for cooling and below: 21.5 for heating with separate automations. This 1°C deadband prevents HVAC equipment from short-cycling. For more sophisticated control, use template triggers that consider both temperature and rate of change.
Time-based triggers combined with temperature conditions create efficient schedules. Trigger an automation at 6:00 AM but only execute actions if temperature is below 20°C—this prevents heating an already-warm room. Use for: conditions to require temperature to remain beyond thresholds for 5-10 minutes, filtering out transient spikes from open doors or cooking.
Building Dashboard Cards
The Mushroom Climate card provides excellent temperature visualization with built-in humidity display. For multi-sensor setups, the Mini Graph Card with 24-hour history reveals trends and patterns. Include battery voltage as a secondary entity to monitor sensor health directly from the dashboard.
Advanced dashboards use template sensors to calculate temperature differentials between rooms. Create a sensor for bedroom_temp - living_room_temp to visualize heat distribution and HVAC balance. Combine this with the Plotly Graph Card for interactive historical analysis, helping identify insulation problems or ductwork imbalances.
Security and Privacy Implications
MQTT Authentication
Never run an open MQTT broker. Use username/password authentication at minimum, and prefer TLS certificates for sensors that support them. Create unique credentials per sensor or sensor group—this limits breach impact and enables per-device access revocation. Some enterprise sensors support client certificates, providing cryptographic device identity.
Password rotation poses challenges for battery sensors. A sensor that sleeps for 10 minutes can’t receive new credentials instantly. Implement a staggered rotation strategy: update broker credentials, then use MQTT retained messages to push new passwords to sensors upon their next wake cycle. Test this process before deployment to avoid mass sensor lockouts.
Network Segmentation
Isolate IoT devices on a separate VLAN with firewall rules restricting access to only the MQTT broker port. This prevents compromised sensors from scanning your network or attacking other devices. Use mDNS reflection or Avahi bridging selectively—most MQTT sensors don’t need it, and it reduces broadcast traffic across VLANs.
Consider MAC address filtering on your Wi-Fi network for sensors. While not a security panacea, it adds a layer of control. Document each sensor’s MAC address during installation, and configure static DHCP leases. This simplifies firewall rule creation and helps identify rogue devices.
Firmware Security
Investigate firmware update mechanisms before purchasing. Sensors with OTA updates via MQTT are convenient but present attack vectors. The best implementations use cryptographically signed firmware and require physical button presses to enter update mode. Avoid sensors that accept unsigned firmware or update automatically without confirmation.
Research the manufacturer’s security track record. Do they publish CVEs? How quickly do they patch vulnerabilities? Open-source firmware like Tasmota or ESPHome offers transparency—you can audit the code and build firmware yourself. Closed-source sensors from reputable manufacturers with bug bounty programs can be equally secure, but opaque vendors should be avoided.
Advanced Automation Scenarios
Climate Control Workflows
Multi-stage HVAC control uses temperature sensors in each room with smart vents or duct dampers. Create an automation that closes vents in rooms exceeding the setpoint while opening them in under-conditioned spaces. Use a weighted average of all room sensors as the primary control input, but implement minimum and maximum room temperature limits to prevent extreme variations.
Predictive pre-conditioning leverages outdoor temperature sensors and weather forecasts. When the outdoor temperature drops below the indoor setpoint by 5°C, pre-cool the house using free outside air via smart windows or whole-house fans. This reduces HVAC runtime and energy costs while maintaining comfort.
Leak Detection and Alerts
Temperature sensors excel at leak detection when placed near water heaters, washing machines, and sump pumps. A sudden 5°C drop often indicates water evaporation cooling the sensor. Combine temperature with humidity spikes for higher confidence leak detection. Create escalating alerts: notification at first detection, phone call after 5 minutes of sustained conditions, and automatic water shutoff after 10 minutes.
Use temperature rate-of-change as an early warning system. A sensor in a crawlspace that drops 2°C per minute suggests a pipe burst, while gradual cooling indicates normal weather changes. Template sensors calculating dT/dt provide this metric for automation triggers.
Energy Optimization
Temperature sensors enable sophisticated energy arbitrage with time-of-use electricity pricing. Pre-cool your home to 18°C during cheap overnight rates, then let it coast to 24°C during expensive peak hours. The thermal mass of your home becomes a battery, storing “cool” for later use. Monitor indoor and outdoor temperature trends to optimize the pre-cooling depth and duration.
Solar panel efficiency correlates with temperature—panels lose 0.5% efficiency per °C above 25°C. Place temperature sensors on your solar array backing and use this data to adjust HVAC setpoints. On cool, sunny days when panels overproduce, run the AC harder to store coolness. On hot days, reduce cooling load to prioritize solar export.
Troubleshooting Common Issues
Connection Drops
Intermittent connections often stem from weak Wi-Fi or DHCP lease renewal problems. Enable MQTT Last Will and Testament (LWT) messages so Home Assistant marks sensors unavailable immediately. Monitor uptime topics to identify sensors that reboot frequently—this indicates power issues or watchdog timer resets.
DHCP renewal can wake sensors from deep sleep, causing battery drain. Use static IP assignments or extend DHCP lease times to 7+ days. Some sensors support mDNS for IP resolution, eliminating DHCP dependency entirely. Check router logs for disconnection patterns—if multiple sensors drop simultaneously, the issue is likely router or broker-related, not individual sensors.
Inaccurate Readings
Systematic errors require calibration, but random fluctuations suggest electrical noise or poor sensor placement. First, verify the sensor’s reported voltage—low battery causes erratic readings. Then, check for EMI sources like dimmer switches or microwave ovens operating nearby. Shield sensor cables and add decoupling capacitors if you have soldering skills.
Thermal mass mismatch causes slow response. A sensor mounted on a thick wooden wall will lag air temperature by 10-20 minutes. Use sensors with low thermal mass for responsive control, or implement derivative calculations in Home Assistant to predict current temperature from the sensor’s lagged readings. Some advanced sensors publish both instantaneous and thermally-averaged values.
Battery Drain Problems
Rapid battery drain stems from four causes: weak Wi-Fi requiring retries, overly frequent updates, firmware bugs preventing deep sleep, or cold temperatures. Use MQTT topics to monitor rssi and reconnect_count—values below -70dBm or counts above 10 per day indicate Wi-Fi issues. Increase update intervals to 5+ minutes and disable non-essential metrics like hourly signal strength reports.
Cold weather dramatically reduces battery capacity. A sensor that lasts a year at 20°C might fail in 3 months at -10°C. Use lithium batteries in cold locations and implement temperature-compensated battery monitoring. Create automations that alert when battery voltage drops below a temperature-adjusted threshold, not a fixed voltage.
Future-Proofing Your Investment
Matter and Thread Compatibility
Matter over Thread promises seamless interoperability, but current implementations lack MQTT’s flexibility. Evaluate sensors based on their core capabilities rather than protocol hype. Many “Matter-ready” devices still support MQTT as a fallback, providing the best of both worlds. Avoid sensors with locked firmware that can’t be updated to support new protocols.
Thread’s mesh networking solves Wi-Fi range issues but introduces new complexity—border routers, commissioning, and channel conflicts with Zigbee. MQTT over Thread is emerging as a hybrid approach, but standards remain immature. For now, choose sensors with upgradeable firmware and open documentation, ensuring they can adapt as protocols evolve.
Firmware Update Policies
Manufacturers’ update policies reveal their long-term commitment. Companies providing monthly security updates and feature enhancements deserve premium pricing. Check if firmware updates preserve your calibration settings and MQTT configuration—poorly implemented updates resetting devices to factory defaults create maintenance nightmares.
Open-source firmware offers ultimate future-proofing. ESPHome and Tasmota communities rapidly adopt new features and security patches. However, this requires initial flashing and ongoing maintenance. Commercial sensors with open APIs but closed firmware strike a balance, offering vendor support while allowing Home Assistant integration flexibility.
Community Support
Vibrant user communities provide configuration examples, troubleshooting guides, and custom firmware. Search GitHub for Home Assistant blueprints and Node-RED flows specific to sensor families. Active forums with manufacturer participation indicate good support. Avoid sensors with no online community presence—obscure devices become e-waste when the manufacturer abandons them.
Community-driven integration quality matters more than official support. Home Assistant’s MQTT integration is so powerful precisely because it doesn’t require custom components. However, sensors that publish non-standard payloads require complex template sensors. Prefer devices that follow MQTT best practices and have documented topic structures.
Cost vs Value Analysis
Budget-Friendly Options
Sub-$20 sensors tempt with low entry cost but often hide expenses. Short battery life increases operating costs, and lack of calibration leads to replacement when accuracy drifts. Cheap sensors may lack proper RF shielding, causing Wi-Fi interference that degrades network performance for all devices. Factor in your time value—spending 2 hours troubleshooting a $15 sensor exceeds the cost of a $40 reliable unit.
Budget sensors excel for non-critical applications like monitoring guest room comfort or garage workshops where ±2°C accuracy suffices. Deploy them where battery access is easy and consequences of failure are low. Use them as “canary” sensors to test placement before committing premium sensors to permanent locations.
Premium Features Worth Paying For
Calibrated accuracy, industrial temperature ranges, and PoE power justify premium pricing for critical applications. A $80 sensor that prevents frozen pipe damage pays for itself immediately. Features like NFC configuration, automatic drift compensation, and enterprise security add value in professional installations or remote properties where maintenance visits are expensive.
Long-term support and firmware updates provide hidden value. A sensor receiving updates for 5+ years amortizes its cost over time, while disposable sensors require replacement every 2-3 years. Calculate total cost of ownership including batteries, installation time, and replacement frequency when comparing prices.
Total Cost of Ownership
TCO analysis must include infrastructure costs. A battery sensor needs no wiring but requires annual battery changes. A PoE sensor needs cable runs but operates maintenance-free for years. For a 10-sensor deployment, PoE infrastructure costs $200-300 but saves $50/year in batteries and 5 hours of maintenance labor.
Consider data costs for cellular backup scenarios. If monitoring a remote cabin, MQTT over satellite or cellular requires minimal data usage. A sensor publishing 10-byte payloads every 5 minutes uses only ~8KB daily. Inefficient sensors sending verbose JSON with 200-byte payloads cost 20x more in data fees—potentially hundreds of dollars annually.
Environmental and Sustainability Factors
Eco-Friendly Materials
Sensor enclosures made from recycled plastics or biodegradable materials reduce environmental impact. However, these materials may compromise durability. Look for sensors with modular designs—replaceable battery compartments and sensor modules extend lifespan when components fail. Avoid ultrasonically welded enclosures that become disposable when batteries die.
Manufacturers’ sustainability reports reveal true commitment. Companies using renewable energy in production and offering take-back programs demonstrate environmental responsibility. Some premium brands offset shipping emissions and use minimal packaging. These factors may influence purchasing if sustainability aligns with your values.
Recyclability and E-Waste
Electronic waste from IoT devices is a growing crisis. Sensors with user-replaceable batteries reduce waste compared to sealed units. Devices supporting open-source firmware avoid premature obsolescence when vendors discontinue support. Check local e-waste recycling policies—many municipalities accept small electronics, but batteries often require separate disposal.
Design for disassembly matters. Sensors using standard screws and connectors allow component recovery. Glue-filled potted sensors are unrepairable and unrecyclable. Support manufacturers publishing repair guides and selling spare parts. The right-to-repair movement increasingly influences IoT design, with some jurisdictions mandating repairability scoring.
Frequently Asked Questions
1. What’s the realistic battery life I should expect from a quality MQTT temperature sensor?
In typical indoor conditions with 60-second update intervals, expect 12-24 months from two AA lithium batteries. Alkaline batteries last 6-12 months, while rechargeable NiMH cells require replacement every 3-4 months. Outdoor sensors in cold climates may see battery life halved. Always verify the sensor’s sleep current specification—premium models consume under 20µA, while inefficient designs draw 100µA+, reducing life by 80%.
2. Can I use MQTT temperature sensors without an internet connection?
Absolutely. MQTT’s greatest strength is local operation. Your MQTT broker (Mosquitto) runs on your Home Assistant server, and sensors communicate directly over your local network. Internet is only needed for initial time synchronization (NTP) and firmware updates. For true offline operation, configure a local NTP server and download firmware updates manually. This architecture ensures your automations work during ISP outages.
3. How many MQTT sensors can my Home Assistant instance handle?
A standard Raspberry Pi 4 running Home Assistant OS can comfortably manage 50-100 MQTT sensors. The limiting factor is database write frequency, not MQTT itself. Reduce write amplification by using force_update: false in MQTT sensor configurations, preventing duplicate value logging. For larger deployments, offload data to InfluxDB and use a dedicated MQTT broker on separate hardware. Enterprise setups handle thousands of sensors with proper infrastructure.
4. What’s better: sensors that publish JSON or separate topics for each value?
Separate topics (sensor/temp, sensor/humidity) simplify Home Assistant configuration and reduce template complexity. JSON payloads (sensor/data containing {"temp":22.5,"humidity":55}) are more bandwidth-efficient and atomic—both values update simultaneously. Choose based on your network constraints and automation needs. JSON works best for bandwidth-limited links; separate topics excel for debugging and selective subscription.
5. How do I calibrate my MQTT temperature sensors accurately?
Use an NIST-traceable reference thermometer in a stable environment (insulated cooler works well). Place sensors and reference together for 30 minutes to equalize. Publish calibration offsets via MQTT if the sensor supports it, or create template sensors in Home Assistant applying the offset. Calibrate at two points: near your typical operating temperature and at one extreme. Re-check calibration annually, as sensors drift over time.
6. Will my 2.4GHz Wi-Fi MQTT sensors interfere with Zigbee devices?
Yes, potential interference exists since both use the 2.4GHz band. Zigbee channels 11, 15, 20, and 25 overlap Wi-Fi channel 1, 6, and 11. Configure your Wi-Fi to use channel 1 or 6, and set Zigbee to channel 15 or 20 with minimal overlap. MQTT sensors using 20MHz Wi-Fi bandwidth (not 40MHz) reduce interference. In congested environments, use Ethernet or PoE sensors to eliminate Wi-Fi conflict entirely.
7. Can I use MQTT temperature sensors in my freezer or refrigerator?
Yes, but with caveats. Use probe-style sensors with the electronics outside and only the probe inside. The rapid temperature cycling and condensation kill internal electronics quickly. Ensure the probe cable doesn’t compromise door seals—flat ribbon cables work best. Set update intervals to 5 minutes to conserve battery, as temperature changes slowly. Use lithium batteries rated for -40°C, and expect 6-12 month battery life due to cold capacity reduction.
8. How do I secure MQTT sensors against unauthorized access?
Implement three layers: network isolation (IoT VLAN), broker authentication (unique credentials per sensor), and TLS encryption where supported. Disable anonymous access in Mosquitto and use ACLs to restrict each sensor to its own topic branch. For high-security scenarios, use client certificates. Regularly audit broker logs for unknown client connections and implement fail2ban to block repeated authentication failures.
9. What’s the ideal update frequency for different automation types?
Climate control: 30-60 seconds for responsive heating/cooling. Freezer monitoring: 5 minutes since temperature changes slowly. Leak detection: 10 seconds with adaptive reporting for rapid temperature drops. Energy optimization: 2 minutes balances responsiveness with battery life. Outdoor weather: 1 minute for accurate trend analysis. Always enable “push” mode if available, where significant changes trigger immediate updates regardless of interval.
10. How do I handle sensors that go offline frequently?
First, diagnose the root cause: weak Wi-Fi, low battery, or firmware crashes. Enable LWT messages and expire_after in Home Assistant to mark sensors unavailable quickly. Create an automation that alerts you when sensors remain unavailable for 15+ minutes. For critical sensors, implement a heartbeat system: have Home Assistant publish to a sensor/keepalive topic every 5 minutes, and configure sensors to reset if they don’t receive this message—this auto-recovers crashed devices. Consider replacing chronically problematic sensors rather than constant troubleshooting.