Your attic might be out of sight, but the moisture lurking there should never be out of mind. Every year, homeowners face thousands of dollars in damage from mold infestations that began as invisible humidity problems in their attic spaces. While we diligently monitor our living rooms and bedrooms for comfort, the attic remains a forgotten frontier—until that musty smell permeates the ceiling or dark spots appear on drywall. Modern moisture sensors have revolutionized how we approach this silent threat, transforming reactive disaster recovery into proactive home protection. This guide walks you through everything you need to know about selecting, installing, and leveraging attic moisture sensors as your first line of defense against mold.
Top 10 Attic Moisture Sensors for Mold Prevention
Detailed Product Reviews
1. General Tools MMD4E Digital Moisture Meter, Water Leak Detector, Moisture Tester, Pin Type, Backlit LCD Display With Audible and Visual High-Medium-Low Moisture Content Alerts, Grays
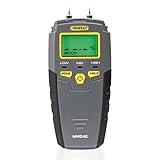
Overview: The General Tools MMD4E is a pin-type digital moisture meter designed for detecting water leaks and preventing mold growth in residential settings. This handheld device measures moisture content in wood (5-50%) and building materials like drywall and concrete (1.5-33%), providing essential data for early remediation efforts and family safety.
What Makes It Stand Out: The meter’s dual-alert system delivers both audible tones and visual on-screen icons for low, medium, and high moisture levels, enabling quick assessments without constant display monitoring. The backlit LCD features large 0.3-inch digits for excellent visibility in dark spaces, while the included extra 8mm stainless steel pins and protective cap—which doubles as a calibration checker—add practical utility.
Value for Money: At $38.78, this pin-type meter occupies the mid-range price point. It offers more precise, depth-specific readings than pinless alternatives at similar prices, though it requires physically penetrating surfaces. For homeowners wanting professional-grade accuracy without premium costs, it strikes a solid balance.
Strengths and Weaknesses: Strengths include highly accurate pin-based measurements, intuitive alert systems, excellent display readability, and comprehensive accessories. The invasive pin-type design ensures reliable material-specific readings. Weaknesses include leaving small holes in tested surfaces, slower scanning than pinless models, and inability to detect moisture behind intact materials.
Bottom Line: The General Tools MMD4E suits homeowners prioritizing measurement precision over convenience. If you accept minor surface damage for reliable mold prevention and leak detection, this meter delivers exceptional performance and value.
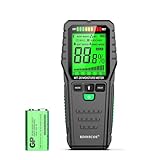
2. ERICKHILL Pinless Wood Moisture Meter, Non-Destructive Wall Moisture Meter for Drywall Masonry Building Material Dampness Inspection Mold Detector Device, Detects up to 2-inch Below Surface

Overview: The ERICKHILL Pinless Moisture Meter provides non-destructive moisture detection using electromagnetic induction, scanning up to 2 inches below surfaces in drywall, masonry, softwood, and hardwood. This versatility makes it ideal for homeowners and inspectors seeking comprehensive water damage assessment without drilling unsightly holes.
What Makes It Stand Out: Four dedicated testing modes automatically apply material-specific correction factors for tailored accuracy across different surfaces. The moisture alarm alerts users when levels reach mold-risk thresholds, enabling proactive prevention. An LCD backlight with tri-color bar indicator ensures visibility in dim conditions, while the 5-minute auto-off function and low battery indicator preserve power and prevent unexpected failures.
Value for Money: At $26.99, this is exceptionally affordable for pinless technology. Similar devices with multi-material capability and 2-inch depth typically cost $40+, making it a budget-friendly choice for DIY moisture management without sacrificing core functionality.
Strengths and Weaknesses: Strengths include completely non-invasive testing, impressive scanning depth, material-specific modes, and outstanding affordability. The power-saving features and alarm system add practical value. Weaknesses include moderate ±4% accuracy that may not suit professional applications, potential interference from material density variations, and less durable plastic construction that may not withstand heavy field use.
Bottom Line: The ERICKHILL meter is perfect for budget-conscious homeowners needing reliable, damage-free detection. For casual use and early leak identification, its features and price point are difficult to surpass.
3. RDINSCOS Pinless Moisture Meter with Ball Sensor – Digital Moisture Detector for Walls, Wood, Drywall, Concrete – Non-Destructive Scanner with LED Flashlight & Custom Alerts

Overview: The RDINSCOS Pinless Moisture Meter features a unique ball sensor that glides smoothly across surfaces while detecting hidden moisture in walls, wood, and concrete without causing any damage. This specialized tool helps locate dampness before it escalates into costly repairs, making it valuable for both pre-installation checks and ongoing monitoring applications.
What Makes It Stand Out: The integrated LED flashlight illuminates dark workspaces like basements and behind appliances—a feature rarely found in this price category. Customizable MID and WET threshold settings allow users to define their own alert parameters, receiving both visual tri-color LED signals and audio warnings when moisture exceeds limits. The ball sensor provides consistent contact pressure for reliable readings across uneven surfaces.
Value for Money: Priced at $38.99, this meter competes directly with entry-level professional tools. The combination of pinless technology, LED illumination, and customizable alerts offers more utility than standard models at this price. For contractors and serious DIYers, the specialized features justify the modest premium over basic alternatives.
Strengths and Weaknesses: Strengths include the innovative ball sensor for smooth scanning, built-in flashlight for dark areas, fully customizable alert thresholds, and dual alert systems. It’s non-destructive and ideal for finished surfaces. Weaknesses include a learning curve to master the ball sensor technique, and the price may exceed casual users’ budgets. Battery life could be impacted by frequent flashlight usage.
Bottom Line: The RDINSCOS meter excels for users needing flexibility and workspace illumination. If you inspect dark areas frequently or want customizable moisture thresholds, this tool delivers professional-grade features at a reasonable price.
4. Pinless Moisture Meter for Home Inspection – Non-Destructive Water Leak Detector & Moisture Reader for Basements Walls, Wood, Drywall, Concrete, Masonry – Accurate Moisture Tester with EMF Technology

Overview: This Pinless Moisture Meter employs electromagnetic field (EMF) technology to detect moisture up to 3/4-inch deep without drilling or puncturing surfaces. Designed for home inspectors and maintenance professionals, it quickly identifies excess moisture from leaks, flooding, or humidity in basements, bathrooms, and kitchens across wood, drywall, concrete, and masonry.
What Makes It Stand Out: The EMF technology provides safe, damage-free testing on finished and sensitive materials where pinholes would be unacceptable. Its versatility across multiple surface types eliminates the need for separate specialized tools. The straightforward operation delivers instant readings, making it practical for real estate inspections and routine maintenance checks.
Value for Money: At $33.49, this meter offers solid mid-range value for non-destructive testing capabilities. While it lacks advanced features like customizable alerts, it provides essential functionality at a price accessible to homeowners and professionals alike. Comparable pinless meters with similar depth range typically cost $35-45.
Strengths and Weaknesses: Strengths include completely non-invasive EMF detection, broad material compatibility, simple one-handed operation, and reliable accuracy when used correctly. It’s lightweight and portable for fieldwork. Weaknesses include the shallow 3/4-inch scanning depth, which limits detection capability, and significant interference from nearby metal objects requiring careful positioning. The generic branding may raise durability concerns.
Bottom Line: This moisture meter serves as a reliable, no-frills tool for basic home inspection tasks. If you need straightforward, damage-free moisture detection without advanced features, it provides dependable performance at a fair price.
5. MESTEK Pinless Wood Moisture Meters for Drywall, Water Leak Detector, Wall Moisture Tester for Lumber Concrete Building, Wall Moisture Sensor Digital Humidity Tester for Firewood

Overview: The MESTEK Pinless Moisture Meter combines high-precision induction technology with user-centric design for non-destructive moisture testing in wood, drywall, concrete, and masonry. With a measuring depth of 0.78 inches and an impressive 0.0-100.0 range, it serves contractors, homeowners, and firewood users seeking accurate, damage-free assessments.
What Makes It Stand Out: The standout 3-inch HD color screen displays three-color analog bars indicating DRY, RISK, and WET status through intuitive green, yellow, and red visualization—superior to monochrome displays. Ergonomic soft rubber side grips ensure comfortable extended use, while the included cloth bag enhances portability. The generous 3-year replacement warranty demonstrates manufacturer confidence unmatched by competitors.
Value for Money: At $45.99, this is the premium option in the group, but the HD color display, ergonomic design, and exceptional warranty justify the cost for frequent users. The high-performance processing chip and alloy probe deliver responsive, accurate measurements that professionals demand, making it a worthwhile investment over budget alternatives.
Strengths and Weaknesses: Strengths include the large, beautiful color screen for instant status interpretation, comfortable rubberized grip, comprehensive 0.0-100.0 measurement range, and outstanding 3-year warranty. The HOLD function and auto-power-off add convenience. Weaknesses include the highest price point and relatively modest 0.78-inch depth compared to some pinless models offering deeper scanning. The accuracy specification lacks material-specific details.
Bottom Line: For users who prioritize display quality, ergonomic comfort, and long-term reliability, the MESTEK meter is worth the premium. The 3-year warranty makes it a risk-free investment for serious DIYers and professionals.
6. 2-in-1 Pin & Pinless Moisture Meter, Digital Moisture Detector for Wood, Drywall & Building Materials, Large LCD Display, 3-Color Indicator, Calibration, Rechargeable Battery

Overview: This professional-grade moisture meter delivers dual-mode functionality for comprehensive moisture detection across wood, drywall, concrete, and other building materials. The 2-in-1 design combines non-invasive scanning with precise pin-based measurements, making it suitable for both quick surveys and detailed analysis. With a wide measurement range and ±2.5% accuracy, it serves contractors, home inspectors, and serious DIYers who need reliable data to prevent costly moisture damage.
What Makes It Stand Out: The integrated pin and pinless modes eliminate the need for two separate tools, while the rechargeable 1200mAh battery removes the hassle and expense of disposables. The 2.9-inch backlit LCD ensures visibility in dark crawl spaces, and the tri-color LED indicator with audible alarms provides instant moisture level feedback. The HOLD function freezes readings for easy recording, and auto-shutoff preserves battery life during long workdays.
Value for Money: At $86.99, this meter sits in the mid-range professional category. Considering it replaces two dedicated devices and includes rechargeable convenience, it offers strong value for frequent users. Casual homeowners may find it overkill, but for professionals who rely on accurate moisture readings regularly, the price is justified compared to purchasing separate pin and pinless meters from premium brands.
Strengths and Weaknesses: Strengths include versatile dual-mode operation, rechargeable battery, clear visual/audio alerts, wide measurement range, and professional accuracy. Weaknesses involve the pin mode leaving small probe holes and the price point being steep for occasional use. The 30-minute auto-off may interrupt extended inspection sessions.
Bottom Line: This moisture meter is an excellent investment for professionals and dedicated DIYers needing comprehensive, accurate moisture detection. The dual functionality and rechargeable design make it a practical, cost-effective alternative to owning two separate meters.
7. Master Flow GAF Adjustable Humidistat & Thermostat Combo for Power Vents & Fans | Controls Attic Moisture & Heat Buildup | Adjustable for All Climates | Universal Compatibility | UL Listed - HT1

Overview: The HT1 combo controller automates attic ventilation by simultaneously monitoring humidity and temperature to activate compatible power vents. Designed specifically for GAF Master Flow and LL Building Products single-speed vents, this UL-listed device provides hands-free climate control that protects homes from moisture buildup, mold, and heat damage. It continuously adjusts ventilation based on real-time conditions rather than manual settings.
What Makes It Stand Out: Dual-sensor automation sets this apart from basic thermostats. By controlling both humidity and temperature, it addresses the root causes of attic moisture problems more effectively than temperature-only controllers. The universal compatibility with GAF’s vent ecosystem ensures reliable integration, while adjustable settings accommodate everything from humid coastal climates to dry mountain regions, making it versatile across North America.
Value for Money: Priced at $76.99, the HT1 offers solid value for homeowners with existing GAF power vents. It eliminates manual adjustments and prevents expensive moisture-related repairs, potentially paying for itself by avoiding a single mold remediation. Compared to smart home ventilation systems costing hundreds more, it provides essential automation at a reasonable price point.
Strengths and Weaknesses: Strengths include automatic dual-climate control, UL safety certification, proven GAF compatibility, and climate adaptability. Weaknesses are brand-specific compatibility limiting use to GAF vents, requiring electrical installation, and lack of smart home connectivity. It also only controls attic spaces, not whole-home humidity.
Bottom Line: For homeowners with compatible GAF attic vents, the HT1 is a worthwhile upgrade that automates moisture and heat management. It delivers reliable, energy-efficient protection against moisture damage without the complexity or cost of whole-home systems.
8. Lizusidtsy 2 in 1 Moisture Meter, Humidity Meter for Mold Self-Testing Moisture Sensor for Firewood

Overview: This budget-friendly moisture meter targets DIY enthusiasts and homeowners seeking basic dual-mode moisture detection. Combining pin and pinless measurement options, it promises versatility across wood, drywall, and concrete applications. The device includes an LCD display with illumination and a self-test calibration feature, positioning itself as an entry-level tool for occasional moisture checks and home improvement projects.
What Makes It Stand Out: The sub-$25 price point with dual-mode functionality is its primary differentiator. The built-in illumination function aids use in dark spaces like basements or behind appliances. The self-test calibration check, integrated into the protection cap, allows users to verify accuracy without separate reference materials—a rare feature at this price level.
Value for Money: At $23.08, this is one of the most affordable 2-in-1 meters available. For homeowners who need occasional moisture checks after leaks or for firewood seasoning, it costs less than a single professional inspection. However, the extremely low price raises questions about sensor quality and long-term durability compared to established brands.
Strengths and Weaknesses: Strengths include exceptional affordability, dual measurement modes, backlight display, and self-test capability. Major weaknesses stem from the poorly translated product description suggesting quality control issues, unknown brand reliability, potentially lower accuracy, and questionable durability. The vague “color difference” disclaimer indicates manufacturing inconsistencies.
Bottom Line: This meter suits budget-conscious DIYers needing occasional moisture detection for non-critical applications. Professionals and those requiring certified accuracy should invest in reputable brands. It’s a decent starter tool, but verify readings against known standards before trusting important decisions to it.
9. RDINSCOS Pinless Moisture Meter for Wall, Wood & Masonry – Non-Invasive Digital Moisture Detector with 19mm Depth, Flashlight, LCD Display – Ideal for Leak Detection & Water Damage
Overview: The RDINSCOS moisture meter offers non-invasive moisture detection for homeowners and inspectors who need quick assessments without surface damage. Using electromagnetic sensors, it detects hidden moisture up to 19mm deep in wood, tile, and masonry—perfect for checking walls after plumbing leaks or assessing flood damage. The integrated flashlight and compact design make it practical for inspecting dark, confined areas.
What Makes It Stand Out: True non-invasive scanning at this price point is remarkable. The 19mm detection depth exceeds many budget pinless meters, while the built-in LED flashlight eliminates the need for a separate work light. Its ability to preserve delicate finishes makes it ideal for renters, restoration specialists, and anyone inspecting visible surfaces where probe holes would be unacceptable.
Value for Money: At $22.59, this represents exceptional value for pinless technology. Most non-invasive meters start around $40-50, making this an accessible entry point for homeowners. While it lacks advanced features of professional models, it provides the core functionality needed for leak detection and damage assessment at a fraction of the cost.
Strengths and Weaknesses: Strengths include completely non-destructive testing, integrated flashlight, impressive 19mm depth, affordability, and ease of use. Weaknesses involve pinless-only operation (no precise percentage readings), accuracy interference near metal, lack of calibration verification, and no audible alerts. The single-mode limitation means users can’t verify readings with pin probes.
Bottom Line: This is an excellent value for homeowners needing quick, damage-free moisture checks after leaks or before purchasing a home. For definitive percentage readings, pair it with a basic pin meter. It’s a practical, affordable tool for early moisture detection and damage prevention.
10. Lignomat Mini-Ligno S/D - Pin Moisture Meter - Mold Detector & Tester for Construction, Maintenance, Flooring, Water Damage - Humidity Detection & Moisture Meter for Wood, Wall, Drywall & Firewood

Overview: The Lignomat Mini-Ligno S/D is a professional-grade pin-type moisture meter from a trusted name in wood moisture measurement. Designed for contractors, flooring installers, and restoration specialists, it provides accurate readings across wood, drywall, and gypsum from 6% to 45% moisture content. The compact, ergonomic design with protective green cap doubles as a comfortable handle for extended field use.
What Makes It Stand Out: Lignomat’s reputation for calibration accuracy is the key differentiator. Automatic calibration before each measurement ensures consistent, reliable results over the device’s lifetime—critical for professionals whose work depends on precise readings. The auto-hold function displays readings for 30 seconds, allowing technicians to extract the meter from tight spaces before recording data. The broad material range covers everything from firewood to drywall.
Value for Money: At $99.50, this commands a premium price that reflects professional-grade accuracy and brand reputation. For flooring contractors, home inspectors, and restoration professionals who depend on reliable measurements for contractual decisions, the cost is justified. Hobbyists and occasional users will find better value elsewhere.
Strengths and Weaknesses: Strengths include trusted brand accuracy, automatic calibration, auto-hold function, wide detection range, durable construction, and ergonomic design. Weaknesses are the premium price, pin-only operation (no non-invasive scanning), probe holes left in materials, and lack of advanced features like backlit displays or data logging found in newer models.
Bottom Line: The Mini-Ligno S/D is a top-tier choice for professionals prioritizing measurement accuracy and consistency above all else. While it lacks modern conveniences, its reliable performance and automatic calibration make it a worthwhile investment for those who stake their reputation on precise moisture readings.
Why Attic Moisture Monitoring Matters for Home Health
Attics function as the respiratory system of your home, managing airflow, temperature regulation, and moisture balance. When this system fails, the consequences cascade downward. Excess moisture creates a five-star resort for mold spores, which can colonize organic materials like wood sheathing and insulation within 24-48 hours of consistent humidity above 60%. Beyond structural damage, attic mold releases mycotoxins that infiltrate living spaces through recessed lighting, HVAC systems, and ceiling penetrations, triggering respiratory issues, allergies, and chronic health problems. A quality moisture sensor acts as an early warning system, detecting microclimatic changes before they become macro problems, potentially saving you $10,000-$30,000 in remediation costs while protecting your family’s health.
Understanding the Science Behind Attic Moisture
The Stack Effect and Your Attic
Warm air naturally rises through your home, escaping through the attic in a phenomenon called the stack effect. This upward airflow pulls cooler air from basements and crawl spaces, creating a continuous circulation pattern. In winter, warm, moist air from cooking, showers, and breathing hits the cold attic surfaces and condenses. In summer, hot, humid outdoor air infiltrates cooler attic spaces, creating the same problem. Understanding this dynamic explains why moisture issues are rarely static—they’re constantly evolving based on temperature differentials, air pressure, and seasonal changes.
Relative Humidity vs. Absolute Humidity
Most homeowners focus on relative humidity (RH) percentages, but absolute humidity—the actual amount of water vapor in a given air volume—tells the real story. A 50% RH reading at 40°F contains far less moisture than 50% RH at 80°F. Advanced sensors track both metrics, giving you a complete picture. Look for devices that measure dew point temperature, which indicates when condensation will occur on surfaces. This metric is far more actionable than RH alone because it tells you exactly when water will transition from vapor to liquid on your roof deck or insulation.
How Attic Moisture Sensors Work
Capacitive vs. Resistive Sensing Technology
Moisture sensors employ two primary detection methods. Capacitive sensors measure changes in electrical capacitance caused by water molecules between two conductive plates. They’re highly accurate, resistant to contamination, and excel at detecting subtle humidity fluctuations. Resistive sensors measure electrical resistance changes in a hygroscopic material that absorbs moisture. While more affordable, they can drift over time and are vulnerable to chemical contaminants common in attics, such as wood treatments and insulation off-gassing. For attic applications where precision matters, capacitive technology justifies its premium price point.
Wireless vs. Wired Sensor Systems
Wireless sensors offer installation flexibility in hard-to-reach attic spaces, transmitting data via Wi-Fi, Zigbee, or Z-Wave protocols. However, they require battery maintenance and can suffer connectivity issues through dense insulation and roofing materials. Wired sensors provide continuous power and reliable data transmission but demand careful installation to avoid damaging insulation or creating fire hazards. Hybrid systems combine a wired hub with wireless remote sensors, offering the best of both worlds for large or complex attic layouts.
Key Features to Look for in Attic Moisture Sensors
Accuracy and Calibration Standards
Seek sensors with ±2% RH accuracy or better. Medical-grade or industrial-grade calibration certificates indicate higher quality. Some premium models feature automatic calibration using reference sensors, while others require annual manual calibration with salt solution test kits. The calibration drift rate—how quickly accuracy degrades—should be less than 1% per year. In attic environments with extreme temperature swings, temperature compensation becomes critical for maintaining accuracy across seasonal variations.
Temperature Compensation Capabilities
Attic temperatures can swing from 30°F to 150°F throughout the year. Without automatic temperature compensation, humidity readings become meaningless. Quality sensors use integrated algorithms that adjust readings based on simultaneous temperature measurements. This feature distinguishes professional-grade equipment from consumer gadgets that work fine in climate-controlled rooms but fail in harsh attic environments.
Data Logging and Trend Analysis
Single-point readings tell you what’s happening now; data logging reveals patterns. Look for sensors that store at least 30 days of minute-by-minute data locally, with cloud backup for longer-term analysis. The ability to visualize trends helps distinguish between normal seasonal fluctuations and problematic sustained moisture. Some advanced systems use machine learning to establish your attic’s unique “moisture signature” and alert you only when deviations occur, reducing false alarms.
Alert Systems and Notifications
Effective alerts operate on multiple levels. Local audible alarms ensure you know about problems even during internet outages. Push notifications to your smartphone provide immediate awareness. Email summaries offer daily or weekly trend reports. The best systems allow customizable thresholds—perhaps 65% RH triggers a warning, while 75% demands immediate action. Escalating alert systems that notify multiple family members prevent single-point communication failures.
Battery Life and Power Options
Attic sensor battery life typically ranges from six months to two years. Lithium batteries outperform alkaline in temperature extremes. Some sensors feature solar panels or energy-harvesting technology that captures energy from ambient light or temperature differentials. Hardwired options with battery backup eliminate maintenance concerns but require professional installation. Consider the accessibility of your sensor location when evaluating power options—changing batteries in a cramped, insulated attic corner is nobody’s idea of fun.
Connectivity Protocols Explained
Wi-Fi sensors offer direct cloud connectivity but can strain your network with dozens of devices. Zigbee and Z-Wave create mesh networks where devices relay signals to a central hub, improving reliability in signal-challenged attics. LoRaWAN (Long Range Wide Area Network) technology provides exceptional range and battery life but requires a compatible gateway. For most homes, a Zigbee or Z-Wave hub-based system balances performance, power consumption, and reliability.
Strategic Placement for Maximum Effectiveness
Critical Zones in Your Attic
Moisture doesn’t distribute evenly. Focus on “cold spots” where condensation likely forms: the north-facing roof deck, areas above bathrooms and kitchens, and spots near recessed lighting penetrations. Place sensors within 12 inches of potential problem areas but not directly against surfaces, which creates artificially high readings. The ridge line, soffit vents, and around HVAC equipment represent other strategic locations. For attics larger than 1,000 square feet, deploy multiple sensors to create a moisture map.
Height and Positioning Best Practices
Mount sensors at the same height as your insulation top—typically 12-18 inches above the attic floor. This captures the microclimate where warm, moist air meets cold surfaces. Avoid placing sensors directly in the path of ventilation airflow, which creates artificially low readings. Position them away from roof leaks, bathroom exhaust fans, and attic access hatches that introduce external variables. Use mounting brackets that allow easy removal for maintenance without disturbing insulation.
Avoiding False Readings
Direct contact with insulation, wood, or metal surfaces skews readings. Maintain a 2-inch clearance around the sensor using standoff brackets. Keep sensors away from dust sources like uncapped storage boxes or construction debris, which can coat sensor elements. Seasonal adjustments matter: in winter, shift sensors slightly away from the coldest roof sections to avoid condensation on the sensor itself, which would create false high readings.
Integration with Smart Home Systems
Z-Wave, Zigbee, and Wi-Fi Compatibility
Smart home integration transforms raw data into actionable intelligence. Z-Wave sensors typically offer better range and lower power consumption, making them ideal for detached attics. Zigbee devices create robust mesh networks and often cost less, but may experience interference from 2.4GHz Wi-Fi networks. Wi-Fi sensors provide the simplest setup but can congest your network. Consider your existing smart home ecosystem—if you already use Samsung SmartThings, Z-Wave or Zigbee devices integrate seamlessly. For Alexa or Google Home ecosystems, Wi-Fi sensors often provide the smoothest experience.
IFTTT and Automation Possibilities
Advanced integration goes beyond simple alerts. Connect your moisture sensor to smart ventilation systems that automatically activate attic fans when humidity exceeds thresholds. Trigger dehumidifiers in finished attics or bonus rooms. Log data to Google Sheets for long-term analysis. Some homeowners integrate sensors with smart thermostats to adjust whole-house ventilation based on attic conditions. The possibilities expand as your smart home matures, creating a responsive building envelope that actively prevents moisture problems.
Installation Considerations
DIY vs. Professional Installation
DIY installation works for wireless, battery-powered sensors in accessible attics with proper flooring. You’ll need basic tools: drill, screwdriver, ladder, and safety equipment. However, professional installation becomes essential for wired systems, sensors near electrical equipment, or complex roof structures. Pros understand how to route wires safely through insulation, seal penetrations to maintain R-value, and position sensors for optimal performance. The $200-$500 installation cost often pays for itself through correct placement and avoided mistakes.
Electrical Safety in Attic Spaces
Attics contain hidden hazards: exposed nails, low-hanging rafters, and potentially live electrical wiring. Always turn off power to attic circuits before installation. Use a non-contact voltage tester to verify wires are dead. Wear head protection, gloves, and a respirator to avoid insulation fibers. Never step on drywall—only walk on joists or installed catwalks. For wired sensors, use armored cable or conduit where required by code, and avoid penetrating electrical cables or plumbing vents.
Dealing with Insulation and Obstructions
Blown-in insulation presents unique challenges. Use a plywood board to compress insulation temporarily while installing sensors, then restore it carefully to maintain thermal performance. For spray foam attics, surface-mounted sensors work better than recessed ones. In insulated roofline assemblies (unvented attics), place sensors between insulation and roof sheathing to monitor the critical interface. Always document sensor locations with photos to avoid losing them in deep insulation.
Maintenance and Calibration Protocols
How Often to Recalibrate
Even high-quality sensors drift. Plan for annual calibration checks using saturated salt solutions (which create known humidity levels at specific temperatures). Some premium sensors feature automatic self-calibration that compares readings against a sealed reference chamber monthly. If your sensor lacks this feature, mark your calendar for yearly calibration. Sensors in particularly dusty or chemically active environments may need biannual checks. Always recalibrate after any physical impact or extreme temperature event.
Cleaning Sensor Probes
Dust and biological growth on sensor elements create false readings. Every six months, gently vacuum around sensors using a soft brush attachment. For the sensor element itself, use compressed air at low pressure (30 PSI or less) to avoid damage. Never use liquids or solvents, which can destroy sensitive components. If you notice persistent high readings that don’t match other indicators, the sensor may need professional cleaning or replacement.
Firmware Updates and Software
Manufacturers regularly release firmware updates that improve accuracy, add features, or patch security vulnerabilities. Enable automatic updates if available, or check quarterly for new releases. Update the companion smartphone app regularly to ensure compatibility. Keep a log of firmware versions and update dates—this helps troubleshoot issues and maintains warranty compliance. Some enterprise-grade systems offer remote diagnostic tools that technicians can use to verify sensor health without attic access.
Interpreting Your Moisture Data
Understanding Normal vs. Concerning Levels
Attic humidity should generally track outdoor humidity within 10-15% points, trending lower in winter and higher in summer. Readings consistently above 60% RH warrant investigation. Sustained readings above 70% demand immediate action. However, context matters: a brief spike to 75% RH during a summer thunderstorm is normal; three days at that level is not. Pay attention to the rate of change—humidity rising more than 5% per hour suggests active moisture intrusion rather than ambient conditions.
Seasonal Variations and Patterns
Your attic has a unique annual moisture signature. In cold climates, winter brings condensation challenges as warm indoor air meets cold roof decks. Summer introduces humidity infiltration through ventilation. Spring and fall often show the most stable readings. Track your data for a full year to establish baseline patterns. Many advanced systems can overlay your data with local weather reports, helping you distinguish between weather-related fluctuations and building envelope failures.
When to Take Immediate Action
Set alert thresholds based on absolute humidity and dew point, not just RH. When dew point approaches the temperature of your roof sheathing, condensation is imminent. If you receive an alert at 2 AM, don’t panic—check the trend data first. A single spike might be a sensor glitch; a sustained rise over several hours indicates a real problem. Have an action plan ready: know how to increase ventilation, operate attic fans manually, or contact emergency services if you suspect a roof leak during a storm.
Common Mistakes to Avoid
Relying on a Single Sensor
One sensor creates a single data point, not a moisture map. Large attics need at least three sensors: one near the ridge, one above the main moisture source (usually bathrooms), and one in the coldest corner. This triangulation approach identifies problem locations and prevents false confidence. A sensor showing normal readings might miss a localized condensation zone just 10 feet away. Budget for multiple sensors from the start—it’s cheaper than replacing sheathing in one missed problem area.
Ignoring Temperature Fluctuations
Focusing solely on humidity while ignoring temperature is like checking your car’s speed but not the fuel gauge. Temperature drives condensation, affects sensor accuracy, and indicates insulation problems. Always analyze temperature and humidity together. A 20°F temperature drop with stable humidity means your ventilation is working; stable temperature with rising humidity suggests an active moisture source. The best sensors display both metrics on a single psychrometric chart for easy interpretation.
Poor Placement Decisions
The most common error is placing sensors where they’re convenient rather than where they’re effective. Avoid the attic hatch area, which experiences constant air exchange and doesn’t represent the true attic environment. Don’t place sensors directly in front of soffit vents, which create artificially low readings. Never install sensors on the underside of roof decking, where they can be damaged by condensation and don’t reflect the air mass conditions. Think like a molecule of water vapor when positioning—where would you condense?
Cost vs. Value Analysis
Initial Investment Considerations
Entry-level sensors start around $30 but lack temperature compensation and data logging. Mid-range options ($75-$150) offer the accuracy and features most homeowners need. Professional-grade systems ($200-$400 per sensor) provide industrial accuracy, long-term reliability, and advanced integration. For a typical 1,500 square foot attic with three sensors, budget $300-$600 for quality equipment. Add $200-$500 for professional installation if needed. This investment pales compared to the $15,000 average cost of mold remediation.
Long-term Savings from Mold Prevention
A single prevented mold incident pays for your entire sensor system. Beyond remediation savings, moisture control extends roof life by preventing sheathing rot, preserves insulation R-value (wet insulation loses up to 40% of its thermal performance), and reduces energy costs. Properly monitored attics also prevent ice dams in winter and reduce cooling loads in summer. Most homeowners see a 5-10% reduction in energy bills after addressing moisture issues identified by sensors.
Insurance Implications
Many insurance companies now offer premium discounts for smart home monitoring systems, including moisture sensors. Document your installation with photos and keep calibration records. In the event of a claim, sensor data can prove you maintained proper conditions, potentially covering damage that might otherwise be denied due to “neglect.” Some policies specifically exclude mold damage unless you can demonstrate proactive prevention measures—moisture sensors provide that documentation.
Attic Moisture Sensors vs. Traditional Methods
Visual Inspections: The Limitations
The human eye detects moisture problems only after they’ve become visible—typically when mold is established or wood has darkened. By then, remediation costs have multiplied. Visual inspections miss condensation that occurs only at night or during specific weather conditions. They can’t quantify moisture levels or track trends. While visual checks remain valuable, they’re reactive, not preventive. Think of them as autopsies rather than health screenings.
Manual Hygrometers: Why They’re Insufficient
Those $15 hardware store hygrometers seem economical but lack the accuracy, data logging, and alerting capabilities needed for effective monitoring. Their cheap resistive sensors drift significantly within months. They can’t wake you at 3 AM when humidity spikes during a storm. Manual reading requires regular attic trips, which homeowners skip during extreme weather—the exact times when monitoring matters most. They’re like using a sundial instead of a programmable thermostat.
Professional Assessments: When You Need Them
Hire certified building performance professionals for baseline assessments, complex moisture problems, or when buying a home. They use thermal imaging, blower door tests, and professional-grade data loggers to diagnose issues. However, professional assessments are snapshots in time, not continuous monitoring. Use them to validate your sensor placement and interpret unusual data patterns, but don’t rely on annual inspections alone. The best approach combines continuous sensor monitoring with periodic professional validation.
Building a Comprehensive Moisture Management Strategy
Ventilation Improvements
Sensors identify problems; ventilation solves them. Ensure you have 1 square foot of net free ventilation area for every 150 square feet of attic floor space, split evenly between soffit and ridge vents. Consider powered attic ventilators with humidity sensors that activate automatically. For complex roof designs, balanced mechanical ventilation systems maintain slight negative pressure, actively pulling moisture out while preventing conditioned air loss.
Air Sealing Techniques
The best moisture prevention stops humidity at its source. Seal ceiling penetrations for recessed lights, plumbing stacks, and electrical wires with fire-rated caulk or spray foam. Install airtight attic hatches with weatherstripping. Seal ductwork leaks that dump conditioned air into the attic. Your moisture sensors will confirm the effectiveness of these measures—expect to see humidity drop 10-15% after comprehensive air sealing.
Insulation Upgrades
Proper insulation prevents warm, moist air from reaching cold surfaces. Ensure insulation meets current R-value recommendations for your climate zone (typically R-38 to R-60). Avoid compressing insulation, which reduces R-value and creates condensation points. In humid climates, consider vapor barrier paint on ceiling surfaces below the attic. Monitor sensor data before and after insulation upgrades to quantify improvements.
Troubleshooting Common Issues
False Alarms and How to Prevent Them
False alarms erode trust in your monitoring system. If you receive frequent alerts, first check sensor placement—is it too close to a surface or vent? Verify that temperature compensation is enabled. Review your alert thresholds; they may be too aggressive. Exclude data during known events like bathroom exhaust fan operation or active roof leaks being repaired. Some systems allow “learning periods” where they establish baselines before activating alerts.
Connectivity Problems
Attics challenge wireless signals. If sensors drop offline, try repositioning the hub closer to the attic or adding a mesh network repeater. For metal roofs or radiant barriers, you may need external antennas or wired sensors. Check for firmware updates that improve connectivity. Wi-Fi sensors should use 2.4GHz bands, which penetrate building materials better than 5GHz. Document signal strength at each sensor location during installation to identify weak spots before they become problems.
Sensor Drift and Failure Signs
Gradual reading changes that don’t correlate with weather or indoor conditions indicate sensor drift. Compare readings between multiple sensors; significant deviations suggest one sensor needs recalibration. Sudden, erratic readings or complete data loss often precede battery failure. Most sensors report battery level, but this can be unreliable in temperature extremes. Replace batteries annually as preventive maintenance, regardless of reported levels. If a sensor fails calibration twice, replace it—continued use provides false confidence.
Frequently Asked Questions
1. How many moisture sensors do I actually need in my attic?
For attics under 800 square feet, one properly placed sensor suffices. Larger attics require a minimum of three sensors: near the ridge line, above primary moisture sources like bathrooms, and in the coldest corner. Add one sensor for every additional 500 square feet or for each distinct attic zone separated by kneewalls or structural elements.
2. Can I use a standard indoor humidity monitor instead of a specialized attic sensor?
Standard indoor monitors lack the temperature compensation, durability, and accuracy required for attic conditions. Their readings become unreliable below 40°F or above 100°F, and they can’t handle the dust and chemical environment. Within six months, most indoor sensors will drift beyond usable accuracy in an attic setting.
3. What’s the ideal humidity level I should maintain in my attic?
Target relative humidity within 10-15% of outdoor levels, but never exceeding 60% RH for sustained periods. More importantly, monitor dew point temperature—keep it at least 10°F below the temperature of your coldest roof sheathing surface to prevent condensation. These targets vary by climate and season.
4. How do I know if my sensor is giving accurate readings?
Perform a simple validation: place the sensor in a sealed plastic bag with a cup of salt water (using a salt slurry) for 24 hours. It should read 75% RH at room temperature. For attic-specific validation, temporarily install a second sensor nearby and compare readings after 48 hours. Consistent deviation greater than 5% suggests one sensor needs calibration.
5. Will adding moisture sensors increase my home’s resale value?
While sensors themselves don’t directly increase appraised value, they demonstrate proactive maintenance that appeals to savvy buyers. Documented moisture monitoring can expedite inspections and provide confidence in roof and attic condition. Some buyers specifically seek homes with smart monitoring systems, viewing them as indicators of a well-maintained property.
6. Can moisture sensors detect roof leaks, or just humidity?
Most humidity sensors detect leaks indirectly through sudden humidity spikes. However, some advanced systems include leak detection cables or spot sensors that trigger on direct water contact. For comprehensive protection, combine humidity sensors with leak detection cables along valleys, around chimneys, and near roof penetrations where leaks most commonly occur.
7. How long do attic moisture sensors typically last?
Quality sensors last 5-10 years with proper maintenance. The sensing element degrades faster in dusty or chemically active environments. Battery-powered units may fail sooner due to corrosion from battery leakage. Plan for sensor replacement every 7 years as part of your home maintenance schedule, similar to smoke detectors.
8. Are there any fire safety concerns with installing sensors in attics?
Choose sensors with appropriate fire ratings for enclosed spaces. Battery-powered units pose minimal risk. For wired sensors, use plenum-rated cables and proper junction boxes. Never penetrate fire-rated assemblies without proper firestopping. Keep sensors away from recessed lighting, which generates significant heat. Most quality sensors operate at low voltage, presenting minimal fire hazard when installed correctly.
9. Can I integrate attic moisture sensors with my existing security system?
Many modern security systems include environmental monitoring zones that accept Z-Wave or hardwired sensor inputs. Contact your security provider to verify compatibility. Some systems treat moisture alerts as environmental alarms, triggering notifications alongside intrusion alerts. This integration centralizes monitoring and may reduce monitoring fees compared to separate services.
10. What should I do if my sensor shows consistently high humidity but I can’t find the source?
Persistent high readings indicate either moisture intrusion or inadequate ventilation. First, verify sensor accuracy with a second device. Then conduct a visual inspection during different weather conditions—some leaks only appear during wind-driven rain. Consider hiring a building performance specialist with a blower door and thermal imaging camera. They can identify hidden air leaks and vapor drive issues that sensors alone can’t locate.