Imagine stepping into a room where warmth embraces you like sunlight on a crisp morning—no drafts, no noisy fans, just silent, even comfort from above. Retrofit radiant ceiling panels are revolutionizing how we heat existing spaces, offering a sleek, energy-efficient solution that eliminates the need for invasive ductwork or bulky radiators. Whether you’re renovating a mid-century modern gem or simply tired of battling cold spots in your home, these innovative panels deliver targeted heat exactly where you need it most.
Unlike traditional heating systems that waste energy warming the air, radiant ceiling panels work by directly heating objects and people in a room through infrared radiation. This guide will walk you through everything you need to know about retrofitting your space with this cutting-edge technology, from assessing structural compatibility to optimizing performance for decades of reliable comfort.
Top 10 Retrofit Radiant Ceiling Panels
Detailed Product Reviews
1. BeVisible N Glow ETL Listed 1 Pack 3.93’’ Retrofit Light Kit for Ceiling Flush Ceiling Fan Light Replacement Panel PCB 18W 3000K 6000K 1900LM 120V Flicker-Free CRI90 Dimmable (Warm White 3000K)
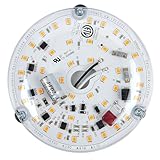
Overview: The BeVisible N Glow retrofit kit offers an 18W LED solution producing 1900 lumens of warm white (3000K) light, designed to replace traditional ceiling fan and flush mount fixtures. This ETL-listed panel replaces two 60W incandescents or 13W CFLs while consuming minimal power, making it ideal for energy-conscious homeowners seeking quality illumination in living spaces and bedrooms.
What Makes It Stand Out: This kit employs advanced driver-on-board (DOB) technology, eliminating bulky external drivers and simplifying installation. It achieves exceptional 5% triac dimming without flicker, paired with a 90+ CRI for accurate color rendering. The 50,000-hour lifespan and 5-year warranty provide long-term reliability, while Energy Star certification ensures efficiency standards are met.
Value for Money: At $15.59, this retrofit kit delivers premium features typically found in higher-priced alternatives. The 80% energy reduction translates to immediate utility savings, and the extended lifespan means fewer replacements over time. Compared to purchasing separate drivers and panels, this integrated solution offers significant cost advantages and installation convenience.
Strengths and Weaknesses: Pros include flicker-free deep dimming, high CRI color accuracy, no external driver requirement, robust certifications, and excellent heat dissipation. Cons are the fixed warm white temperature in this version, requirement for fixtures with mounting plates, and the need to verify inner diameter compatibility before ordering.
Bottom Line: For those prioritizing dimming performance and color quality, this retrofit kit is an outstanding choice. The combination of certifications, advanced technology, and long warranty makes it a reliable investment for upgrading ceiling fixtures with professional-grade results.
2. TobeBright 36W Ceiling Fan Light kit 6.69 inch 3200Lm, 3CCT 3000K/4000K/5000K Dimmable Ceiling Fan LED Light Replacement, Led Engine Retrofit Kit for Ceiling Light, Pendant, Lantern

Overview: The TobeBright 36W kit delivers an impressive 3200 lumens from its 6.69-inch panel, making it suitable for larger fixtures requiring substantial illumination. With switchable color temperatures (3000K/4000K/5000K), this retrofit solution addresses diverse lighting needs across ceiling fans, pendants, and lanterns in spaces like kitchens and dining rooms.
What Makes It Stand Out: The integrated color temperature selector on the backside provides unmatched versatility, allowing users to adapt lighting to seasons or activities. Eighty-four professional optical LED beads ensure uniform light distribution without flicker or delay. The wide 10-100% dimming range works with most LED dimmers, offering flexible brightness control throughout the day.
Value for Money: Priced at $15.99, this 36W powerhouse represents exceptional value, delivering twice the output of many competitors at similar price points. The 3-in-1 color flexibility eliminates buying multiple units for different rooms, while the professional-grade LED beads ensure durability and consistent performance over time.
Strengths and Weaknesses: Strengths include high lumen output, three selectable color temperatures, excellent optical design, broad dimmer compatibility, and effective heat dissipation. Weaknesses are the larger size limiting compatibility with smaller fixtures, potential overkill for compact spaces, and lack of specific certification mentions in the listing.
Bottom Line: This is the ideal solution for illuminating large spaces with customizable ambiance. The color-switching feature and powerful output make it a versatile, cost-effective upgrade for compatible fixtures where maximum brightness and flexibility are priorities.
3. OLYMSTAR 12W LED Flush Mount Ceiling Fan Light Kit Replacement,Retrofit LED Light Engine Panel,4500K Natural Light (1 Pack)

Overview: The OLYMSTAR 12W LED kit provides a budget-friendly retrofit solution producing natural 4500K light equivalent to a 60W incandescent. Designed for ceiling fans and flush mounts, this panel features magnetic installation and wide voltage compatibility for straightforward upgrades in hallways, bedrooms, and kitchens.
What Makes It Stand Out: Innovative magnetic mounting allows tool-free attachment to metal bases, while the included adapter enables installation over existing lampholders without removal. The 85-265V AC drive technology suits global applications, and the gear-design aluminum PCB ensures superior heat dissipation for enhanced safety and longevity.
Value for Money: At $9.99, this kit offers remarkable affordability without sacrificing core performance. The 80% energy savings and 50,000-hour lifespan deliver long-term value, while the 3-year warranty provides peace of mind. It’s an economical choice for multi-room upgrades or rental properties.
Strengths and Weaknesses: Pros include easy magnetic installation, wide voltage range, excellent heat management, natural light color, and strong safety features. Cons are the fixed 4500K temperature limiting ambiance control, lower brightness unsuitable for large areas, and shorter warranty than premium alternatives.
Bottom Line: Perfect for budget-conscious homeowners seeking simple, safe fixture upgrades. The magnetic installation and natural light output make it ideal for kitchens, hallways, and bedrooms where basic, reliable illumination is needed without advanced features.
4. Led Ceiling Light Panel Fixtures 12w Ceiling Fan Light Retrofit kit Circle Replacement Board Bulb 6000K 1-Pack(White)

Overview: This 12W circular LED panel delivers 1200 lumens of cool white 6000K light, designed as a straightforward replacement for ceiling fan and flush mount fixtures. With universal AC100-265V driver compatibility, it serves as a basic upgrade for incandescent or CFL bulbs in utility areas and workspaces.
What Makes It Stand Out: The panel utilizes high-brightness 5730 SMD LEDs, producing 50 lumens per chip for impressive efficacy. Its simple circular design fits standard fixtures, and the global voltage range makes it suitable for international use. The installation process is straightforward for DIY enthusiasts seeking quick upgrades without complex wiring.
Value for Money: At $10.98, this no-frills kit provides adequate brightness at a competitive price point. While lacking premium certifications, it offers 5-year lifespan expectancy with daily use, representing decent value for basic lighting needs where advanced features aren’t required.
Strengths and Weaknesses: Strengths include high brightness per watt, simple installation, global voltage compatibility, and cool white clarity for task lighting. Weaknesses are absence of dimming capability, lack of safety certifications (UL/ETL), unspecified CRI, vague warranty terms, and fixed cool temperature limiting versatility.
Bottom Line: A functional budget option for non-dimming applications in garages, workshops, or utility areas. Choose this if certifications and color quality aren’t priorities, but verify fixture compatibility first and consider your need for adjustable lighting before purchasing.
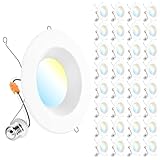
5. Sunco 6 Inch LED Recessed Light, Retrofit Downlight Can Lights for Ceiling, Baffle Trim, 1050 LM, 13W (75W Equivalent), 5000K Daylight, Dimmable, Damp Rated UL 4 Pack

Overview: Sunco’s 4-pack retrofit downlights provide 13W (75W equivalent) LED solutions producing 1050 lumens of daylight 5000K illumination. Designed for 5-6 inch recessed cans, these UL-certified, Energy Star listed fixtures suit kitchens, bathrooms, and common areas requiring reliable, damp-rated lighting with professional performance.
What Makes It Stand Out: The adjustable sizing fits both 5 and 6-inch housings, eliminating guesswork during purchase. Seamless 100-10% dimming works with most dimmers, while the baffle trim reduces glare. UL certification and Energy Star listing ensure safety and efficiency, backed by Sunco’s USA-based 7-year warranty and knowledgeable support specialists.
Value for Money: At $7.25 per unit ($28.99/4-pack), these certified downlights offer professional-grade quality at consumer pricing. Bulk packaging reduces per-unit cost significantly compared to individual purchases. The extensive warranty and USA support add substantial long-term value and peace of mind.
Strengths and Weaknesses: Pros include dual-size compatibility, full dimming range, damp location approval, robust certifications, long warranty, and mercury-free construction. Cons are the 5000K daylight-only option (no warm white), California prohibition due to regulations, and restriction to recessed can fixtures only.
Bottom Line: The best choice for recessed lighting renovations, offering certified safety, flexibility, and warranty coverage. Ideal for multi-room installations where reliability and dimming performance are essential, making it a smart bulk purchase for homeowners and contractors alike.
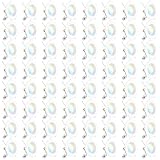
6. Sunco 32 Pack 6 Inch LED Recessed Light, Retrofit Downlight Can Lights for Ceiling, Baffle Trim, 1050 LM, 13W (75W Equivalent), Selectable CCT 2700K/3000K/3500K/4000K/5000K, Dimmable, Damp Rated UL
Overview: The Sunco 32-pack offers a comprehensive solution for upgrading recessed lighting across large residential or commercial spaces. Each 6-inch retrofit produces 1050 lumens while consuming just 13 watts, equivalent to traditional 75-watt bulbs. The baffle trim design reduces glare, making these suitable for kitchens, living rooms, bedrooms, and damp locations like bathrooms.
What Makes It Stand Out: The standout feature is the selectable color temperature, offering five options from warm 2700K to daylight 5000K via a simple slider switch. This flexibility allows you to customize lighting room-by-room during installation without buying different products. The retrofit design fits both 5-inch and 6-inch cans, and the damp rating expands installation possibilities. Instant-on, flicker-free performance with full dimming compatibility adds professional-grade functionality.
Value for Money: At $119.99 ($3.75 per unit), this pack delivers exceptional bulk value—individual retrofits often cost $8-15 each. The seven-year warranty and UL listing provide peace of mind, while the energy savings (13W vs 75W) quickly offset the initial investment. For projects requiring 20+ lights, this bulk pricing is hard to beat.
Strengths and Weaknesses: Strengths include unbeatable price-per-unit, versatile CCT selection, easy installation, damp location approval, and reliable performance. Weaknesses: The 32-pack may be excessive for small projects; no smart home integration; requires existing recessed cans; baffle trim may not suit all aesthetic preferences.
Bottom Line: Perfect for large renovations, new construction, or contractors. The selectable CCT and bulk savings make this a smart choice for extensive lighting overhauls where consistency and flexibility matter.
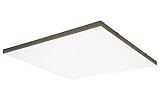
7. QuestLED 1x4 LED Ceiling Light 4 Pack, 40W Flat Ultra-Slim Dimmable Edge Lit LED Panel Light (3500K Warm White)

Overview: The QuestLED 4-pack delivers commercial-grade LED panel lighting designed for modern ceiling systems. Each 1x4 foot panel produces an impressive 4,600 lumens of 3500K warm white light while consuming only 40 watts. The ultra-slim edge-lit design creates uniform, shadowless illumination ideal for offices, schools, healthcare facilities, and retail spaces where visual clarity is paramount.
What Makes It Stand Out: These panels achieve exceptional light uniformity through edge-lit technology, eliminating hot spots and harsh shadows. The 0-10V dimming capability allows smooth brightness adjustment from 100% down to 5%—far lower than standard dimmers—enabling precise ambient control. The mercury-free construction supports environmental goals, while the dual mounting system (T-bar or pendant) accommodates various ceiling types without complex retrofitting.
Value for Money: At $209.99 ($52.50 per panel), these sit in the mid-range for commercial lighting. While pricier than basic troffers, the 50,000-hour lifespan (45 years at 3 hours daily) dramatically reduces maintenance and replacement costs. Energy consumption is 40% lower than fluorescent equivalents, delivering substantial utility savings that justify the upfront investment within 2-3 years in commercial settings.
Strengths and Weaknesses: Strengths include superior brightness, flawless light distribution, deep dimming range, long lifespan, and versatile installation. Weaknesses: Single 3500K temperature offers no flexibility; requires specialized 0-10V dimmers; higher initial cost than traditional fixtures; may be overpowered for small residential rooms.
Bottom Line: An excellent choice for commercial spaces demanding professional, uniform lighting. For residential use, consider only if you need high-output lighting and are satisfied with the fixed warm-white temperature.
8. Sunco 64 Pack 6 Inch LED Recessed Light, Retrofit Downlight Can Lights for Ceiling, Baffle Trim, 1050 LM, 13W (75W Equivalent), Selectable CCT 2700K/3000K/3500K/4000K/5000K, Dimmable, Damp Rated UL
Overview: This 64-pack from Sunco is essentially a supersized version of their popular 6-inch retrofit kit, offering identical specifications for larger-scale projects. Each unit delivers 1050 lumens at 13 watts with a 75-watt equivalent output. The baffle trim design minimizes glare, while the selectable CCT feature provides five temperature options from 2700K to 5000K, making these suitable for comprehensive whole-home or multi-unit installations.
What Makes It Stand Out: The massive 64-unit quantity combined with per-unit selectable color temperature gives contractors and large-project homeowners unprecedented flexibility. Like the smaller pack, the simple slider switch allows temperature customization during installation, ensuring each room achieves optimal ambiance. The universal 5/6-inch can compatibility, damp rating, and instant-on flicker-free performance remain consistent with the 32-pack offering.
Value for Money: At $239.99 ($3.75 per unit), the price-per-light matches the 32-pack exactly, maintaining Sunco’s aggressive bulk pricing strategy. For projects requiring 50+ fixtures, this eliminates multiple orders and ensures batch consistency. The seven-year warranty and UL certification apply to all units, providing the same risk protection as smaller quantities while maximizing purchase efficiency.
Strengths and Weaknesses: Strengths include the same excellent value-per-unit as the 32-pack, massive quantity for uniform large-scale installations, versatile CCT selection, and proven reliability. Weaknesses: 64 units may be overwhelming for typical single-home projects; represents significant upfront cost; lacks smart features; requires existing can housings.
Bottom Line: Ideal for contractors, builders, or extensive whole-property renovations. If your project needs exceed 50 lights, this bulk pack delivers unmatched convenience and consistency at the same excellent per-unit value.
9. 375W 208V Radiant Ceiling Panels
Overview: Note: This is a radiant heating panel, not a lighting fixture. This 375-watt electric panel provides silent, draft-free warmth by radiating infrared heat from the ceiling. Measuring 51 x 27 inches and just 2.63 inches thick, it installs into T-bar ceilings, recesses into drywall, or surface mounts. Operating at 208 volts, it’s designed for commercial spaces or residential applications with appropriate electrical service.
What Makes It Stand Out: Unlike forced-air systems, this panel heats objects and people directly without moving air, eliminating drafts, noise, and airborne dust circulation. The installation versatility is exceptional—adapting to T-bar, recessed, or surface-mount applications without complex ductwork. This preserves wall and floor space while delivering even heat distribution across its coverage area, making it ideal for bathrooms, offices, or supplemental heating zones.
Value for Money: At $399.50 per panel, the upfront cost is moderate for radiant heating but requires consideration of operating expenses. Electric resistance heating typically costs 3-5 times more than heat pumps per BTU. However, the 208V configuration allows efficient circuit loading in commercial settings. With no moving parts, maintenance costs are zero, and the lifespan exceeds decades, potentially offsetting long-term HVAC servicing expenses.
Strengths and Weaknesses: Strengths include silent operation, no drafts, space-saving design, installation flexibility, and even heat distribution. Weaknesses: High operating cost for electric resistance heating; requires 208V service (non-standard for most homes); 375W output only heats small areas (100-150 sq ft); expensive as primary heat source.
Bottom Line: Best suited for targeted supplemental heating in commercial spaces or well-insulated rooms with 208V availability. Consider only if silent, draft-free operation justifies the higher energy costs compared to conventional heating systems.
What Are Retrofit Radiant Ceiling Panels?
Retrofit radiant ceiling panels are slim, energy-efficient heating elements designed to install directly onto or into existing ceiling structures without major demolition. These panels emit infrared heat that warms surfaces, furniture, and occupants below, creating a consistent thermal environment from the top down.
Understanding the Technology
At their core, these panels use either electric resistance heating or hydronic (hot water) tubing to generate heat. Electric models contain heating wires or films sandwiched between layers of conductive material, while hydronic systems circulate warmed fluid through concealed pipes. Both types operate at relatively low temperatures—typically 100-170°F—making them safe for ceiling applications while delivering exceptional comfort.
How They Differ from Traditional Systems
Conventional forced-air systems heat air that quickly rises to the ceiling, creating temperature stratification and energy waste. Radiant ceiling panels flip this paradigm by positioning the heat source where warm air naturally collects, ensuring efficient downward radiation. Unlike bulky wall radiators or underfloor systems that require extensive subfloor modifications, ceiling panels preserve your floor plan and wall space entirely.
Why Choose Ceiling-Mounted Radiant Heating?
The decision to mount radiant heat overhead rather than underfoot or within walls involves strategic advantages that many homeowners overlook.
The Science of Radiant Heat Transfer
Radiant heat travels in electromagnetic waves that heat objects directly rather than the air between them. Your ceiling becomes a massive, low-temperature radiator that creates a gentle temperature gradient—warmest near the ceiling, comfortably cool at floor level. This mirrors how the sun warms the earth and aligns perfectly with human thermal comfort preferences.
Benefits Over Floor and Wall Systems
Ceiling panels avoid the floor height buildup of underfloor systems (which can raise floors 1-2 inches) and eliminate the furniture placement restrictions of wall radiators. They also heat up faster—reaching operating temperature in 15-30 minutes versus hours for concrete slab hydronic systems. For retrofit projects, ceiling access is often easier than tearing up finished floors or opening wall cavities.
Assessing Your Space for Retrofit Compatibility
Not every ceiling is ideal for radiant panel installation, but most can accommodate the technology with proper evaluation.
Structural Considerations
Your ceiling must support the panel weight—typically 2-5 pounds per square foot for electric models, more for hydronic. Check joist spacing (usually 16" or 24" on center) and ensure solid anchoring points. For drywall ceilings, panels can mount directly to the surface; plaster ceilings may require reinforcement or backer boards to prevent cracking.
Ceiling Height Requirements
You’ll need a minimum ceiling height of 7'6" for surface-mounted panels to maintain comfortable headroom. Recessed installations require 8-10 inches of clearance above the ceiling plane for housing and insulation. Low ceilings benefit from ultra-thin panels (as slim as 1 inch) that minimize spatial impact while maximizing heat output.
Electrical Capacity Evaluation
Electric panels draw significant power—typically 100-250 watts per panel. A 200-amp service panel can usually accommodate a modest retrofit, but older homes with 100-amp service may require an upgrade. Calculate your existing load and plan for dedicated 240V circuits for optimal efficiency and performance.
Types of Retrofit Radiant Ceiling Panels
Understanding the spectrum of available technologies helps you match the system to your specific needs and budget.
Electric vs. Hydronic Systems
Electric panels shine in smaller zones or spot-heating applications, offering simple installation and individual room control. Hydronic systems excel in whole-house retrofits, connecting to boilers or heat pumps for superior operating costs, though they require more invasive plumbing work. Your choice often hinges on energy costs in your region—hydronic wins where natural gas is cheap; electric makes sense where solar offsets grid power.
Surface-Mounted vs. Recessed Installation
Surface-mounted panels attach directly to the existing ceiling, ideal when attic access is limited or you want a faster install. Recessed panels sit flush with the ceiling plane, creating a seamless look but requiring ceiling material removal and proper insulation above to prevent heat loss. Drop ceiling grids offer a third option—panels designed to replace standard 2’x2’ or 2’x4’ ceiling tiles.
Modular vs. Custom Solutions
Modular panels come in standard sizes (2’x4’, 2’x2’, 4’x8’) and wattages, allowing you to mix and match like building blocks. Custom panels can be fabricated to exact dimensions, wattage specifications, and even printed with custom graphics to blend with your ceiling design. For most retrofits, modular systems offer the best balance of cost and flexibility.
Key Features to Evaluate Before Buying
The performance and longevity of your system depend on several critical specifications that manufacturers don’t always highlight prominently.
Wattage Density and Heat Output
Look for panels delivering 25-40 watts per square foot for primary heating in well-insulated spaces. Lower densities (15-20 W/sq ft) work for supplemental heating or mild climates. Avoid ultra-high density panels that create hot spots and reduce comfort. The best systems provide even heat distribution across the entire panel surface.
Material Quality and Thermal Mass
Aluminum-faced panels offer excellent heat transfer and durability, while gypsum-core panels integrate seamlessly with drywall ceilings. High-quality panels include multiple layers—insulation backing, heating element, heat-spreading layer, and protective face—to ensure efficient, safe operation. Thicker panels with more thermal mass provide gentler, more consistent heat but respond slower to thermostat changes.
Control System Compatibility
Modern panels should integrate with standard 24V thermostats, smart home hubs, and zoning controllers. Look for units with built-in temperature sensors and overheat protection. Some advanced systems offer Wi-Fi connectivity, occupancy sensing, and learning algorithms that adapt to your schedule for maximum efficiency.
Noise Levels and Acoustic Properties
Quality radiant panels operate silently, but poorly designed units can emit faint clicking or humming as they heat and cool. Panels with acoustic backing can actually improve room sound dampening by adding mass to the ceiling. If noise sensitivity is a concern, request decibel ratings and choose models with solid-state controls rather than mechanical relays.
Installation: DIY vs. Professional
The complexity of your retrofit will determine whether you can tackle portions yourself or need professional expertise.
What You Can Safely Do Yourself
Homeowners comfortable with basic electrical work can handle mounting panels, running low-voltage control wiring, and installing thermostats. Surface-mounted electric panels often come with plug-and-play connectors that simplify installation. You can also prepare the space by moving insulation, marking joist locations, and planning circuit routing.
When to Call a Licensed Professional
Any 240V electrical connections, service panel upgrades, or hydronic plumbing requires a licensed professional. Ceiling work involving structural modifications, fire-rated assemblies, or asbestos-containing materials demands certified contractors. Professional installation typically includes load calculations, thermal imaging verification, and warranty protection worth the additional cost.
Permitting and Code Requirements
Most jurisdictions require electrical permits for new circuits and may mandate inspections for ceiling modifications. Fire codes specify clearance requirements around panels, especially near recessed lighting. Your contractor should pull all necessary permits and ensure compliance with NEC (National Electrical Code) and local amendments.
Energy Efficiency and Operating Costs
Understanding the true cost of operation helps you size your system appropriately and predict long-term savings.
Understanding BTU Ratings
While panels are rated in watts, convert to BTUs for heating load comparisons (1 watt = 3.41 BTUs). A well-insulated room needs roughly 30-35 BTUs per square foot in cold climates, less in moderate zones. Calculate your home’s heat loss using Manual J methodology or hire an energy auditor for precise sizing—oversized systems cycle frequently and waste energy.
Zoning Strategies for Maximum Savings
Divide your home into heating zones based on occupancy patterns and solar gain. Bedrooms can run cooler than living spaces; south-facing rooms need less heat than north-facing ones. Individual panel controls allow you to heat only occupied areas, potentially reducing heating costs by 20-40% compared to central systems.
Integration with Smart Home Systems
Connect panels to smart thermostats that learn your schedule and adjust based on outdoor temperature. Use geofencing to pre-heat rooms as you arrive home. Advanced systems can integrate with window sensors to pause heating when windows open, or with weather forecasts to optimize startup times for maximum efficiency.
Design and Aesthetic Considerations
The visual impact of your retrofit matters as much as the thermal performance—especially in living spaces.
Panel Finishes and Visual Integration
Standard white panels blend with most ceilings, but custom finishes include wood veneers, metallic surfaces, and even printed artwork. Some manufacturers offer paintable surfaces that accept standard latex paint for perfect color matching. Consider the panel’s reflectivity—high-gloss finishes improve heat output but may create unwanted glare with certain lighting.
Impact on Ceiling Height
Surface-mounted panels reduce ceiling height by 1-3 inches, which matters in older homes with already-low ceilings. Recessed installations preserve headroom but require sufficient attic space. For basements with exposed joists, panels can mount between joists with a finished drywall soffit, creating a coffered ceiling effect that actually enhances the aesthetic.
Lighting and Fixture Coordination
Plan panel placement around existing ceiling fixtures, keeping panels at least 6 inches from recessed lights to avoid overheating. Some manufacturers offer integrated LED lighting panels that combine heating and illumination in a single unit. Ceiling fans can actually improve radiant panel performance by gently circulating the warm air layer that forms near the ceiling.
Common Retrofit Challenges and Solutions
Every existing home presents unique obstacles—anticipating them prevents costly mid-project surprises.
Dealing with Existing Insulation
Panels installed on the ceiling plane need insulation above to prevent heat loss into the attic. Blown-in insulation may need temporary removal and replacement around mounting points. Spray foam insulation provides excellent sealing but makes future panel service difficult. Create access panels in the attic for any junction boxes or connections.
Managing Thermal Bridging
Metal fasteners and framing members can conduct heat away from panels, creating cold stripes. Use thermal break washers and isolate panels from conductive framing with non-metallic standoffs. Infrared thermography during commissioning can identify thermal bridging issues before they become permanent problems.
Wiring and Plumbing Access Issues
Older homes with plaster-and-lath ceilings make wire fishing difficult. Consider running surface-mounted wire moldings painted to match the ceiling, or use wireless control systems that reduce wiring needs. For hydronic systems, PEX tubing can often be snaked through existing wall cavities with minimal drywall damage compared to rigid copper.
Cost Breakdown: Budgeting Your Project
Realistic budgeting separates successful retrofits from abandoned projects.
Material Costs vs. Installation Labor
Electric panels run $200-500 per unit for quality models, while hydronic panels cost $150-350 plus boiler and pump expenses. Professional installation typically doubles the total project cost, with electricians charging $75-150 per hour and HVAC contractors $100-200 per hour. A typical 200 sq ft room might cost $1,500-3,000 fully installed.
Hidden Expenses to Plan For
Factor in thermostat upgrades ($100-300 each), electrical panel modifications ($500-2,000), attic insulation improvements ($1-3 per sq ft), and ceiling repairs or repainting. Structural reinforcement, asbestos abatement, or bringing outdated electrical up to code can add thousands. Always include a 15-20% contingency fund.
Financing and Incentive Options
Many utilities offer rebates for efficient electric heating upgrades. Home equity lines of credit or energy improvement mortgages can finance larger projects. Some manufacturers provide 0% financing promotions. Check the Database of State Incentives for Renewables & Efficiency (DSIRE) for local programs that might offset 10-30% of your costs.
Maintenance and Longevity
A well-designed radiant ceiling system requires minimal maintenance but benefits from periodic attention.
Routine Care Requirements
Dust panels annually with a soft brush attachment—accumulated dust can slightly reduce efficiency. Check electrical connections every 3-5 years for signs of overheating or corrosion. Hydronic systems need annual boiler service and occasional pressure testing. Keep attic insulation clear of panel housings to prevent overheating.
Expected Lifespan of Components
Quality electric panels last 25-40 years, with heating elements being the most likely failure point. Hydronic tubing can last 50+ years, but pumps and valves may need replacement every 10-15 years. Control systems typically require updates every 10-20 years as technology advances. Look for warranties covering at least 10 years on panels and 5 years on controls.
Troubleshooting Common Issues
Uneven heating often indicates improper panel spacing or thermal bridging. Panels that won’t turn on might have tripped GFCI protection or failed temperature sensors. Hydronic systems with gurgling sounds likely have air in the lines needing bleeding. Most issues are diagnosed with a simple infrared thermometer and multimeter.
Performance Optimization Tips
Fine-tuning your system after installation maximizes comfort and efficiency.
Thermostat Placement Strategies
Mount thermostats on interior walls away from drafts, direct sunlight, and panel influence. For ceiling systems, place thermostats 4-5 feet high to sense occupant-level temperature accurately. Consider averaging multiple sensors in large rooms for more uniform control. Avoid placing thermostats in hallways that don’t represent actual living space conditions.
Furniture and Layout Considerations
Radiant heat travels line-of-sight, so avoid placing tall bookcases or cabinets directly beneath panels. Open floor plans benefit most from ceiling systems as heat can radiate freely. In bedrooms, position panels over the bed area for personal comfort while allowing perimeter zones to remain cooler. Glass-top tables and polished floors reflect radiant heat effectively, improving system performance.
Seasonal Adjustments
Lower panel temperatures in spring and fall to prevent overheating during mild weather. Use programmable schedules that reduce temperatures 5-7°F during sleep hours—radiant systems recover quickly. In vacation homes, enable “away” modes that maintain minimum temperatures to prevent freeze damage while minimizing energy use.
Building Codes and Safety Standards
Compliance isn’t optional, and understanding requirements upfront prevents red tags and rework.
Electrical Codes for Ceiling-Mounted Units
NEC Article 424 covers fixed electric space heating equipment, requiring dedicated circuits, disconnect means, and GFCI protection in damp locations. Panels must be listed by a recognized testing laboratory (UL, ETL). Wire gauge must handle 125% of the panel’s rated current, and circuits need arc-fault protection in living areas.
Fire Safety Ratings
Panels must meet specific flame-spread and smoke-developed ratings, especially in multi-family buildings. Most jurisdictions require a minimum 1/2" drywall thermal barrier between panels and occupied space. Keep panels 3 feet from storage areas and never install over closets where items might be stacked against the ceiling. Some fire codes limit total wattage density per square foot of ceiling area.
Insurance Implications
Notify your homeowner’s insurance before installation, as unreported electrical modifications can void coverage. Some insurers offer discounts for whole-house electric heating systems with modern safety features. Keep all permits, inspections, and manufacturer certifications on file. Hydronic systems may require additional water damage coverage considerations.
ROI and Property Value Impact
Beyond comfort, your investment should make financial sense.
Energy Savings Over Time
In well-insulated homes, radiant ceiling panels can reduce heating costs 10-30% compared to forced-air systems by eliminating duct losses and enabling precise zoning. Savings compound when paired with time-of-use electricity rates—panels can pre-heat during off-peak hours. Most homeowners see payback in 7-12 years, faster in regions with high gas heating costs.
Resale Value Considerations
Modern, efficient heating systems appeal to buyers seeking comfort and low operating costs. Radiant ceiling panels are a strong selling point in luxury markets where invisible heating is prized. Document your installation with thermal imaging reports and energy bills showing pre-and-post consumption. Some appraisers will assign value to permanent heating improvements.
Comparing Payback Periods
Electric panels offer faster payback in small projects (1-3 rooms) due to lower installation costs. Hydronic systems justify their higher upfront cost in whole-house applications or where natural gas is inexpensive. Solar panel integration dramatically improves electric system economics, potentially achieving payback in under 5 years when combined with federal tax credits.
Frequently Asked Questions
How much do retrofit radiant ceiling panels cost per square foot of living space?
Expect $6-12 per square foot for electric systems including installation, or $8-15 for hydronic. Total costs depend on ceiling height, accessibility, and local labor rates. A typical 12’x12’ bedroom runs $1,000-2,500 fully installed.
Can I install radiant ceiling panels in a bathroom or kitchen?
Yes, with proper specifications. Choose panels rated for damp locations with GFCI protection. In kitchens, avoid placing panels directly above cooktops where steam and grease accumulate. Bathroom panels should mount away from direct shower spray and include timers for moisture control.
Will ceiling panels heat my floors enough to be comfortable?
Radiant ceiling panels primarily heat objects and people, not the air. While floors will feel warmer than with forced-air systems, they won’t reach the temperatures of dedicated radiant floor systems. The comfort comes from reduced temperature stratification and direct radiant warmth, not hot floors.
How do ceiling panels perform in homes with high ceilings or open floor plans?
They excel in these applications. The overhead position effectively counteracts the natural heat rise in tall spaces. For vaulted ceilings, position panels at the lower portion of the slope. In open floor plans, panels create distinct comfort zones without physical barriers, though you may need higher wattage density due to increased air volume.
Can radiant ceiling panels be my primary heat source in a cold climate?
Absolutely, provided your home meets modern insulation standards (R-30+ attic, R-20+ walls). In extremely cold regions (-20°F design temperature), you may need supplemental heating or higher panel density. Conduct a proper heat loss calculation before committing to ceiling panels as your sole heat source.
Do these panels interfere with Wi-Fi, cell signals, or electronics?
No. Radiant panels operate at low electromagnetic frequencies that don’t interfere with wireless communications. In fact, because they don’t create air movement, they reduce dust circulation that can interfere with electronics compared to forced-air systems.
What happens if a panel fails? Can it be repaired?
Most electric panels have modular heating elements that can be replaced without removing the entire unit. Hydronic systems can isolate individual panels for service. Keep spare panels or elements if the manufacturer has limited availability. Professional diagnosis typically costs $150-300, with repairs running $200-600 depending on the issue.
How do I know what size panels to buy for my room?
Calculate your room’s heat loss (Manual J) or use the rule of thumb: multiply square footage by ceiling height, then by a climate factor (2.5 for mild, 4 for cold climates) to get required BTUs. Convert to watts and select panels that meet 80-90% of that load—oversizing reduces efficiency and comfort.
Are there any health concerns with infrared heating from above?
Infrared radiation is simply heat energy—identical to what you feel from the sun or a fireplace. It’s completely safe and actually reduces airborne allergens by eliminating forced-air circulation. The panels operate at temperatures far below combustion levels, producing no emissions, VOCs, or electromagnetic fields of concern.
Can I install panels on a textured or popcorn ceiling?
Yes, but preparation is key. Surface-mounted panels need a flat mounting surface—scrape popcorn texture from the installation area or install furring strips to create a level plane. Recessed installations require complete texture removal. Some manufacturers offer spacers specifically designed for textured ceilings that maintain proper air gap and thermal performance.