Installing a smart lock seems straightforward—until you’re staring at a pristine door with a drill in hand, realizing one wrong move could turn a $300 upgrade into a $500 door replacement. The difference between a professional-looking installation and a DIY disaster often comes down to one overlooked tool: the installation jig. While YouTube tutorials make freehand drilling look simple, experienced locksmiths know that precision is non-negotiable when you’re boring through someone’s front door.
Smart lock installation jigs are the unsung heroes of door hardware upgrades, transforming a nerve-wracking process into a repeatable, accurate, and confidence-building project. This comprehensive guide pulls back the curtain on what makes these tools indispensable for DIYers, how to evaluate the features that actually matter, and why understanding the nuances of jig design can save you time, money, and countless headaches. Whether you’re upgrading your first deadbolt or planning to install smart locks throughout your entire property, mastering the art of jig selection and use is your ticket to pro-level results.
Top 10 Smart Lock Installation Jigs for DIYers
Detailed Product Reviews
1. Pro-Lok Door Lock Installation Kit (INJIG-KJ)
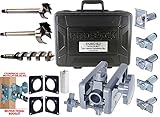
Overview: The Pro-Lok INJIG-KJ represents the pinnacle of professional door lock installation tools, engineered specifically for locksmiths and high-volume contractors who demand unwavering precision. This comprehensive system centers around the renowned “Killer Jig” and includes five specialized markers for every conceivable door hardware configuration. The kit arrives in a heavy-duty carrying case measuring 16 x 12 x 6 inches, containing hardened bushing plates and three premium bits.
What Makes It Stand Out: The Killer Jig’s reputation in the industry is unmatched, offering unparalleled accuracy for repetitive commercial installations. The inclusion of separate strike plate, latch, deadbolt, lip strike, and strike locator markers eliminates guesswork entirely. Hardened steel bushing plates ensure the 2-1/8" and 1-1/2" multi spur bits maintain perfect alignment through hundreds of installations, while the 1" auger bit handles latch prep with surgical precision.
Value for Money: At $564.75, this kit commands a premium price that only professionals can justify. For contractors installing multiple doors daily, the durability and time savings quickly offset the initial investment. However, DIYers or occasional users will find the cost prohibitive compared to sub-$100 alternatives. The hardened components and replaceable parts ensure a service life measured in years, not projects.
Strengths and Weaknesses: Pros: Professional-grade durability, comprehensive marker set, hardened steel components, industry-standard precision, excellent for high-volume work. Cons: Extremely expensive for casual use, significant overkill for homeowners, heavy and bulky for transport, steep learning curve for novices.
Bottom Line: This kit is exclusively for professional locksmiths and commercial contractors. If door hardware installation is your livelihood, the Pro-Lok INJIG-KJ is a worthwhile investment that pays dividends in accuracy and efficiency. For everyone else, look elsewhere.
2. Door Hinge Jig and Door Lock Installation Kit, Aluminum Alloy Router Template for Hinge Mortising from 2.5" to 5" and Types of Square, 1/4", 5/8" Radius, Door Hole Drilling Kit for Knob and Deadbolt

Overview: This all-in-one aluminum alloy system tackles both hinge mortising and lock installation in a single package, making it an attractive option for DIY enthusiasts and semi-professional installers. The kit handles hinge sizes from 2.5" to 5" and accommodates square, 1/4", and 5/8" radius corners, while the lock jig adjusts for standard 1-3/8" and 1-3/4" door thicknesses with 2-3/8" and 2-3/4" backsets.
What Makes It Stand Out: The dual-functionality eliminates the need for separate jigs, saving both money and storage space. Silicone anti-skid pads on both sides protect door surfaces while providing stability during routing—a thoughtful feature absent in many competitors. The aluminum construction offers superior rigidity compared to plastic alternatives, reducing flex and improving cut accuracy across various hinge dimensions.
Value for Money: Priced at $46.99, this kit delivers exceptional value by combining two tools into one. Purchasing separate hinge and lock jigs would typically cost $70-$100. While not professional-grade, the aluminum build quality exceeds expectations for the price point, making it ideal for homeowners tackling multiple door upgrades or handymen building their tool arsenal.
Strengths and Weaknesses: Pros: Dual-function versatility, aluminum durability, surface protection pads, wide hinge size compatibility, complete accessory package. Cons: Aluminum may bend under heavy professional use, lacks fine-tuning adjustments of premium kits, router not included, instructions could be clearer for beginners.
Bottom Line: An excellent choice for DIYers and handymen seeking one tool for both hinge and lock installation. It balances affordability with functionality, delivering professional-looking results without the professional price tag.
3. DUEBEL Door Lock Hole Opener Kit for Installing Doors Lock Mortiser Kit for Wooden Door Lock Jig Mortising Machine Door Lock Installation Kit Jig Mortise Machine Door Hinge Jig + Lock Tongue Opener

Overview: The DUEBEL kit positions itself as an industrial-grade mortising machine for serious contractors and ambitious DIYers. Weighing 13.66 pounds and housed in a substantial blow-molded case, this steel-construction tool features an upgraded linear bearing system for smooth, jam-free operation. It includes three tungsten steel alloy cutters (18/22/24mm) designed for various lock body sizes and a dedicated lock tongue hole opener.
What Makes It Stand Out: Eight specific upgrades distinguish this kit: industrial linear bearings, silicone dustproof sleeves, surrounding positioning screws, adjustable bearing seat slide rails, fine-tuning slide rail design, solid steel positioning rings, and improved parallel clamp feet. These features provide micro-adjustments and precision control that budget jigs simply cannot match. The tungsten steel cutters offer superior hardness and longevity compared to standard high-speed steel bits.
Value for Money: At $109.99, this kit occupies the mid-high tier, offering legitimate professional features without reaching Pro-Lok pricing. The industrial components and comprehensive accessory package (gloves, chisel, ruler) justify the cost for users who value precision and durability. For contractors, the time savings and professional results provide solid ROI after several jobs.
Strengths and Weaknesses: Pros: Industrial-grade precision, tungsten steel cutters, comprehensive fine-tuning adjustments, includes lock tongue opener, professional accessories. Cons: Heavy and bulky, significant learning curve, overkill for occasional use, price may deter casual DIYers, requires practice for optimal results.
Bottom Line: Perfect for contractors and serious DIY remodelers who prioritize precision and durability. The DUEBEL kit bridges the gap between consumer and professional tools, delivering industrial performance without the premium price tag.
4. Milescraft 1338 Lock Mate PLUS – Self Clamping, Professional Door Lock Installation Kit, Door Lock Jig for Wood/Metal Doors with 1-3/8” and 1-3/4” Thickness. Bi-Metal Cobalt Hole Saws Included

Overview: The Milescraft 1338 Lock Mate PLUS targets homeowners and occasional installers with its innovative self-clamping design that eliminates the need for screws or additional hardware. This compact kit focuses exclusively on lock installation for standard wood and metal doors, accommodating 1-3/8" and 1-3/4" thicknesses. The package includes 2-1/8" and 1" Bi-Metal Cobalt hole saws capable of cutting both solid and hollow-core doors.
What Makes It Stand Out: The self-clamping mechanism sets this kit apart, gripping the door securely without marring surfaces—a major advantage for finished doors. The metal-lined stepped drill guide bushings protect the jig from wear, extending its lifespan significantly compared to all-plastic models. Including cobalt alloy hole saws at this price point is remarkable, as these bits alone typically cost $20-$30 separately.
Value for Money: At $39.99, this kit offers outstanding value for homeowners tackling one or two door lock installations. The self-clamping feature saves time and prevents costly door damage, while the included cobalt saws provide professional cutting performance. For occasional use, it outperforms cheaper plastic jigs that flex and wear quickly, making it a smart long-term purchase.
Strengths and Weaknesses: Pros: Self-clamping (no screws/damage), includes cobalt hole saws, metal-lined bushings, affordable price, easy setup, works on metal doors. Cons: Lock installation only (no hinge capability), plastic components may fatigue over time, not suitable for high-volume professional use, limited adjustment range.
Bottom Line: The best budget option for homeowners installing locks on finished doors. The self-clamping design prevents surface damage while delivering accurate results, making it ideal for DIYers who prioritize convenience and door protection over heavy-duty construction.
5. Milescraft 7301 Door Kit – For Installing Door Locks, Knobs, and Hinges. Self-Clamping Lock Jig with Bi-Metal Hole Saws. Rout Common Hinge Mortises on Standard Doors. Cutting Tools Included

Overview: The Milescraft 7301 expands on the Lock Mate’s foundation by adding hinge mortising capability, creating a versatile two-in-one solution for complete door preparation. Like its sibling, it features a self-clamping design that requires no screws and prevents surface damage. The kit includes the same high-quality 2-1/8" and 1" Bi-Metal Cobalt hole saws and adjusts for standard 2-3/8" and 2-3/4" backsets on 1-3/8" and 1-3/4" thick doors.
What Makes It Stand Out: This kit uniquely combines self-clamping convenience for both lock drilling and hinge routing in one affordable package. The ability to mortise common hinge sizes without switching tools streamlines the door installation process significantly. The cobalt hole saws cut cleanly through wood and metal doors, while the self-centering design ensures consistent alignment across multiple doors—a feature typically reserved for more expensive systems.
Value for Money: Priced at $59.99, the 7301 offers compelling value for DIYers needing both functions. Purchasing separate lock and hinge jigs would cost $80-$120, making this a cost-effective choice. While not built for daily contractor use, the included cobalt saws and dual functionality make it a smarter investment than buying two separate entry-level tools.
Strengths and Weaknesses: Pros: Dual lock and hinge capability, self-clamping (no damage), quality cobalt hole saws, easy setup, excellent price for versatility. Cons: Not as robust as professional-grade kits, limited to standard door sizes, plastic components may wear with heavy use, lacks fine adjustments of premium jigs.
Bottom Line: An excellent all-around choice for DIYers and occasional installers who want one tool for both locks and hinges. The self-clamping design and cobalt saws deliver professional results without complexity, making it perfect for homeowners tackling door replacement projects.
6. Milescraft 1337 Lock Mate - Door Lock Installation Kit with Jig for Wood/Metal Doors, 1-3/8" to 1-3/4" Thickness. Bi-Metal Cobalt Hole Saws Included

Overview: The Milescraft 1337 Lock Mate is a versatile door lock installation kit for DIYers and professionals. It drills precise lockset holes in wood and metal doors from 1-3/8" to 1-3/4" thick, covering standard interior and exterior door thicknesses with standard backset adjustments.
What Makes It Stand Out: Bi-metal cobalt alloy hole saws differentiate this kit, cutting wood and hollow metal doors without separate accessories. The stepped drill guide bushing prevents jig damage and extends lifespan. Adjusting between 2-3/8" and 2-3/4" backsets accommodates virtually all residential locksets, making it exceptionally versatile for mixed-material installations.
Value for Money: At $20.27, this kit is outstanding value. The cobalt hole saws alone cost nearly this much separately. While professional mortising jigs exceed $100, the Lock Mate provides reliable accuracy for a fraction of the cost, ideal for occasional use or as a professional backup kit.
Strengths and Weaknesses:
- Strengths: Bi-metal cobalt saws cut multiple materials; stepped guide prevents wear; adjustable for standard doors and backsets; excellent price.
- Weaknesses: Basic jig construction may lack durability for daily professional use; no strike plate templates; requires careful handling to maintain alignment.
Bottom Line: The Milescraft 1337 Lock Mate excels for homeowners tackling one or two installations and budget-conscious professionals. Its material versatility and thoughtful design make it the best value in its class.
7. IRWIN Door Lock Installation Kit for Wooden Doors (3111001), Blue

Overview: The IRWIN 3111001 Door Lock Installation Kit simplifies lock installation on wooden doors through a three-step process. Engineered specifically for wood applications, this blue kit makes lockset installation accessible even for beginners attempting their first door hardware project with minimal tools required.
What Makes It Stand Out: The self-centering jig automatically aligns hole saws, eliminating guesswork and ensuring perfectly centered installations. Unlike basic kits, IRWIN includes a router bit and bolt plate templates, providing complete installation components without additional purchases. Carbon hole saws deliver clean cuts through interior and exterior wood doors efficiently.
Value for Money: Priced at $17.65, this is among the most affordable complete kits available. For wood-only applications, it undercuts competitors while including templates many budget kits omit. However, carbon steel saws may dull faster than cobalt alternatives, potentially limiting its lifespan for heavy users despite the low initial cost.
Strengths and Weaknesses:
- Strengths: Self-centering jig ensures accuracy; includes router bit and templates; beginner-friendly three-step process; works with all common door widths; lowest price point.
- Weaknesses: Carbon hole saws less durable than bi-metal; wood-only limitation; jig may flex with aggressive use; no strike plate chisel included.
Bottom Line: The IRWIN kit is ideal for DIYers working exclusively with wooden doors who prioritize simplicity and affordability. It delivers reliable results for occasional installations at an unbeatable price.
8. MJTXiaoWu Wood Door Lock Mortiser Kit, Door Lock Installation Tool Set with Aluminum Alloy Frame, Manual Mortising Jig with Tools

Overview: The MJTXiaoWu Wood Door Lock Mortiser Kit is a premium manual mortising solution for professional woodworkers and serious DIYers. Its aluminum alloy frame and precision components enable creating lock body slots and keyhole openings with exceptional accuracy far beyond basic drill-guided systems.
What Makes It Stand Out: The twin-screw clamping mechanism provides rock-solid stability preventing movement during operation. Graphite copper sleeves ensure silky-smooth rotation and axial movement, while the spherical handle offers superior ergonomics. Two hardened optical shafts with linear sliders guarantee precise vertical movement, eliminating wobble for professional-grade mortises consistently.
Value for Money: At $139.90, this kit positions itself as a premium manual alternative to powered mortisers costing significantly more. For craftsmen regularly installing high-end lock hardware, the precision and durability justify the investment. However, casual users will find the price prohibitive for occasional residential lock installations.
Strengths and Weaknesses:
- Strengths: Exceptional stability and precision; smooth operation via copper sleeves; professional aluminum construction; creates side and front slots; ergonomic spherical handle.
- Weaknesses: Highest price point; manual operation requires skill and patience; overkill for simple cylindrical locks; no powered cutting included.
Bottom Line: This mortiser kit is a professional-grade tool built for craftsmen demanding perfection who regularly work with mortise locks. The investment pays dividends in accuracy and durability for frequent users.
9. GQGP Door Mortise Lock Jig, Door Lock Installation Kit with 18mm 22mm 25mm Tungsten Steel Cutters, Door Lock Hole Opener Kit, Mortising Machine Mortise Jig Lock Mortiser for Carpenter on Wooden Doors

Overview: The GQGP Door Mortise Lock Jig bridges the gap between basic drill jigs and professional mortising machines. This kit handles wooden doors from 25-90mm thick with 140mm maximum grooving depth and 240mm length, making it versatile for mortise, electronic, and combination lock installations.
What Makes It Stand Out: The 45x34cm anti-slip mat provides exceptional stability, while adjustable slides with 7-shaped universal screws maintain perfect vertical alignment. Tungsten steel cutters in three sizes deliver superior cutting performance and longevity. The removable sliding bearing reduces friction and enhances accuracy, while the included plastic suitcase ensures organized portability.
Value for Money: At $69.99, this kit offers tremendous value for serious DIYers and semi-professionals. The tungsten cutters alone represent significant value, and the comprehensive feature set rivals kits costing twice as much. It successfully balances professional capabilities with accessible pricing for regular lock installation work.
Strengths and Weaknesses:
- Strengths: Large anti-slip mat ensures stability; durable tungsten steel cutters; comprehensive accessory package; lightweight at 11lb; versatile for various lock types; good size range.
- Weaknesses: Instructions may be unclear for beginners; some plastic components could affect long-term durability; requires careful setup for perfect alignment.
Bottom Line: The GQGP kit is an excellent choice for carpenters and dedicated DIYers seeking professional results without the premium price tag. Its stability and versatility make it a smart investment.
10. Aigreat Mortise Lock Jig, Door Lock Installation Kit, Door Lock Hole Opener Kit with 18mm 22mm 25mm Tungsten Steel Cutter Blade, Door Mortise jig, Mortising Machine Jig for Wooden Doors

Overview: The Aigreat Mortise Lock Jig offers a compelling mid-range mortising solution featuring industrial-grade linear bearings and a user-friendly split design. This kit targets serious DIYers and professionals needing precision for wooden door lock installations across mortise, electronic, and fingerprint lock types.
What Makes It Stand Out: The split design facilitates easy assembly and disassembly, making storage and transport more convenient than rigid-frame alternatives. Industrial-grade linear bearings combined with precise scales enhance cutting accuracy and workflow efficiency. Vertical guides with integrated height and depth stops prevent costly overcuts, protecting door integrity during installation.
Value for Money: At $67.99, it undercuts similar kits slightly while offering comparable features. The tungsten steel cutters provide excellent durability, and the comprehensive toolset eliminates additional purchases. For users prioritizing easy storage and setup, the split design adds practical value beyond the modest price savings over competitors.
Strengths and Weaknesses:
- Strengths: Split design for portability; industrial linear bearings ensure smooth operation; precise scales aid accuracy; comprehensive tungsten cutter set; good depth/length capacity; lightweight construction.
- Weaknesses: Brand recognition may concern some buyers; 7cm maximum edge-to-center distance may limit some applications; setup requires practice for optimal results.
Bottom Line: The Aigreat Mortise Lock Jig is a solid, well-priced option for users needing a portable, precise mortising solution. Its split design makes it particularly appealing for mobile contractors and workshops with limited storage space.
What Is a Smart Lock Installation Jig and Why Do You Need One?
A smart lock installation jig is essentially a precision-guided template system that clamps onto your door and directs your drill and router to create perfectly placed holes and mortises for lock hardware. Think of it as a combination of a stencil, a clamp, and a drill guide that eliminates guesswork and ensures every cut lands exactly where it should.
Without a jig, you’re measuring multiple times, marking with pencils, and hoping your drill doesn’t wander as you bore through dense wood or metal. The margin for error is razor-thin—just 1/8-inch off, and your smart lock’s deadbolt won’t align with the strike plate, or the exterior and interior escutcheons won’t meet properly. For DIYers, a quality jig isn’t just a convenience; it’s insurance against turning your door into Swiss cheese.
The Anatomy of a Professional-Grade Installation Jig
Core Components Explained
Every effective jig shares several critical components that work in concert. The backbone is the alignment rail—a rigid bar that spans the door’s width and establishes your horizontal reference line. Attached to this are vertical guide plates that position your face bore (the large hole for the lock body) and edge bore (the hole for the latch bolt). These plates feature hardened steel drill bushings that prevent bit wandering and control depth.
The clamp mechanism is equally crucial. Look for designs with multiple contact points that distribute pressure evenly without marring the door surface. Premium jigs use cam-action or quick-release clamps that maintain square alignment under torque. Finally, the strike plate mortise guide is often a separate but integrated piece that rides along the door edge to route out the recessed area for the strike box.
Material Construction Deep Dive
The material choice directly impacts accuracy and longevity. Aircraft-grade aluminum alloys strike the best balance between rigidity and weight, resisting flex while remaining portable for ladder work. Avoid plastic components in high-stress areas—while ABS might suffice for clamp pads, drill guides demand steel or hardened aluminum. The best jigs use anodized finishes that prevent metal shavings from sticking and make cleanup effortless.
Key Features to Look for in a Quality Jig
When evaluating jigs, prioritize adjustable backset capability—the distance from the door edge to the center of the face bore. Quality jigs handle both 2-3/8" and 2-3/4" backsets without requiring separate parts. Built-in level vials are non-negotiable; bubble levels integrated into the alignment rail ensure your installation isn’t cockeyed.
Depth stops deserve special attention. These should be positive-stop mechanisms that physically prevent over-drilling, not just adjustable collars that can slip. The finest jigs include replaceable drill bushings—after hundreds of installations, these wear and being able to swap them restores factory precision. Also, examine the clamping range: can it accommodate doors from 1-3/8" to 2-1/4" thick, including those with beveled edges?
Understanding Door Prep Standards: ANSI/BHMA A156.115
Before buying any jig, you need to understand the standard it should meet. ANSI/BHMA A156.115 specifies exact dimensions for cylindrical lock bores: a 2-1/8" diameter face bore, positioned with specific backset measurements, and a 1" edge bore centered vertically on the door edge. The standard also defines the 1" x 2-1/4" mortise for the strike plate.
A pro-grade jig doesn’t just approximate these measurements—it builds them into its DNA. The best models have ANSI-compliant markings laser-etched into the guide plates, allowing you to visually confirm alignment before drilling. Some even include template overlays for non-standard smart locks that might require additional holes for cables or mounting posts. Understanding this standard helps you spot cheap jigs that take shortcuts with dimensions.
Common Smart Lock Installation Challenges for DIYers
DIYers consistently struggle with three issues: door material density variations, backset confusion, and through-bolt alignment. Drilling through a solid oak door requires different technique than a hollow-core interior door, yet the jig must perform equally well on both. Many novices don’t realize their existing deadbolt’s backset until they’ve already drilled in the wrong location.
Through-bolt alignment is particularly tricky with smart locks—the interior and exterior assemblies connect with long bolts that must pass through perfectly aligned holes. A jig that only guides the face bore but doesn’t help align the through-bolt holes leaves you guessing. Cable routing is another modern challenge; many smart locks require a small hole for the data cable between the inner and outer assemblies, and some jigs now include guides for this often-overlooked bore.
How to Choose the Right Jig for Your Door Type
Wooden Doors
For solid wood and wood-core doors, look for jigs with aggressive clamp teeth that bite into the door edge without crushing the wood fibers. The jig should include a backer plate or support block that fits inside the door to prevent blowout when the drill bit exits. Wood doors also benefit from jigs with chip evacuation channels that prevent packed shavings from affecting drill depth accuracy.
Metal Doors
Metal doors demand jigs with magnetic alignment aids and extra-rigid clamping. The drill bushings must be hardened steel to withstand the abrasion of metal drilling. Critically, the jig should have a lubrication port or allow easy access to apply cutting oil during the bore. Without this, you’ll dull bits quickly and generate enough heat to warp thin-gauge steel doors.
Fiberglass Doors
Fiberglass splinters catastrophically if not supported properly. Your jig needs full-contact clamp pads that distribute pressure across a wider area to prevent cracking the gel coat. The drill guide should produce a clean shear cut rather than a tearing action—look for jigs that specify compatibility with abrasive materials and include fine-tooth hole saws or recommend specific bit geometries.
Accuracy Features That Separate Amateurs from Pros
Micro-adjustment dials are the hallmark of professional-grade jigs. These allow you to nudge the guide plate 1/32" in any direction after initial clamping, perfect for correcting slight misalignments without starting over. Dual-axis leveling—both horizontal and vertical level vials—ensures the jig is square to the door face and plumb to the world.
Positive-locking depth stops with audible clicks prevent the gradual creep that happens with friction-based stops. The best jigs also feature laser alignment pointers that project the bore center onto the door surface, giving you a visual confirmation before committing to the cut. Anti-vibration pads between the jig and door dampen the harmonic chatter that can enlarge holes beyond spec.
Versatility: One Jig for Multiple Lock Brands
Smart lock designs vary wildly—August locks retrofit existing deadbolts, while Yale Assure locks require full replacement. A versatile jig handles both scenarios with modular guide plates that swap out based on lock type. Look for jigs advertising “multi-brand compatibility” that include templates for major manufacturers’ unique hole patterns.
Some advanced jigs feature adjustable strike plate guides that accommodate both standard rectangular strikes and the rounded T-strikes common with Schlage. Cable management brackets that position the data cable hole at different offsets (some locks need it at 12 o’clock, others at 3 o’clock) showcase thoughtful versatility. The ability to add or remove reinforcement plates for different door thicknesses without buying a whole new jig system saves money long-term.
The Learning Curve: Ease of Use Considerations
Even the best jig is useless if you can’t figure it out. Seek out designs with color-coded components—blue for clamping parts, red for drilling guides, etc. QR codes etched into the jig that link to video tutorials demonstrate manufacturer confidence in user experience. Tool-less adjustments for backset and door thickness changes mean you won’t be hunting for Allen wrenches on a ladder.
The instruction manual matters more than you’d think. Premium jig makers provide laminated field guides with life-size diagrams you can reference without scrolling on your phone. Some include practice templates—thin plastic sheets that let you rehearse the entire process on a scrap board before touching your actual door. Weight distribution also affects usability; a jig that’s front-heavy will sag during setup, throwing off alignment.
Safety Features You Shouldn’t Overlook
A jig that slips mid-drill can destroy a door and cause injury. Triple-redundant clamping—two clamps plus a locking brace—ensures the jig stays put even if one mechanism fails. Non-slip jaw inserts made from silicone or rubberized composite prevent the jig from rotating under load.
Bit guards that shield the drill chuck from contacting the door face protect both the finish and your knuckles. Emergency release levers let you quickly detach the jig if the bit binds, preventing kickback. For metal doors, grounding lugs that connect the jig to the door frame reduce the risk of electrical shock when drilling near wiring. Always verify the jig has OSHA-compliant guarding around pinch points.
Budget vs. Premium: What Are You Really Paying For?
Entry-level jigs ($40-$80) typically use stamped steel and plastic bushings. They’ll get you through one or two installations but lack the precision for consistent results. The clamping mechanism is often a single screw that marries the door, and depth control is rudimentary at best. These are fine for a single project on a replaceable door.
Mid-range jigs ($90-$150) introduce aluminum construction, replaceable bushings, and dual-clamp systems. This is the sweet spot for most DIYers—accurate enough for multiple installations, durable enough to loan to friends, and versatile enough for various lock types. You’ll find better ergonomics and clearer markings in this tier.
Premium jigs ($200+) justify their cost through micrometer adjustments, hardened steel throughout, and lifetime warranties. They often include calibration tools and certified tolerance specifications. For professionals or serious DIYers planning multiple properties, the time saved and errors prevented quickly recoup the investment. These jigs also retain resale value, often commanding 60-70% of original price on secondary markets.
Essential Accessories and Complementary Tools
Your jig is only part of the system. Carbide-tipped hole saws specifically designed for lock bores cut cleaner and last longer than standard bi-metal saws. A right-angle drill or drill guide attachment is crucial for the edge bore—drilling a perfectly perpendicular 1" hole freehand is nearly impossible.
Self-centering drill bits (Vix bits) for the strike plate screw holes ensure they align perfectly with the mortise. Door edge protectors—thin plastic shields that tape onto the door—prevent jig scratches on high-gloss finishes. Chip extractors or door vacuum attachments keep your work area clean and prevent shavings from interfering with the jig’s clamping surface.
Don’t forget layout fluid or machinist’s blue to mark drilling centers on metal doors; it wipes clean without leaving permanent marks. A digital angle finder helps verify the jig is square on warped or non-standard doors.
Step-by-Step: How to Properly Set Up Your Jig
Start by verifying door thickness and backset—measure three times, drill once. Position the alignment rail at the correct height (typically 36" to 48" from floor, depending on local code). Clamp the rail first, checking both level vials before tightening fully. The rail should be snug but not so tight it deforms the door edge.
Next, attach the face bore guide plate, selecting the correct backset position. Insert the drill bushing and verify it aligns with your mark. Clamp the vertical guide using even pressure on both knobs—uneven pressure tilts the bushing. For the edge bore, switch to the edge guide plate and test-fit the latch before drilling to confirm orientation.
Before drilling, do a dry run: run the drill into the bushing without power to feel the alignment. Check that your depth stop contacts the bushing at the correct measurement. Secure the door so it can’t swing during drilling; even slight movement ruins accuracy. Finally, drill the face bore first, then the edge bore, then the strike mortise—this sequence prevents the jig from losing registration.
Pro Tips for Perfect Alignment Every Time
Mark your reference line with a knife, not a pencil. A scribed line is more precise and won’t smudge. When drilling the face bore, drill halfway from each side rather than all the way through—this eliminates blowout and ensures perfect centering. Use a backer block inside metal doors to support the exit hole.
For through-bolt alignment, insert the bolts loosely before fully tightening any component. This lets the hardware “find” its natural alignment. Wax your drill bits before each use; it reduces friction and improves cut quality. If your jig includes a laser pointer, align it in low light for maximum visibility.
Check squareness by measuring diagonally from the face bore center to opposite door corners—the distances should be equal. On pre-finished doors, apply painter’s tape under the jig to prevent metal-on-finish contact. Finally, always drill a test hole in a scrap of identical material first to verify depth and backset.
Maintenance and Care for Longevity
After each use, blow out all drill bushings with compressed air to remove trapped shavings. Wipe down the entire jig with a microfiber cloth and a drop of light machine oil on metal surfaces—this prevents rust from sweaty hands. Inspect clamp pads for embedded metal shards that could scratch the next door; replace them when worn.
Store your jig fully collapsed in its case to prevent warping the alignment rail. If the jig has plastic components, keep it away from direct sunlight and extreme temperatures that cause degradation. Calibrate annually using a dial indicator to check bushing alignment; some premium jigs include calibration fixtures. Replace drill bushings after roughly 50 installations, or immediately if you notice any wobble.
For jigs with moving parts, a light grease on adjustment threads prevents seizing. Never use the jig as a hammer or pry bar—it’s a precision instrument, not a multi-tool. If you loan it out, include a copy of the manual; misuse accounts for 80% of jig damage.
Troubleshooting Common Jig-Related Issues
If the face bore is off-center, check that the door edge is square—many modern doors have slight bevels that fool the jig. Use shim stock to square the clamping surface. When the edge bore doesn’t intersect the face bore, you’ve likely got a backset mismatch; verify the latch specification matches your jig setting.
Jig slippage during drilling usually means insufficient clamp pressure or dirty clamp pads. Clean with alcohol and apply fresh non-slip tape. If your holes are egg-shaped, the drill bushing is worn or your drill’s chuck is wobbling—check both. Inconsistent depth often stems from a loose depth stop or compressible door material; switch to a positive-stop mechanism and drill in smaller increments.
For metal doors that warp during drilling, reduce drill speed and increase pressure gradually. The heat from aggressive drilling can distort thin metal. If the strike mortise is misaligned, trace the latch plate with layout dye before removing the jig to see exactly where material needs removal.
Frequently Asked Questions
1. Can I use a regular door lock jig for smart locks, or do I need a specialized version?
Standard lock jigs work for basic smart deadbolts that share dimensions with traditional locks. However, smart locks with integrated handles, keypads, or cameras often require additional holes for cables, mounting posts, or larger diameter face bores. A smart-lock-specific jig includes modular templates for these variations, saving you from freehand drilling the extra holes.
2. What’s the learning curve like for a first-time user?
Most DIYers achieve professional results on their second or third attempt. Your first installation should be on a practice door or inconspicuous location like a garage entry. Expect to spend 30-45 minutes on the initial setup, but once you’re familiar with the jig, subsequent installations take 15-20 minutes. The key is reading the manual thoroughly and doing a complete dry run before powering up any tools.
3. How do I know if my door is too thin or too thick for a standard jig?
Quality jigs accommodate doors from 1-3/8" (standard interior) to 2-1/4" (exterior solid core). Measure your door at the edge; if it’s outside this range, you’ll need specialized clamps or extension kits. For doors thinner than 1-3/8", use a door reinforcement plate to give the jig a stable clamping surface. Thicker doors, common in custom homes, may require a deep-reach jig with extended alignment rails.
4. Will using a jig guarantee my smart lock will fit perfectly?
A jig guarantees the holes are in the right places, but it can’t compensate for a warped door, misaligned strike plate jamb, or a lock with manufacturing defects. Always test-fit the lock before final tightening. The jig also won’t address door prep issues like insufficient clearance behind the door for the interior assembly—verify you have at least 2-1/2" of clear space from the door face to any obstruction.
5. Can jigs damage my door’s finish?
Any metal tool can damage a finish if misused. Prevent scratches by applying painter’s tape under all clamping points and using rubber jaw covers. Keep the jig clean—metal shavings trapped between the jig and door act like sandpaper. For high-gloss or delicate finishes, consider a jig with non-marring composite clamp pads specifically designed for finished surfaces.
6. What’s the difference between a jig and a template?
A template is a flat pattern you trace or use as a visual guide. A jig is a three-dimensional, self-clamping system that physically guides your tools. Templates are cheaper but require steady hands and careful measuring. Jigs are more expensive but eliminate human error in hole placement and drilling angle. For smart locks, where precision is critical, a jig is the only reliable choice for most DIYers.
7. How many installations can I expect from a quality jig?
A mid-range aluminum jig with replaceable bushings should last 200+ installations. The bushings themselves need replacement every 50-80 holes depending on door material. Premium steel jigs can exceed 500 installations with proper maintenance. The clamping mechanism typically wears first—look for models with replaceable clamp pads and serviceable hardware rather than riveted construction.
8. Is it worth buying a premium jig for just one or two installations?
For a single installation, consider renting a premium jig from a tool library or home improvement store. Many retailers offer weekend rentals for $25-$40. If you plan two or more installations, buying a mid-range jig makes financial sense. The resale market for quality jigs is strong; you can often recoup 60% of your cost after completing your projects. Factor in the cost of replacing a ruined door, and even one use justifies the purchase.
9. Can I use these jigs on fiberglass doors without cracking them?
Yes, but you need the right technique and jig features. Use a jig with wide clamping surfaces to distribute pressure. Drill at the lowest speed that still cuts effectively, and use a backer block inside the door to support the exit hole. Some pros drill a 1/8" pilot hole completely through first to guide the larger bits and reduce stress. Always check the jig manufacturer’s specifications for fiberglass compatibility.
10. What do I do if my smart lock requires holes that aren’t in the standard template?
First, check if the jig manufacturer offers add-on templates for your specific lock brand. Many maintain online libraries of downloadable templates you can print and adhere to the door. If no template exists, use the jig to drill the standard holes, then use the lock’s own mounting plate as a template for additional holes. Clamp the plate in place and use a self-centering punch to mark locations before drilling freehand with a small drill press for accuracy.