You’ve finally decided to join the smart home revolution. The promise of remote temperature control, energy savings, and automated scheduling has you ready to upgrade your old thermostat. But as you remove the cover from your existing unit, your heart sinks—where’s that mysterious “C-wire” everyone keeps talking about? Before you abandon your dreams of a smarter home or contemplate an expensive electrical overhaul, take a deep breath. The absence of a C-wire is one of the most common roadblocks homeowners face, yet it’s rarely the dead end it appears to be.
In fact, millions of households have successfully installed smart thermostats without a common wire, using a variety of clever workarounds and modern solutions that didn’t exist even five years ago. This guide will walk you through everything you need to know about identifying your wiring situation, understanding why that C-wire matters, and implementing the solution that best fits your home, technical comfort level, and budget. Whether you’re renting a century-old apartment or own a mid-century house with outdated HVAC infrastructure, you’ll discover that the path to smart climate control is more accessible than you imagined.
Top 10 Smart Thermostats without C-Wire
Detailed Product Reviews
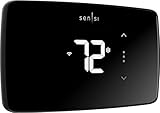
1. Sensi Lite Smart Thermostat, Data Privacy, Programmable, Wi-Fi, Easy DIY, Works With Alexa, Energy Star Certified, ST25, Most Systems C-Wire Not Required, Except On Heat/Cool Only and Heat Pump System
Overview:
The Sensi Lite Smart Thermostat delivers essential smart climate control at an accessible price point. This ENERGY STAR-certified device promises up to 23% HVAC energy savings through Wi-Fi connectivity and intelligent scheduling. Designed for DIY enthusiasts, it features a built-in level and straightforward installation instructions. The unit works with most HVAC systems without requiring a C-wire, though heat pump and heat/cool-only setups need one. Its standout feature is robust data privacy—Sensi explicitly states they won’t sell user data or use thermostat activity for advertising.
What Makes It Stand Out:
Privacy protection is the defining characteristic in today’s data-hungry market. While competitors monetize user behavior, Sensi maintains a strict no-sell policy. The geofencing capability automatically adjusts temperatures based on your location, while detailed usage reports help optimize energy consumption. The mobile app earns top ratings on both Android and iOS platforms, offering intuitive remote access. For renters or homeowners seeking smart functionality without invasive data practices, this thermostat provides rare peace of mind.
Value for Money:
At $65.98, this thermostat undercuts major competitors while delivering core smart features. The potential 23% energy savings can return your investment within the first year. Compared to premium brands costing $150+, the Sensi Lite offers comparable functionality minus unnecessary frills. The DIY installation eliminates professional setup costs, adding further value. For those prioritizing privacy and essential smart controls over flashy interfaces, this represents exceptional ROI.
Strengths and Weaknesses:
Pros: Strong privacy commitments; No C-wire needed for most systems; Highly-rated mobile app; ENERGY STAR certified; Geofencing and scheduling features; Budget-friendly price
Cons: Requires C-wire for heat pumps; Basic aesthetic design; Limited advanced features compared to premium models; Brand recognition weaker than Nest/Ecobee
Bottom Line:
The Sensi Lite is ideal for cost-conscious consumers who value data privacy above all. If you have a standard HVAC system and want reliable smart controls without becoming a product yourself, this thermostat delivers outstanding value. Skip it only if you have a heat-only/cool-only system or demand cutting-edge features.
2. C-Wire Adapter for Smart Thermostats: A Power Solution for Smart Thermostats Without a C-Wire THP9045A2098/U

Overview:
This C-Wire Adapter solves the most common obstacle in smart thermostat installation: powering devices without existing common wires. Priced at $25.99, it converts existing G (fan) and Y (cooling) wires into C and K wires, delivering stable power to compatible smart thermostats. Designed specifically for Honeywell home series and serving as a Nest alternative, this adapter bridges the gap between legacy HVAC wiring and modern smart climate control.
What Makes It Stand Out:
The adapter’s wire conversion technology eliminates the need for expensive electrical rewiring, which can cost hundreds of dollars. Its step-by-step installation guide makes it accessible even to those unfamiliar with thermostat wiring. The device acts as a crucial intermediary, breathing new life into older HVAC systems that weren’t designed for always-on smart thermostats. Compatibility with multiple brands increases its versatility beyond single-ecosystem solutions.
Value for Money:
At under $26, this adapter pays for itself immediately compared to professional C-wire installation ($150-300). For renters or homeowners who can’t modify building wiring, it’s the only practical solution. The device extends the usable life of existing HVAC infrastructure while enabling modern smart features. When paired with a budget smart thermostat, the total cost remains below premium alternatives that might still require professional installation.
Strengths and Weaknesses:
Pros: Dramatically cheaper than rewiring; Clear installation instructions; Broad compatibility; Solves power issues reliably; DIY-friendly
Cons: Only works with specific wire configurations; Not universal for all thermostat brands; Adds another point of potential failure; Requires basic technical comfort
Bottom Line:
Essential purchase if your smart thermostat requires a C-wire and you lack one. The adapter makes financial sense in nearly every scenario versus professional installation. Verify compatibility with your specific HVAC system before purchasing, but for most standard setups, it’s a reliable, cost-effective power solution.
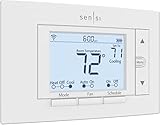
3. Sensi Smart Thermostat, 100 Years Of Expertise, Wi-Fi, Data Privacy, Programmable, Easy DIY Install, Works With Alexa, Energy Star Certified, Mobile App, ST55
Overview:
Building on a century of HVAC expertise, the Sensi ST55 smart thermostat balances traditional design with modern connectivity. At $81, this ENERGY STAR-certified device delivers approximately 23% energy savings through programmable scheduling, remote access, and usage reporting. The unit’s genius lies in its familiar button interface and standard footprint, eliminating the need for wall patching during installation. Most systems don’t require a C-wire, making it accessible for older homes.
What Makes It Stand Out:
The ST55 uniquely mimics traditional thermostats while hiding smart capabilities beneath. This design choice reduces the learning curve for less tech-savvy users. Its smart maintenance features provide proactive HVAC health monitoring, sending filter replacement reminders and equipment alerts that prevent costly breakdowns. The privacy protection policy remains robust—no data selling or targeted advertising. The built-in level and app-guided installation streamline DIY setup.
Value for Money:
The $81 price positions it as a mid-range option, but the included maintenance monitoring adds long-term value unavailable in budget competitors. By preventing just one HVAC service call through early warning alerts, it pays for itself. The compatibility with existing wall spaces saves additional renovation costs. Compared to the Sensi Lite, the premium brings tangible benefits for homeowners wanting monitoring without complexity.
Strengths and Weaknesses:
Pros: Traditional thermostat appearance; Smart maintenance alerts; No wall patching needed; Strong privacy policy; C-wire optional for most; Century of brand expertise
Cons: Higher price than base models; Interface less modern than touchscreen competitors; Limited advanced automation; Requires smartphone for full features
Bottom Line:
Perfect for homeowners wanting smart energy savings without abandoning familiar controls. The maintenance monitoring makes it especially valuable for those with aging HVAC systems. Choose this over the Lite if you value equipment health insights and traditional aesthetics. It’s a smart investment in both comfort and system longevity.
4. Amazon Smart Thermostat – Save money and energy - Works with Alexa and Ring - C-wire required

Overview:
Amazon’s entry into smart climate control delivers deep Alexa integration at an aggressive $79.99 price point. This ENERGY STAR-certified thermostat leverages EPA estimates of $50 average yearly savings through intelligent automation. The device creates comfort zones using Echo devices or Smart Air Quality Monitors for presence-based temperature adjustments. Amazon automatically emails rebate information from local energy providers post-purchase, potentially reducing the net cost significantly.
What Makes It Stand Out:
Seamless Alexa ecosystem integration is the killer feature. The thermostat can automatically switch between home, away, and sleep temperatures based on voice commands, routines, or presence detection through linked Echo devices. This level of hands-free automation surpasses most competitors. The potential for additional energy provider rebates—sometimes covering the entire purchase price—makes it uniquely attractive. The automatic control removes the need for manual scheduling entirely.
Value for Money:
At $80, it’s competitively priced, but the rebate potential makes it potentially free. Even without rebates, the $50 annual savings provides quick ROI. The requirement of a C-wire may necessitate additional installation costs, offsetting some value. For households already invested in Alexa, the synergy creates value beyond the hardware itself. However, those without existing Echo devices won’t experience full benefits.
Strengths and Weaknesses:
Pros: Deep Alexa integration; Automatic rebate information; Presence-based control; Clean, simple design; Strong energy savings claims; Automatic temperature switching
Cons: Requires C-wire; Limited compatibility outside Alexa ecosystem; Privacy concerns with Amazon data collection; No Google Assistant support; Basic display
Bottom Line:
Best for Alexa-centric smart homes. If you already use Echo devices and have a C-wire, this thermostat offers unmatched convenience and potential zero net cost through rebates. Avoid if you’re privacy-conscious, use Google Assistant, or lack the required wiring. The ecosystem lock-in is both its strength and limitation.
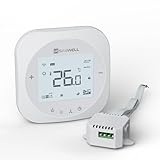
5. SASWELL Smart WiFi Thermostat for Home, Programmable Thermostat with C-Wire Adapter, 3H/2C for Heat Pump & Conventional Systems, Tuya App Control, Compatible with Alexa & Google Assistant

Overview:
The SASWELL Smart WiFi Thermostat delivers comprehensive HVAC compatibility at $69.99, including a bundled C-wire adapter that solves installation hurdles. Supporting 3H/2C heat pump and conventional multi-stage systems, it covers complex setups that budget thermostats often miss. The Tuya app ecosystem enables control alongside other smart home devices, while Alexa and Google Assistant integration provides voice command flexibility. A bright LED touchscreen offers modern interaction.
What Makes It Stand Out:
The included C-wire adapter eliminates guesswork and additional purchases, making it a complete package for homes lacking common wires. Its support for complex multi-stage and heat pump systems at this price point is remarkable—most competitors require premium models for such compatibility. The Tuya/Smart Life app integration allows it to function within a broader smart home ecosystem beyond just climate control. The intuitive touch interface rivals more expensive brands.
Value for Money:
At $70 with an included adapter (worth $25+ separately), the net thermostat cost is under $45—exceptional for the feature set. Compatibility with sophisticated HVAC systems prevents the need for professional-grade equipment. DIY installation avoids labor costs. For homes with multi-stage or heat pump systems, this is arguably the best value on the market, delivering capabilities usually found in $150+ devices.
Strengths and Weaknesses:
Pros: C-wire adapter included; Broad HVAC compatibility; Multi-stage system support; Dual voice assistant support; Modern touchscreen; Affordable price
Cons: Lesser-known brand; Tuya app may have privacy concerns; Build quality unknown long-term; Limited brand support network; Installation may be complex for novices
Bottom Line:
Outstanding value for owners of complex HVAC systems. The included adapter and multi-stage support make it a no-brainer for heat pump users on a budget. Accept the brand risk for the substantial savings and feature set. Perfect for tech-savvy users comfortable with Tuya ecosystem integration.
6. ecobee Smart Thermostat Essential - Energy Star Certified programmable Wi-Fi Thermostat - Works with Siri, Alexa, and Google Assistant

Overview: The ecobee Smart Thermostat Essential hits the sweet spot for homeowners seeking Energy Star-certified climate control without premium pricing. This $134.99 device promises up to 23% annual savings on heating and cooling while working with Siri, Alexa, and Google Assistant for comprehensive smart home integration.
What Makes It Stand Out: The 85% system compatibility rate is impressive, and the option to add a Power Extender Kit for C-wire-less homes makes it accessible. The color touchscreen provides intuitive local control, while the ecobee app enables remote adjustments and energy monitoring. Free software updates ensure long-term value and feature improvements.
Value for Money: At under $135, this thermostat undercuts many competitors while delivering core smart features. The PEK costs extra but still makes installation cheaper than hiring an electrician. Compared to premium models, you sacrifice some advanced sensors but retain essential automation and energy management capabilities.
Strengths and Weaknesses: Strengths include broad compatibility, multi-assistant support, credible energy savings claims, and DIY-friendly design. The touchscreen interface is responsive, and the app provides useful consumption data. Weaknesses: the PEK is sold separately, potentially adding $20-25 to your total cost. It lacks remote sensors for room-specific temperature balancing found in higher-end ecobee models.
Bottom Line: This is an excellent choice for most households wanting reliable smart climate control without breaking the bank. The ecobee Smart Thermostat Essential delivers genuine energy savings potential and modern convenience at a mid-tier price point.
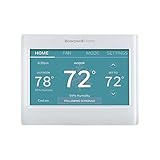
7. Honeywell Home RTH9600WF Smart Color Thermostat ENERGY STAR Wi-Fi Programmable Touchscreen Alexa Ready - C-Wire Required
Overview: The Honeywell Home RTH9600WF Smart Color Thermostat positions itself as a premium option at $167.23, offering extensive customization and Energy Star certification for the discerning homeowner who values both aesthetics and functionality.
What Makes It Stand Out: The customizable high-definition color screen sets it apart, letting you match your décor or preferences. It displays indoor/outdoor temperature, humidity, and weather forecasts directly on the unit. Compatibility with Alexa, Google Assistant, and even Microsoft Cortana provides rare flexibility. The rebate finder tool and demand response program enrollment can offset costs through utility incentives.
Value for Money: While pricier than basic models, the feature set justifies the cost. The color display and on-screen comfort information add tangible value, and utility rebates can reduce the effective price significantly. It competes directly with Nest and ecobee premium tiers while offering unique display capabilities.
Strengths and Weaknesses: Strengths include the vibrant customizable display, comprehensive smart home integration, flexible programming options, and on-screen weather data. The Energy Star certification ensures efficiency. Weaknesses: C-wire requirement limits compatibility without professional help, and the higher price may deter budget buyers. Some users report the app experience lags behind competitors in responsiveness.
Bottom Line: Ideal for those prioritizing aesthetics and detailed environmental information. If you want a thermostat that doubles as an information hub and have a C-wire, this Honeywell delivers premium features worth the investment.
8. SASWELL Smart WiFi Thermostat for Home, Programmable Thermostat with C-Wire Adapter, 3H/2C for Heat Pump & Conventional Systems, Tuya App Control, Compatible with Alexa & Google Assistant, White
Overview: The SASWELL Smart WiFi Thermostat enters the market at an aggressive $69.99 price point, targeting budget-conscious buyers unwilling to sacrifice core smart functionality. It supports complex HVAC systems rarely seen at this price level.
What Makes It Stand Out: The included C-wire adapter is a game-changer at this price, eliminating a common installation barrier without extra cost. It supports complex 3H/2C heat pump and conventional multi-stage systems—unusual for budget thermostats. Tuya app integration and voice control via Alexa/Google provide genuine smart home connectivity typically reserved for pricier models.
Value for Money: Exceptional. No other brand includes a C-wire adapter at this price while maintaining multi-stage system compatibility. You’re getting 70% of premium features for 40% of the cost. Perfect for rental properties or first-time smart home adopters testing the waters.
Strengths and Weaknesses: Strengths: unbeatable price, included C-wire adapter, broad system compatibility, straightforward DIY installation, and decent app control. The LED touchscreen is functional if not spectacular. Weaknesses: SASWELL lacks the brand recognition and support network of Honeywell or ecobee. The Tuya app ecosystem, while capable, feels less polished than native apps. Long-term reliability data is limited for this emerging brand.
Bottom Line: This is the value champion. If you’re comfortable with a lesser-known brand and want maximum features for minimum spend, the SASWELL thermostat is a smart risk that pays off in immediate savings and functionality without major compromises.
9. Google Nest Power Connector - C Wire Adapter for Smart Thermostats - 3.98in Accessory, Snow

Overview: The Google Nest Power Connector is a specialized $24.99 accessory, not a thermostat itself, designed to solve the C-wire compatibility issue for Nest thermostat owners. This small device bridges the gap when your HVAC system lacks the necessary common wire for consistent power delivery.
What Makes It Stand Out: This purpose-built adapter attaches directly to your furnace, air handler, or zone controller without requiring new wiring or wall drilling. It’s engineered specifically for Nest thermostats that need a C-wire but don’t have one—particularly heating-only, cooling-only, zone-controlled, and heat pump systems where power-stealing technology proves insufficient.
Value for Money: Far cheaper than hiring an electrician to run new wires, and safer than risky DIY wiring attempts. At $25, it’s a small investment to enable a $130+ smart thermostat purchase. Essential for specific system types where Nest’s standard operation fails, preventing an otherwise functional thermostat from becoming an expensive paperweight.
Strengths and Weaknesses: Strengths: simple installation with clear instructions, affordable, eliminates C-wire obstacle, designed specifically for Nest compatibility. It’s compact and doesn’t require wall modifications. Weaknesses: Only works with Nest thermostats—useless for other brands. It won’t solve every compatibility issue, and some complex systems may still require professional assessment. Limited functionality beyond providing consistent power.
Bottom Line: This is a must-buy if you’ve purchased or plan to buy a Nest thermostat and lack a C-wire. It’s a cheap, effective solution that prevents installation headaches and expands your HVAC compatibility options significantly.
10. Honeywell Home RTH9585WF1004 Wi-Fi Smart Color Thermostat, 7 Day Programmable, Touch Screen, Energy Star, Alexa Ready, Gray

Overview: The Honeywell Home RTH9585WF1004 Wi-Fi Smart Color Thermostat strikes a balance at $124.23, offering customizable aesthetics and robust programming without the premium price tag of its RTH9600WF sibling. It delivers proven Honeywell reliability with modern smart features.
What Makes It Stand Out: The customizable color screen lets you personalize the display to match your home, while the 7-day programmable scheduling provides granular control over your climate. Honeywell’s demand response program compatibility can earn you utility bill credits during peak usage. The bright touchscreen remains easy to read across varying lighting conditions.
Value for Money: Positioned as a mid-range option, it delivers core smart features and visual customization for $40 less than the RTH9600WF. You lose some on-screen weather data but retain Energy Star certification and rebate eligibility. Strong competition for ecobee and Nest at this price point from an established brand.
Strengths and Weaknesses: Strengths: attractive customizable display, flexible scheduling, Energy Star efficiency, Alexa readiness, and utility incentive programs. The touchscreen is responsive and intuitive. Weaknesses: C-wire requirement may necessitate professional installation. It lacks the Cortana support and detailed humidity/forecast display of the pricier RTH9600WF. The app experience, while functional, trails competitors in polish and modern design.
Bottom Line: A solid mid-range choice for homeowners wanting visual customization and proven brand reliability without paying flagship prices. If you have a C-wire and prioritize flexible scheduling over cutting-edge features, this Honeywell delivers excellent value and long-term dependability.
Understanding the C-Wire: What It Is and Why It Matters
The Role of the Common Wire in HVAC Systems
The C-wire, or common wire, completes the 24-volt circuit that powers modern thermostats. Think of it as the neutral wire in your home’s electrical system—it provides a continuous return path for power without carrying switching signals. In traditional heating and cooling setups, wires like R (power), W (heat), Y (cool), and G (fan) each serve specific on/off functions. The C-wire’s sole purpose is to deliver steady, uninterrupted power to sophisticated electronics.
Your furnace’s control board generates this low-voltage current specifically for thermostat operation. Without a dedicated common wire, smart thermostats must resort to creative—and sometimes unreliable—methods to siphon enough power to maintain Wi-Fi connectivity, color displays, and internal processors. This power hunger distinguishes them from simple programmable models that only need brief bursts of energy to close relay circuits.
How Smart Thermostats Differ from Traditional Models
Traditional thermostats are power-misers, functioning as simple switches that momentarily close circuits to signal your HVAC equipment. They consume virtually no electricity themselves, drawing tiny amounts only when you adjust the temperature. Smart thermostats, conversely, are always-on computers. They maintain Wi-Fi connections, run background processes, power LED displays, and execute complex algorithms—all while your heating and cooling system sits idle.
This continuous operation requires 20-30 times more power than old-school models. The C-wire ensures this demand doesn’t interfere with HVAC signaling or create voltage fluctuations that could damage sensitive components. Without it, your smart device becomes like a smartphone trying to charge from an intermittent power source—it might work, but expect unpredictable behavior and performance hiccups.
Identifying Your Current Wiring Setup
Locating Your Thermostat Wiring Panel
Before diving into solutions, you need definitive knowledge of what wires are actually present. Start by carefully removing your thermostat’s faceplate—most models snap off with gentle pressure at the bottom edge. Behind it, you’ll see a baseplate with labeled terminals and colored wires. Take a clear, well-lit photograph with your phone; this documentation proves invaluable during installation troubleshooting.
Don’t assume wire color corresponds to function. While industry conventions exist (blue or black for C-wire, red for R-power), contractors often use whatever wire was handy during original installation. Focus on the letter labels on the terminals, not the insulation colors. If you see a wire connected to a terminal marked “C,” you’re already set. If that terminal is empty, continue investigating before celebrating or despairing.
Decoding Wire Colors and Labels
The standard thermostat wire bundle, often called “thermostat wire” or “Bell wire,” typically contains 18-gauge solid copper conductors wrapped in a brown or white sheath. Common configurations include 4-wire (R, W, Y, G), 5-wire (adding C), and even 8-wire bundles for complex systems. Each terminal serves a distinct purpose: R provides 24V power, W calls for heat, Y initiates cooling, G activates the fan, and C completes the circuit.
Some installations feature separate Rc and Rh terminals for cooling and heating power, often with a jumper connecting them. Heat pump systems add additional terminals like O/B for reversing valves and auxiliary heat controls. Understanding this alphabet soup helps you assess whether unused wires in the bundle might be repurposed as a C-wire—a common discovery that solves the problem instantly.
Using a Multimeter to Verify Power
For definitive answers, a basic multimeter becomes your best friend. Set it to measure AC voltage in the 200V range, then carefully touch the red probe to the R terminal and the black probe to the C terminal. A reading between 24-30 volts confirms active common wire functionality. No reading on C doesn’t necessarily mean the wire doesn’t exist—it might be disconnected at the furnace end.
Test between R and each other terminal to verify your HVAC system is sending proper voltage. This diagnostic step prevents hours of frustration from chasing solutions when the underlying issue is a blown fuse or tripped breaker at the furnace. Remember, you’re working with low-voltage electricity (generally safe), but always exercise caution and keep fingers away from exposed metal contacts.
The No-C-Wire Dilemma: Why Many Homes Lack This Crucial Wire
Historical Wiring Standards in Older Homes
If your home predates the mid-1990s, the absence of a C-wire isn’t a flaw—it’s historically accurate. Building codes didn’t require thermostat common wires until smart technology became mainstream. HVAC contractors optimized for cost and simplicity, running only the essential wires needed for basic heating and cooling functions. A typical 1970s installation used 4-wire bundles because nothing more was necessary.
This legacy infrastructure affects approximately 40% of American homes, creating a massive market for C-wire alternatives. The good news? These systems were overbuilt mechanically, making them perfectly capable of supporting modern smart thermostats with minor modifications. The transformers in older furnaces often have unused terminals specifically designed for future C-wire connections.
Modern Building Codes and C-Wire Prevalence
Contemporary construction mandates C-wires in new thermostat installations, but adoption has been slow and inconsistent. Many homes built between 2000-2010 during the transitional period have the wire physically present but unconnected at both ends. Contractors would run 5-wire bundles “just in case” but leave the blue or black wire coiled behind the wall plate and furnace panel.
This hidden solution is more common than you’d expect. Even if your thermostat shows no C-wire, gently pull the wire bundle from the wall to check for extra, unused conductors. Similarly, open your furnace’s access panel and examine the control board—an unconnected wire may be waiting for you to attach it to the C terminal, solving your problem in thirty seconds without spending a dime.
Solution 1: Using a Power Adapter or Transformer
How Plug-in Adapters Work
External power adapters bypass your HVAC system entirely, providing dedicated 24V power through a separate transformer that plugs into a standard wall outlet. These devices convert household 120V AC to the low-voltage current your smart thermostat craves. The adapter’s output wires connect to the C and Rc terminals on your thermostat base, creating an independent power circuit while leaving your existing HVAC wires untouched.
This approach is electrically clean and universally compatible. The thermostat draws its operational power from the adapter, while still controlling your heating and cooling through the original R, W, Y, and G connections. Think of it as giving your smart thermostat its own electrical panel separate from your HVAC system. Most adapters provide 24V AC at 500mA, more than sufficient for even the most feature-rich devices.
Installation Steps for External Transformers
Begin by identifying a convenient outlet within 15 feet of your thermostat location—closets, adjacent rooms, or basements directly below work perfectly. Route the adapter’s low-voltage wire discreetly along baseboards or through small holes drilled in wall plates. At the thermostat, connect the adapter’s positive lead (typically red) to the Rc terminal, and the negative lead (usually blue or black) to the C terminal.
Your existing R wire from the furnace connects to Rh, with the jumper removed if present. This separation ensures the adapter powers the thermostat while the furnace wire maintains control functionality. Secure all connections firmly and insulate any exposed copper with electrical tape. The adapter should remain plugged in continuously—avoid connecting it to switched outlets controlled by wall switches.
Pros and Cons of Adapter-Based Solutions
The primary advantage is reliability. Your thermostat receives stable, uninterrupted power regardless of HVAC system state, eliminating the “phantom power” issues that plague other methods. Installation is reversible and doesn’t modify HVAC wiring, making it ideal for renters. Adapters cost between $15-30, making this the most budget-friendly professional-grade solution.
However, aesthetic concerns exist. You’ll have a visible wire running along your wall, though cable raceways can camouflage it effectively. The adapter also consumes a small amount of standby power (typically under 1 watt). Some HVAC purists argue that completely isolating thermostat power from the furnace system theoretically reduces overall system efficiency, though this impact is negligible in practice.
Solution 2: Leveraging the G-Wire (Fan Wire) Hack
Understanding the G-Wire Workaround
The G-wire hack repurposes your fan control wire to serve double duty as both fan activator and power provider. This method works because most smart thermostats can operate in a “power-stealing” mode, drawing small amounts of current through the G-wire even when the fan isn’t running. The thermostat pulses the wire rapidly, extracting power between the pulses without triggering the fan relay.
This approach requires a specific wiring configuration at the furnace. You’ll connect the G-wire to both the G terminal and the C terminal using a short jumper wire or wire nut. This creates a parallel path that allows continuous power flow while preserving fan control functionality. The thermostat’s internal circuitry separates the power harvesting from the switching signals.
Step-by-Step Rewiring Process
First, turn off power to your HVAC system at the breaker. At the thermostat, move the G-wire to the C terminal. If you have both a G-wire and an unused wire in the bundle, you can maintain separate fan control, but most no-C-wire situations require sacrificing independent fan operation. At the furnace, locate the wire connected to the G terminal and add a second wire that runs to the C terminal, creating a Y-shaped connection.
Some installations benefit from adding a 220-ohm, 5-watt resistor between G and C at the furnace board, which prevents voltage feedback that can cause the fan to run intermittently. After making connections, restore power and test thoroughly. Verify that heating and cooling cycles function normally, and that the fan option appears in your thermostat’s manual control menu.
Limitations and Potential Drawbacks
The most significant compromise is losing independent fan control. You can no longer run the fan alone for air circulation without also calling for heating or cooling. This method works best in climates where continuous fan operation is unnecessary. Some HVAC systems, particularly multi-stage or variable-speed units, may not be compatible due to sensitive control boards that interpret the power-stealing pulses as faulty signals.
You might also experience occasional “ghost fan” episodes where the fan briefly activates during power harvesting, though modern thermostats have largely eliminated this issue through refined algorithms. This solution demands more technical precision than adapter installation, and improper wiring can damage your furnace’s control board—a risk that warrants careful consideration.
Solution 3: Installing a C-Wire Adapter at the Furnace
What is a C-Wire Adapter Kit?
Furnace-mounted adapters, often called “add-a-wire” or “C-wire maker” devices, intercept existing wires and multiplex signals to create a virtual C-wire. These small modules install at the furnace control board and use frequency modulation to send both control signals and power over the same physical wire. The thermostat receives a decoder module that separates these combined signals back into discrete functions.
This technology essentially adds a communication protocol layer to your existing wiring, similar to how powerline Ethernet adapters work. The adapter kit includes a sender unit that wires into your furnace terminals and a receiver that connects to your thermostat base. Most kits support up to four wires (R, W, Y, G) and generate a reliable C-wire output without running new cable.
Furnace Board Installation Guide
Begin by mounting the adapter module on or near your furnace control board using the provided adhesive strips or screws. Disconnect your existing thermostat wires from the furnace terminals and connect them to the corresponding inputs on the adapter. Then run new wires from the adapter’s outputs back to the furnace terminals, effectively inserting the device in series with your existing connections.
The adapter will have a dedicated C-wire output terminal. Connect a new wire from this terminal to the C terminal on your furnace board. At the thermostat end, you’ll wire the receiver module similarly, connecting your thermostat wires to the receiver inputs and the receiver outputs to the thermostat base. Power up the system and follow the manufacturer’s pairing procedure, which typically involves holding a button for several seconds until LED indicators confirm successful communication.
Compatibility Considerations
These adapters work with most conventional gas, oil, and electric furnaces, as well as air handlers and heat pump systems. However, they may not support proprietary communicating systems found in some high-efficiency variable-speed units that use manufacturer-specific protocols. Always verify compatibility with your HVAC system’s voltage specifications and control board type.
The adapters add a slight delay (typically under one second) to HVAC response times as signals are encoded and decoded. This lag is imperceptible in daily operation but can affect diagnostic procedures if you’re troubleshooting other system issues. The modules consume minimal power themselves, usually under 2 watts, and include surge protection that can safeguard your thermostat from furnace electrical noise.
Solution 4: Choosing Battery-Powered Smart Thermostats
How Battery-Operated Models Function
Battery-powered smart thermostats represent a fundamentally different design philosophy. Instead of continuously sipping power from your HVAC system, these units operate in aggressive power-saving modes, waking only when needed. They use lithium AA batteries or rechargeable battery packs that last 1-2 years under normal conditions. Wi-Fi connectivity remains active, but the device reduces polling frequency and display brightness to conserve energy.
These thermostats maintain full smart functionality through strategic power management. The display activates only when you approach, using proximity sensors. Wi-Fi transmissions occur in bursts rather than continuously. Background processes run at intervals instead of constantly. This intermittent operation model mirrors how your smartphone preserves battery life, just optimized for a stationary device with less demanding computational needs.
Battery Life Expectations and Maintenance
Real-world battery life depends heavily on your HVAC system’s cycling frequency and Wi-Fi signal strength. In mild climates where heating and cooling run infrequently, batteries can exceed two-year lifespans. In extreme climates with constant system operation, expect 12-18 months. Weak Wi-Fi signals force the radio to transmit at higher power, draining batteries 30-40% faster.
Most models provide low-battery warnings 2-3 weeks before depletion, giving you ample time to replace them. Use high-quality lithium batteries rather than alkaline for better cold-weather performance and longer shelf life. Some advanced models feature battery health monitoring in their apps, showing voltage levels and estimated replacement dates. Rechargeable options exist but require periodic removal for charging, creating temporary smart functionality gaps.
Feature Trade-offs to Consider
Battery-powered units typically sacrifice color displays for monochrome e-ink or low-power LCD screens. Touchscreen responsiveness may feel slightly laggy compared to wired models. Geofencing features sometimes operate less precisely due to less frequent location polling. However, core functionality—scheduling, remote control, energy reports, and smart home integration—remains fully intact.
These thermostats excel in installations where aesthetics trump features, such as historic homes where running visible wires is unacceptable. They’re also ideal for zones with infrequent adjustments, like guest rooms or basements. The absence of a C-wire dependency means you can install them in minutes without touching furnace wiring, making them perfect for DIY novices or renters prohibited from modifying electrical systems.
Solution 5: Running a New C-Wire
When DIY Wire Installation Makes Sense
Sometimes the most straightforward solution is physically running new thermostat cable. This makes economic sense if you have an accessible route between your thermostat and furnace—such as an unfinished basement below, an attic space above, or interior walls without fire blocking. The materials cost under $30 for a 50-foot spool of 18/5 thermostat wire, making it cheaper than most electronic adapters.
Consider this approach if you plan future smart home upgrades that might require additional wires, like whole-home humidifiers, dehumidifiers, or ventilation systems. Running a robust 18/8 cable future-proofs your installation for any conceivable upgrade. The project typically takes 2-4 hours for a handy homeowner and provides the satisfaction of a permanent, code-compliant solution that adds value to your property.
Tools and Materials Needed
You’ll need fish tape or a fish stick to pull wire through walls, a drill with long bits for navigating plates and fire blocks, and a wire stripper/crimper. A stud finder helps avoid obstacles, while glow rods illuminate dark wall cavities. Purchase cable rated CL2 or CL3 for in-wall installation, ensuring it meets fire safety codes. Wire staples secure the cable along joists, and a wall plate with a larger opening accommodates the new, thicker bundle.
Invest in a non-contact voltage tester to confirm power is off before drilling near electrical lines. A drywall saw or oscillating tool creates access holes if necessary, though you should minimize wall damage by using existing openings when possible. Labeling tape and a permanent marker keep wires organized at both ends. Finally, a helper makes feeding wire through walls exponentially easier.
Professional Installation vs. DIY
Hiring an HVAC technician or electrician costs $150-300 depending on complexity, but guarantees code compliance and preserves equipment warranties. Professionals carry liability insurance and can diagnose underlying issues like weak transformers or incompatible control boards during installation. They’ll also patch drywall and paint, leaving no trace of the work.
DIY installation risks violating local electrical codes if you use improper cable types or fail to secure wiring adequately. You might accidentally drill through plumbing or electrical lines. However, the low-voltage nature of thermostat wiring means most jurisdictions don’t require permits, and the work is safer than standard electrical projects. If you’re comfortable with basic home improvement and follow safety protocols, DIY is entirely feasible for straight runs without major obstacles.
Key Features to Look for in No-C-Wire Thermostats
Power Harvesting Technology
Advanced smart thermostats now incorporate sophisticated power harvesting circuits that extract energy from HVAC control wires more efficiently. Look for models advertising “power stealing” or “millivolt operation” capabilities. These devices use ultra-low-power processors and e-ink displays that function reliably on the minuscule currents available through W and Y wires.
Some manufacturers have developed proprietary algorithms that pulse power extraction between HVAC cycles, building up charge in internal capacitors to sustain operations. This technology allows full-featured operation without a C-wire in many installations, though performance varies based on your specific equipment and usage patterns. Research user reviews for your particular HVAC system type before purchasing.
Adaptive Power Management
The best no-C-wire thermostats dynamically adjust their behavior based on available power. They’ll dim displays, reduce Wi-Fi check-in frequency, and limit background processing when power reserves run low. This intelligence prevents the dreaded shutdowns that plague simpler devices. Look for settings menus that show power status, signal strength impact on consumption, and options to manually adjust power-saving aggressiveness.
Some models learn your usage patterns and pre-charge internal batteries before anticipated high-usage periods. Others coordinate with your HVAC schedule, performing power-intensive tasks like firmware updates immediately after heating/cooling cycles when capacitors are fully charged. This adaptive approach bridges the gap between battery-only and fully-wired performance.
Low-Power Display Options
Display technology significantly impacts power consumption. LCD screens with LED backlighting are the most demanding, while e-ink displays use power only when changing. Monochrome displays consume 60-70% less energy than color equivalents. Some thermostats offer “always-on” display modes that stay active, while others default to wake-on-approach sensors.
Consider your priorities. If you frequently glance at your thermostat from across the room, an always-on e-ink display provides the best compromise. If you primarily interact through your smartphone app, a display that sleeps until touched maximizes power efficiency. The sweet spot for no-C-wire installations is typically a monochrome LCD with motion activation, balancing readability with conservative power draw.
Installation Safety: What You Must Know
Turning Off Power to Your HVAC System
Never work on thermostat wiring without disconnecting power at the source. Turn off the appropriate breaker in your electrical panel—typically labeled “Furnace,” “Air Handler,” or “HVAC.” Verify power is off by attempting to activate heating or cooling from your existing thermostat. For gas furnaces, you may also need to switch off the service disconnect switch mounted on or near the unit.
Low-voltage thermostat wires carry minimal current (usually under 1 amp), making them relatively safe to handle. However, the transformer producing that voltage is connected to high-voltage mains power. A short circuit in the control board can send dangerous voltage up the thermostat wires. Use a non-contact voltage tester on the R wire before touching any connections. This simple precaution takes seconds but prevents potentially fatal shocks.
Handling Low-Voltage vs. Line-Voltage Systems
This guide addresses low-voltage (24V) systems common in central HVAC. However, some homes, particularly older ones or those with baseboard heating, use line-voltage (120V or 240V) thermostats. These are easily identified by their thick wires (12-14 gauge) and lack of a separate furnace transformer. Never attempt to install a low-voltage smart thermostat on a line-voltage system without a step-down transformer—it will destroy the device and create a fire hazard.
If you’re unsure, check your circuit breaker. Low-voltage systems typically use 15-amp breakers, while line-voltage heating circuits use 20-30 amp breakers. When in doubt, consult a professional. The installation techniques discussed here apply exclusively to low-voltage systems, and attempting modifications on line-voltage equipment without proper training risks serious injury.
When to Call a Professional
Certain scenarios demand expert intervention. If your HVAC system uses a proprietary communicating protocol (Carrier Infinity, Trane ComfortLink, etc.), any wiring modifications may void warranties and disable advanced features. Multi-zone systems with dampers and multiple thermostats require careful consideration of power distribution. Heat pumps with auxiliary heat strips often have complex wiring that doesn’t tolerate power-stealing methods well.
Call a technician if you encounter aluminum wiring, which requires special connectors and precautions. If your furnace control board shows signs of damage, corrosion, or previous amateur work, professional assessment prevents cascading failures. Finally, if you’ve attempted installation and your HVAC system behaves erratically—short cycling, unresponsive controls, or error codes—immediately disconnect the thermostat and seek expert help. The cost of a service call pales compared to replacing a control board.
Troubleshooting Common Installation Issues
“No Power” Error Messages
If your smart thermostat displays a “No Power” or “No C-Wire” error after installation, systematic diagnosis is essential. First, verify all wire connections are secure and fully inserted into terminals. Loose connections cause intermittent power delivery that confuses diagnostic software. Check that you haven’t accidentally reversed polarity on external adapters—C should connect to negative, Rc to positive.
Measure voltage between R and C with your multimeter. Readings below 22V indicate insufficient power, often caused by weak transformers or excessive wire runs over 100 feet. If using a G-wire hack, ensure the furnace end connection is solid and that your system doesn’t have a separate fan control board that isolates the G circuit. Try temporarily disconnecting the G-wire from the thermostat—if the device powers up, you’ve confirmed the wire can deliver power but may have a compatibility issue.
Intermittent Connectivity Problems
Wi-Fi dropouts and unresponsive apps often stem from power instability rather than signal strength. Smart thermostats prioritize maintaining the display and basic HVAC control over Wi-Fi connectivity when voltage dips. Check your router’s admin panel to see if the thermostat is frequently disconnecting and reconnecting. This pattern indicates power issues, not network problems.
If using a power adapter, ensure it’s rated for at least 500mA—underpowered adapters cause voltage sag during high-draw operations like firmware updates. For G-wire hacks, add a 5-watt resistor between C and G at the furnace to stabilize voltage. Battery-powered models may need fresh batteries even without low-battery warnings, as voltage droop under load can cause connectivity issues before the low-power threshold triggers.
HVAC System Short Cycling
Short cycling—your system turning on and off rapidly—often indicates wiring conflicts. When using power-stealing methods, the thermostat may inadvertently send voltage back through control wires, triggering false signals. This is particularly common with the G-wire hack. Install an isolation relay between the thermostat and furnace to electrically separate the control signals from the power harvesting.
Check your thermostat’s advanced settings for “power stealing” or “C-wire” configuration options. Disabling power stealing may force the device to rely more heavily on internal batteries, reducing HVAC interference. If short cycling occurs only during specific operations (like when the display activates), you’ve identified a power demand issue that an external adapter would resolve. Document the cycling pattern—duration, frequency, and triggering events—to help professionals diagnose the root cause if self-troubleshooting fails.
Maximizing Performance Without a C-Wire
Optimizing Wi-Fi Settings to Conserve Power
Wi-Fi is the largest power consumer in most smart thermostats. Access your router’s settings and create a dedicated 2.4GHz network for smart home devices—this frequency penetrates walls better, allowing the thermostat to use lower transmit power. Disable 5GHz connectivity on the thermostat if possible, as it consumes more energy for marginal speed benefits that thermostats don’t need.
Reduce your Wi-Fi beacon interval from the default 100ms to 300ms in router settings, decreasing how often the thermostat wakes to listen for network traffic. Set a static IP address for the thermostat to eliminate DHCP renewal broadcasts. In the thermostat’s own settings, reduce the Wi-Fi signal strength setting from “maximum” to “balanced” or “power saving.” These tweaks can extend battery life by 25-40% in battery-powered models and stabilize power-stealing installations.
Scheduling Strategies for Battery Longevity
Strategic scheduling reduces power demands on no-C-wire installations. Create temperature setbacks that align with your HVAC system’s natural cycles. For example, if your furnace typically runs for 15 minutes every hour during winter nights, schedule a 3-degree setback to begin 10 minutes after the expected cycle start. This allows the thermostat to perform power-intensive display updates and Wi-Fi syncs while the system is already running and power is abundant.
Avoid rapid temperature changes that trigger frequent short cycles. Instead of a 5-degree recovery over 30 minutes, spread it across 90 minutes to reduce total system cycles while maintaining comfort. Use “smart recovery” features that learn your system’s heating and cooling patterns, optimizing for efficiency and power availability. Disable energy-hungry features like continuous fan circulation unless absolutely necessary—each fan activation is a missed power-harvesting opportunity.
Firmware Updates and Power Consumption
Firmware updates are the most power-intensive operation smart thermostats perform, often requiring sustained high current that can drain internal capacitors and cause reboots. Configure your thermostat to perform updates only during active HVAC cycles when power is stable. Most devices default to overnight updates, but you can manually trigger them during heating or cooling periods for no-C-wire installations.
If your thermostat offers “delta updates” (partial firmware downloads), enable this feature to reduce transmission time and power draw. Disable automatic updates entirely and manually check monthly, scheduling them during extended runtime periods. After any update, monitor battery voltage or power status for 24-48 hours, as new firmware sometimes resets power-saving configurations to defaults. Keep a log of update dates and any subsequent power issues to identify problematic firmware versions.
The Future of C-Wire-Free Technology
Advances in Power Harvesting
Emerging thermostats incorporate thermoelectric generators that harvest energy from temperature differences between your wall cavity and room air. While current implementations only extend battery life by 15-20%, next-generation versions promise indefinite operation without external power. Companies are developing piezoelectric materials that generate electricity from HVAC system vibrations, turning mechanical energy into usable current.
More immediately practical are improved capacitor arrays that store energy more densely, allowing thermostats to weather longer periods without HVAC cycles. Some manufacturers are experimenting with supercapacitors that charge in seconds and provide hours of operation. These technologies will eventually make C-wires obsolete, much like how PoE+ reduced the need for separate electrical runs for security cameras.
Battery Technology Innovations
Solid-state batteries are entering the smart home market, offering double the energy density of lithium-ion with no fire risk. These batteries maintain capacity over thousands more charge cycles, potentially lasting the entire lifespan of the thermostat. Some prototypes integrate directly into circuit boards, reducing size and improving thermal management.
Ambient energy harvesting is another frontier—experimental thermostats use tiny solar cells on the faceplate combined with RF energy harvesting from Wi-Fi and cellular signals in your home. While currently insufficient as primary power sources, they can trickle-charge internal batteries, extending replacement intervals to 3-5 years. Expect these hybrid power systems to become standard in premium no-C-wire models within the next 3-5 years.
Industry Standards Evolution
The thermostat industry is gradually moving toward standardized low-power communication protocols like Thread and Matter, which consume 70% less energy than current Wi-Fi implementations. These mesh networks allow devices to relay signals through each other, reducing each unit’s transmit power requirements. As these standards mature, the power budget for smart thermostats will shrink dramatically.
HVAC manufacturers are also beginning to integrate USB-C power ports directly into furnace control boards, recognizing that smart thermostats are essentially peripheral devices. This trend will simplify future installations, allowing a simple USB cable to provide both power and data. Building codes are evolving too, with some jurisdictions now requiring “smart ready” conduit from thermostats to HVAC equipment, making future C-wire installation trivial.
Cost Analysis: Budgeting for Your Installation
Upfront Equipment Costs
External power adapters represent the most economical solution at $15-30. Battery-powered smart thermostats cost $50-100 more than their wired equivalents, but this premium includes the convenience of simple installation. Furnace-mounted adapter kits run $60-90, while professional C-wire installation typically costs $150-300 depending on complexity.
When comparing options, factor in hidden costs. Adapters may require additional wire raceways ($10-15) for aesthetic installation. Battery models need periodic battery replacements ($5-10 every 1-2 years). DIY C-wire installation requires tools you may not own—fish tape ($20-40), long drill bits ($15-25), and a multimeter ($20-50) if you don’t already have one. Calculate total cost of ownership over a 5-year period to make an informed decision.
Long-Term Energy Savings
Smart thermostats typically reduce heating and cooling costs by 10-15%, with EPA estimates suggesting $180 annual savings for average homes. No-C-wire solutions don’t diminish these savings—your thermostat’s energy management capabilities remain fully functional. In fact, some power-stealing methods may slightly improve efficiency by reducing phantom loads, though this effect is minimal.
Battery-powered models might save an additional $2-3 annually by eliminating adapter standby consumption, but this is negligible. The real financial consideration is installation cost avoidance. Spending $30 on an adapter instead of $250 on professional C-wire installation means you break even in under two years. Conversely, if you’re already planning renovations that would expose wall cavities, the marginal cost of adding a proper C-wire during that work is near zero.
Professional Installation Fees
HVAC technicians charge $75-150 per hour, with most C-wire installations requiring 1-3 hours. Complex scenarios involving finished basement ceilings, fire-rated walls, or asbestos-wrapped ductwork can push costs to $400-500. Some companies offer flat-rate thermostat installation packages ($200-350) that include C-wire solutions, which can be economical if you’re uncomfortable with any electrical work.
Consider bundled services—if your furnace is due for maintenance, schedule the C-wire installation simultaneously, as the technician will already be accessing the control board. Many professionals guarantee their work, providing free callbacks if issues arise. This peace of mind justifies the expense for many homeowners, especially those with expensive or complex HVAC systems where amateur mistakes carry high stakes.
Environmental Considerations
Energy Efficiency Impacts
No-C-wire installations have minimal environmental impact compared to the benefits of smart thermostat operation. External adapters consume less than 1 watt of standby power—equivalent to leaving a single LED bulb on continuously. Over a year, this represents about 9 kWh, or roughly $1.20 in electricity and 6 pounds of CO2 emissions. The smart thermostat’s energy savings far outweigh this tiny overhead.
Battery-powered models eliminate this standby consumption entirely, making them the greenest option from a direct power perspective. However, battery production and disposal carry their own environmental costs. Lithium extraction is water-intensive, and improper disposal can leach heavy metals. The net environmental difference between solutions is negligible compared to the 1-2 tons of CO2 emissions avoided annually through optimized heating and cooling.
Battery Disposal and Recycling
If you choose a battery-powered thermostat, commit to proper recycling. Lithium batteries should never enter landfills. Most electronics retailers offer free battery recycling, and some thermostat manufacturers provide prepaid mail-back programs. Keep a small container in your utility room for spent batteries and recycle them annually.
Rechargeable batteries reduce waste but require electricity for charging. The environmental break-even point between disposable lithium and rechargeables occurs after about 50 charge cycles—easily achievable over a thermostat’s lifespan. Consider purchasing rechargeable lithium AA batteries specifically designed for low-drain devices, which maintain voltage better than NiMH alternatives. Some municipalities classify thermostat batteries as hazardous waste, so check local regulations.
Sustainable HVAC Practices
Your no-C-wire installation is part of a larger sustainable home ecosystem. Use the thermostat’s energy reports to identify inefficiencies—perhaps your home loses heat faster than expected, indicating inadequate insulation. Smart scheduling can precondition your home using off-peak electricity, reducing strain on the grid. Integration with smart vents and window sensors creates a holistic system that minimizes energy waste.
Consider that extending the life of your existing HVAC system through smart controls is inherently sustainable. Preventing premature equipment replacement saves the embodied energy of manufacturing new units. The C-wire solutions that avoid running new copper wire also conserve resources. Every foot of 18-gauge wire contains about 0.1 pounds of copper—small individually, but significant at scale across millions of installations.
Frequently Asked Questions
Can I install any smart thermostat without a C-wire, or are some models specifically designed for this?
Not all smart thermostats work without a C-wire. While some premium models include robust power-stealing capabilities, many require the stable power a C-wire provides. Look for explicit “no C-wire required” labeling or check the manufacturer’s compatibility checker before purchasing. Battery-powered models are universally compatible, while others may need verification with your specific HVAC system type.
Is the G-wire hack safe, or could it damage my furnace?
When executed correctly on compatible systems, the G-wire hack is safe and won’t damage modern furnaces. However, it technically violates the electrical isolation between thermostat and fan control circuits. The risk is minimal with conventional systems but increases with sophisticated variable-speed or communicating equipment. Always check your furnace manual for warnings about power-stealing thermostats before attempting this method.
Will I lose any smart features by not having a C-wire?
You shouldn’t lose core features like scheduling, remote control, or energy reports. However, you may experience reduced display brightness, slower app response times, or disabled “always-on” screen options. Some advanced features like continuous fan circulation, rapid geofencing updates, or complex multi-stage control might be limited. Most users find these compromises imperceptible in daily use.
How often will I really need to replace batteries in battery-powered models?
In typical residential use, expect 18-24 months from quality lithium batteries. Extreme climates with frequent HVAC cycling can reduce this to 12 months, while mild climates might stretch it to 3 years. The thermostat’s app will provide low-battery warnings 2-3 weeks in advance. Pro tip: set a calendar reminder for 18 months after installation to proactively check battery levels before heating or cooling season begins.
Can I install a C-wire adapter myself, or does it require an HVAC technician?
Most C-wire adapter kits are designed for DIY installation with clear instructions and color-coded wires. If you’re comfortable turning off breakers, identifying terminals on your furnace board, and following wiring diagrams, you can likely handle it. However, if your furnace has a complex control board or you’re unsure about any step, the $150-200 professional installation fee is worthwhile insurance against costly mistakes.
What’s the absolute cheapest way to get a smart thermostat working without a C-wire?
A plug-in power adapter costs $15-25 and takes 30 minutes to install, making it the most budget-friendly reliable solution. If you have an unused wire in your thermostat bundle, connecting it at both ends costs nothing but time. The G-wire hack is free but sacrifices fan control. Avoid ultra-cheap unknown-brand adapters that lack UL certification—they can introduce electrical noise that interferes with HVAC operation.
Will using these alternative power methods void my HVAC equipment warranty?
Most HVAC manufacturers state that modifications to control wiring can void warranties if the modification causes damage. However, simply adding a C-wire adapter or using an external power supply doesn’t inherently void coverage. Problems arise if improper installation damages the control board. Keep documentation of your installation method, and consider professional installation for newer equipment still under warranty to maintain coverage.
Do I need to turn off power at the breaker, or is the furnace switch enough?
Always turn off power at the main electrical panel breaker, not just the furnace disconnect switch. The disconnect often only interrupts high-voltage power while leaving the low-voltage transformer energized. Additionally, some systems have multiple breakers (one for air handler, one for condenser). Use a non-contact voltage tester on the R wire after turning off power to confirm it’s safe before touching any wires.
Why does my thermostat work fine in winter but show low power errors in summer?
This seasonal variation is common with power-stealing installations. Heating systems (W-wire) typically provide more consistent power extraction opportunities than cooling systems (Y-wire) because heating cycles run longer and more frequently in cold weather. During mild weather with infrequent cooling calls, the thermostat can’t harvest enough power. Consider switching to an external adapter or battery-powered model if this seasonal instability affects your comfort.
Can I combine multiple solutions, like using a power adapter with a battery backup?
Absolutely, and this hybrid approach often provides the best reliability. Many smart thermostats with battery compartments will automatically switch to battery power if external power fails, then recharge when power returns. You can also use a G-wire hack with a small external transformer for supplemental power. However, avoid connecting multiple power sources to the same terminals simultaneously—this can create conflicting voltages. Always follow the manufacturer’s guidelines for dual-power configurations.