If you’ve ever finished a mix that sounded pristine in your home studio only to have it fall apart in your car, headphones, or a friend’s system, you’ve already tasted the bitter truth: you can’t fix what you can’t accurately hear. And what you’re hearing isn’t just your monitors—it’s an invisible cocktail of direct sound, room reflections, HVAC noise, street traffic, and electrical hum that colors every decision you make. Sound and noise monitoring isn’t the sexiest topic in home recording, but it’s the silent guardian between amateur guesses and professional results. While most bedroom producers obsess over plugin collections and microphone lockers, the engineers who consistently deliver translation-ready mixes know that understanding their acoustic environment is the real secret weapon.
This guide pulls back the curtain on professional-grade monitoring strategies that don’t require a commercial facility budget. We’ll decode the science, demystify the gear, and build a monitoring workflow that becomes as natural as reaching for your faders. Whether you’re tracking vocals at midnight or mastering for streaming platforms, these principles will transform how you interact with your space—and finally give you confidence in what you’re actually hearing.
Top 10 Home Recording Studio Sound Monitoring
Detailed Product Reviews
1. PreSonus AudioBox Go Creator Complete Studio Recording Bundle with USB Audio 96K Interface, Condenser Microphone, Professional Monitoring Headphones, and Studio One Pro DAW Software

Overview: The PreSonus AudioBox Go Creator bundle delivers a remarkably compact yet capable recording solution for musicians and content creators who prioritize portability without sacrificing quality. This all-in-one package combines PreSonus’s ultra-portable AudioBox GO interface with their acclaimed M7 condenser microphone and HD7 monitoring headphones, creating a mobile studio that fits in a backpack.
What Makes It Stand Out: The star attraction is the AudioBox GO’s deceptive power—this bus-powered interface handles 96kHz recording while maintaining PreSonus’s renowned low-noise preamps. The inclusion of Studio One 6 Artist Edition provides professional-grade DAW capabilities immediately, while the M7 microphone’s cardioid pattern excels at isolating vocals and acoustic sources. The ergonomic HD7 headphones complete the monitoring chain with surprising accuracy for their class.
Value for Money: While pricing isn’t specified, PreSonus typically positions these bundles competitively against entry-level Focusrite and M-Audio alternatives. The software alone represents significant value, as Studio One Artist retails separately for nearly the cost of some budget interfaces. For mobile creators, consolidating interface, mic, headphones, and software eliminates compatibility guesswork.
Strengths and Weaknesses:
- Strengths: Exceptional portability; zero-latency monitoring; professional software inclusion; reputable brand reliability; USB bus-powered convenience; comprehensive monitoring solution.
- Weaknesses: Limited to two inputs may restrict multi-instrument recording; no included mic stand or pop filter requires additional purchases; headphone quality adequate but not exceptional; pricing ambiguity makes direct comparison difficult.
Bottom Line: Ideal for podcasters, singer-songwriters, and mobile producers seeking a trusted brand’s complete, travel-ready recording solution with professional software integration.
2. Podcast Equipment Bundle, BM-800 Recording Studio Package with Voice Changer, Live Sound Card - Audio Interface for Laptop Computer Vlog Living Broadcast Live Streaming YouTube TikTok (AM100-V8)

Overview: This aggressively priced bundle targets entry-level streamers and podcasters with an all-inclusive package centered around the popular BM-800 condenser microphone and AM100-V8 live sound card. Designed for plug-and-play simplicity, it promises professional results for under $40 while adding entertaining voice modulation capabilities that appeal to content creators on platforms like TikTok and YouTube.
What Makes It Stand Out: The integrated voice changer with multiple sound effects distinguishes this from traditional recording bundles, enabling real-time vocal transformation for creative streaming. Its universal compatibility spans smartphones, tablets, gaming consoles, and computers without requiring drivers. The comprehensive accessory list—including suspension arm, shock mount, and pop filter—eliminates hidden costs for absolute beginners.
Value for Money: At $39.99, this represents exceptional value, costing less than a single entry-level microphone from established brands. The inclusion of a live sound card, adjustable arm, and complete accessory suite makes it significantly more affordable than assembling components separately. For hobbyists testing the waters, the financial risk is minimal.
Strengths and Weaknesses:
- Strengths: Unbeatable price point; complete accessory package; wide device compatibility; entertaining voice effects; beginner-friendly setup; no additional software costs.
- Weaknesses: Audio quality cannot match professional interfaces; build quality reflects budget pricing; requires charging unlike bus-powered alternatives; translated instructions may confuse users; limited long-term upgrade path.
Bottom Line: A perfect starter kit for aspiring streamers and hobbyist podcasters prioritizing fun features and affordability over audiophile-grade fidelity.
3. PreSonus AudioBox 96 25th Anniversary USB Audio MIDI Interface Recording Bundle with Studio One Artist DAW Cardioid Condenser Microphone Shockmount Pop Filter XLR Cable Mic Stand and Headphones

Overview: Celebrating a quarter-century of audio innovation, PreSonus’s anniversary bundle delivers a comprehensive 24-bit/96kHz recording solution that bridges the gap between entry-level interfaces and professional studio setups. This package thoughtfully includes every physical component needed—from microphone to shockmount to adjustable stand—making it a true turnkey solution for serious creators ready to invest in quality.
What Makes It Stand Out: The AudioBox 96 interface provides genuine high-resolution recording with ultra-low-noise Class-A preamps that outperform competitors in this price bracket. The Studio Magic Plug-In Suite adds substantial value, bundling professional effects and virtual instruments rarely included at this level. Zero-latency monitoring via direct hardware mixing ensures seamless recording sessions without distracting delay.
Value for Money: At $219.99, this bundle competes directly with Focusrite Scarlett Solo packs while offering superior software inclusion. The added shockmount, pop filter, and quality XLR cable—often omitted by competitors—represent approximately $50 in additional value. For musicians requiring MIDI connectivity, the interface’s MIDI I/O further justifies the investment.
Strengths and Weaknesses:
- Strengths: High-resolution 96kHz recording; professional software bundle; complete hardware accessories; rugged USB-powered portability; zero-latency monitoring; MIDI interface capability; reputable brand support.
- Weaknesses: Only two inputs limits simultaneous recording; Studio One Artist has steeper learning curve than some DAWs; headphone quality unspecified; mic stand durability adequate but not professional-grade; no studio monitors included.
Bottom Line: An excellent mid-range investment for musicians, podcasters, and voice-over artists seeking professional-grade audio capture with comprehensive software tools and genuine upgrade potential.
4. PreSonus AudioBox USB 96 Bundle — USB Audio Interface, XLR Interface for Guitar, Device for PC & Mac, Complete Recording Package with Studio One Pro, Music Production, Home Studio

Overview: This premium PreSonus bundle elevates the home studio experience by pairing their reliable AudioBox USB 96 interface with Studio One Pro perpetual license and Eris 3.5 studio monitors, creating a complete monitoring and production ecosystem. Unlike subscription-based alternatives, the perpetual software license ensures lifetime access to professional-grade production tools without ongoing costs.
What Makes It Stand Out: The Eris 3.5 studio monitors deliver surprisingly accurate low-end response for 3.5-inch drivers, providing proper mix translation impossible with headphones alone. Studio One Pro’s perpetual license represents the bundle’s crown jewel, offering advanced features like Melodyne integration and mastering tools typically reserved for expensive subscriptions. The M7 MKII microphone includes an improved capsule design over its predecessor.
Value for Money: While pricing isn’t listed, the perpetual Studio One Pro license alone values over $400, immediately establishing this bundle’s premium positioning. The Eris monitors add another $100+ in value, making this an exceptional deal if priced competitively with interface-only packages. For creators committed to long-term production, eliminating subscription fees creates substantial savings.
Strengths and Weaknesses:
- Strengths: Perpetual Pro software license eliminates subscriptions; proper studio monitors for accurate mixing; upgraded M7 MKII microphone; complete monitoring chain; zero-latency hardware monitoring; professional brand reliability.
- Weaknesses: 3.5-inch monitors may lack deep bass for some genres; limited I/O restricts expansion; no included microphone stand requires additional purchase; pricing uncertainty; larger footprint than portable alternatives.
Bottom Line: The ultimate home studio starter kit for serious producers wanting professional monitoring and lifetime software access without subscription fatigue.
5. ALSO GO Podcast Equipment Bundle, Podcast Equipment with BM-800 Microphone(Gold) & F998 Sound Card, Recording Studio Equipment for Podcasting, Singing, Gaming, and Live Streaming YouTube Tiktok

Overview: This gleaming gold-accented bundle targets style-conscious content creators with an all-inclusive package centered on the BM-800 microphone and feature-rich F998 sound card. Positioned as a plug-and-play solution for multiple platforms, it promises studio-quality results for podcasting, gaming, and live streaming while eliminating technical barriers that intimidate beginners.
What Makes It Stand Out: The F998 sound card’s extensive effect library—16 background sounds, 7 recording modes, and 4 voice changers—provides creative flexibility unmatched by traditional interfaces. The striking gold microphone finish offers aesthetic appeal for video-centric creators, while the universal plug-and-play compatibility spans from mobile devices to gaming consoles without driver installation.
Value for Money: At $41.20, this delivers remarkable completeness, including dual-layer pop filtering, shock mounting, and multiple cable types. The price undercuts even basic USB microphones while providing an entire production chain. For TikTok creators and casual streamers, the entertainment value of real-time effects combined with professional accessories makes this a budget champion.
Strengths and Weaknesses:
- Strengths: Comprehensive accessory inclusion; extensive sound effects and voice modulation; attractive gold aesthetic; universal device compatibility; beginner-friendly operation; aggressive pricing.
- Weaknesses: Audio fidelity cannot match dedicated interfaces; plastic construction reduces durability; requires charging between sessions; BM-800 microphone is entry-level; limited upgrade path; effects may overwhelm purists.
Bottom Line: An outstanding value for aspiring streamers and content creators prioritizing creative effects, visual appeal, and all-in-one convenience over absolute audio precision.
6. Focusrite Scarlett Solo 3rd Gen USB Audio Interface for Guitarists, Vocalists, Podcasters or Producers to record and playback studio quality sound

Overview: The Focusrite Scarlett Solo 3rd Gen is a compact USB audio interface engineered for solo creators seeking professional studio quality. This third-generation model delivers pristine audio conversion in a streamlined, desktop-friendly form factor that connects seamlessly to Mac or PC.
What Makes It Stand Out: The switchable Air mode emulates Focusrite’s legendary ISA preamp, adding exceptional clarity and brightness to vocals and acoustic instruments. Intuitive Gain Halo indicators prevent clipping before it happens, while the bundled software suite—including Pro Tools Intro+, Ableton Live Lite, and six months of FL Studio Producer Edition—provides over $1000 in professional production tools that grow with your skills.
Value for Money: At $109.99, this interface offers unmatched preamp quality for the price. The included software alone would cost more than the hardware, making it substantially cheaper than purchasing a DAW separately. Competing interfaces rarely match this combination of audio fidelity and comprehensive software at any entry-level price point.
Strengths and Weaknesses: Strengths include pristine 24-bit/192kHz conversion, ultra-low latency performance, robust metal chassis, and genuinely useful Air mode enhancement. The instrument input handles hot pickups without distortion. Weaknesses are limited to a single XLR input, preventing multi-mic recordings, and no MIDI connectivity. The shared input design means switching between mic and instrument requires cable changes.
Bottom Line: The Scarlett Solo 3rd Gen remains the gold standard for solo creators. For those prioritizing sound quality over I/O flexibility, it’s an unbeatable choice that delivers professional results and software tools to match.
7. PreSonus AudioBox USB 96 Studio Recording Package with Studio One Pro Software

Overview: The PreSonus AudioBox USB 96 Studio Package is a comprehensive turnkey solution for home recording enthusiasts. This bundle eliminates compatibility guesswork by providing every essential component needed to begin producing professional recordings immediately.
What Makes It Stand Out: This package uniquely includes a rugged AudioBox interface, versatile M7 large-diaphragm condenser microphone, HD7 monitoring headphones, and Studio One Artist software. The Studio Magic plugin suite adds over $1000 in additional professional effects and instruments, creating a complete ecosystem where every component is designed to work seamlessly together.
Value for Money: At $189.99, purchasing these components separately would cost significantly more. The M7 microphone alone rivals $100+ mics, while Studio One Artist provides an intuitive DAW experience that competes with software costing hundreds. For beginners, this eliminates the costly trial-and-error of mixing and matching gear.
Strengths and Weaknesses: Strengths include the interface’s durable construction, the M7 microphone’s surprising versatility for both vocals and instruments, and Studio One’s drag-and-drop workflow. The HD7 headphones provide accurate monitoring for the price point. Weaknesses include the AudioBox’s older USB 2.0 connectivity and 96kHz maximum sample rate, which lags behind modern 192kHz interfaces. The microphone lacks the character of premium alternatives.
Bottom Line: Perfect for beginners seeking a complete, ready-to-record setup without research fatigue. While experienced producers may eventually outgrow its limitations, the PreSonus bundle offers unmatched convenience and value for those starting their home studio journey.
8. SwaykTech Studio Recording Microphone Isolation Shield with Pop Filter and Metal Tripod Stand, Studio Mic to PC Laptop Smartphone, Music Microphone for Recording Singing Podcasting

Overview: The SwaykTech Studio Recording Package offers an affordable entry into acoustically treated recording. This all-in-one kit combines a cardioid USB microphone with a five-panel isolation shield and pop filter, targeting podcasters and vocalists working in untreated rooms.
What Makes It Stand Out: The foldable isolation shield features a three-layer acoustic design with high-density foam that effectively reduces room reflections. The included metal tripod and double-layer pop filter provide positioning flexibility, while USB connectivity ensures compatibility with computers and smartphones via the included Type-C adapter, eliminating interface requirements.
Value for Money: At $53.99, this package undercuts competitors by bundling microphone and acoustic treatment together. Individual components would typically cost twice as much, making it ideal for budget-conscious creators who need immediate acoustic improvement without investing in room treatment.
Strengths and Weaknesses: Strengths include excellent portability, straightforward plug-and-play operation, and versatile mounting options. The shield genuinely improves recording clarity in reflective spaces. Weaknesses include the microphone’s limited frequency response and sensitivity compared to professional XLR mics. The lightweight tripod may lack long-term durability, and cable management can be cumbersome with the shield’s design.
Bottom Line: A practical starting point for podcasters and vocalists in imperfect spaces. While the microphone is entry-level, the isolation shield alone makes this package worthwhile for beginners prioritizing acoustic improvement over pristine audio capture.
9. MAONO USB Audio Interface Bundle: Interface with XLR Microphone Headphone 24-bit/192kHz LOOPBACK ASIO Driver for Recording Music Home-Studio Guitar Podcast Streaming PC DAW(PS22+PD100S+MH700)
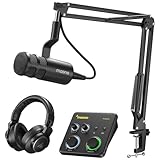
Overview: The MAONO USB Audio Interface Bundle delivers a complete recording solution targeting content creators and musicians. This package includes the PS22 interface, dynamic XLR microphone, and studio headphones—everything required for professional productions without additional purchases.
What Makes It Stand Out: The PS22 interface features advanced loopback functionality and ASIO driver support for low-latency streaming, capabilities often missing in this price range. The included ProStudio Routing Software provides virtual channel mixing, while the dynamic microphone eliminates phantom power needs and offers excellent off-axis rejection for untreated rooms.
Value for Money: At $139.99, this bundle competes directly with entry-level interfaces while adding a quality microphone and headphones. The software features alone rival interfaces costing twice as much, delivering exceptional value for streamers and podcasters needing professional routing capabilities.
Strengths and Weaknesses: Strengths include comprehensive I/O options, intuitive mode switching for different applications, and impressive software integration. The dynamic mic performs admirably for voice work and rejects room noise effectively. Weaknesses include slightly less transparent preamps compared to Focusrite equivalents, and the plastic construction feels less robust. The headphone output could offer more power for high-impedance models.
Bottom Line: An outstanding value for streamers and podcasters needing loopback functionality. While audiophiles might prefer premium preamps, this bundle’s feature set and included accessories make it a smart choice for versatile content creation.
10. TroyStudio Portable Vocal Booth, Large Foldable Microphone Isolation Shield, Music Recording Studio Sound Echo Absorbing Box, Desk & Stand Use Reflection Filter with Thickened Dense Acoustic Foam

Overview: The TroyStudio Portable Vocal Booth is a compact acoustic treatment solution designed for recording in untreated spaces. This foldable isolation box creates a controlled recording environment wherever needed, from bedrooms to hotel rooms.
What Makes It Stand Out: The 2-inch thick dense egg-crate foam provides superior sound absorption compared to thinner shield-style alternatives, reducing room reverb by up to 92.7%. Its clever five-panel design folds flat to just six inches thick while weighing only two pounds, enabling true portability without sacrificing acoustic performance.
Value for Money: At $34.99, this booth costs less than a single acoustic panel while delivering targeted treatment. For creators without permanent studio space, it offers professional-grade isolation at a fraction of the cost of building a vocal booth, paying for itself after just a few sessions.
Strengths and Weaknesses: Strengths include exceptional foam density, quick one-minute setup, and versatile mounting for both stands and desk use. The included cable management holes demonstrate thoughtful design. Weaknesses include the interior space being somewhat cramped for larger microphones or expressive performers. The 0.86-inch stand diameter limitation excludes some boom arms, and frequent folding may wear the felt casing over time.
Bottom Line: An ingenious solution for mobile creators and those in challenging acoustic environments. While not replacing permanent treatment, its portability and effectiveness make it invaluable for consistent recordings on the road or in temporary spaces.
Why Sound Monitoring is the Unsung Hero of Home Studios
The difference between a hobbyist setup and a professional home studio rarely comes down to gear alone—it’s about data-driven decisions. Without monitoring, you’re flying blind in an environment specifically designed to deceive you. Your ears adapt to inconsistencies within minutes, normalizing frequency imbalances and masking low-level noise that will haunt your final product. Monitoring provides the objective reference point your subjective hearing desperately needs. It protects your hearing by revealing dangerous SPL levels before fatigue sets in, prevents neighbor complaints by tracking noise pollution, and ensures your creative intent survives the journey from your room to the world. Most importantly, it builds a feedback loop: measure, treat, listen, adjust, repeat. This iterative process is how professional rooms are built, and it’s entirely achievable in your home.
Decoding the Basics: Sound Pressure Level vs. Ambient Noise Floor
Before diving into gear, you need to understand what you’re actually measuring. Sound Pressure Level (SPL) quantifies the intensity of acoustic energy hitting your ears—everything from your monitor speakers to a vocalist’s performance. It’s measured in decibels (dB) relative to the quietest sound humans can hear. Your ambient noise floor, conversely, is the baseline noise present when no intentional sound is being produced: computer fans, refrigerator hum, traffic rumble, and air movement. The relationship between these two values is your signal-to-noise ratio (SNR), and it’s the single most important metric in your studio. A 20dB SNR means your quietest recorded passage is only 20dB above your room’s inherent noise—a recipe for hiss and muddy silence. Professional studios aim for 35dB+ SNR, which often requires dropping the noise floor below 25dB SPL through treatment and isolation.
Understanding Decibel Scales: A-Weighting, C-Weighting, and Z-Weighting Explained
Not all decibels are created equal. Human hearing isn’t linear—we’re most sensitive to midrange frequencies where speech resides, and we perceive bass and extreme highs as quieter than they physically are. Weighting filters correct measurements to match human perception. A-weighting (dBA) mimics quiet listening conditions and is the standard for environmental noise regulations and hearing safety. Use it when measuring your room’s noise floor or ensuring you won’t disturb neighbors. C-weighting (dBC) is flatter, responding more to bass, and reflects loud listening conditions. It’s crucial for measuring subwoofer levels and identifying low-frequency problems your ears might miss. Z-weighting (dBZ) is completely unfiltered, measuring true sound pressure across 10Hz-20kHz. This is the scientific standard for acoustic analysis and calibration. Using the wrong weighting is like using a ruler with invisible bends—you’ll get numbers, but they’ll mislead your decisions. Always match your weighting to your goal: A for noise complaints, C for bass management, Z for technical accuracy.
Hardware Solutions: Standalone Monitors and Professional SPL Meters
When software won’t cut it, dedicated hardware becomes your truth-teller. Professional SPL meters fall into Class 1 and Class 2 categories (defined by IEC 61672). Class 1 meters offer ±1.5dB accuracy across temperatures and frequencies—essential for legal compliance and mastering work. Class 2 meters (±2.5dB) suffice for most home studio calibration and general monitoring. Look for devices with fast and slow time weighting: fast (125ms) captures peaks and transients, while slow (1 second) gives you an average level for consistent monitoring. The best hardware includes data logging capabilities, allowing you to track SPL variations over hours or days—perfect for identifying that intermittent HVAC cycle or traffic pattern that’s ruining takes. Some units also feature octave band analysis, breaking down noise into frequency bands to pinpoint problem areas without needing a separate analyzer. Avoid cheap, uncertified “decibel meters” that lack proper microphone capsules or weighting options; their readings can be off by 5-10dB, rendering them worse than useless.
Software Solutions: DAW Plugins and Standalone Applications
Software monitoring tools integrate seamlessly into your production workflow, offering visual feedback directly in your DAW. Level meters with true-peak detection prevent inter-sample clipping when converting to lossy formats. Loudness meters implementing ITU-R BS.1770 or EBU R128 standards show integrated LUFS (Loudness Units relative to Full Scale), the metric that Spotify, YouTube, and Apple Music use to normalize playback. This is non-negotiable for modern mastering. Spectrum analyzers with high FFT resolution reveal frequency buildup and masking in real-time, while spectrograms show how energy evolves over time—ideal for finding resonant rings in drum recordings. Standalone applications often provide deeper analysis: room measurement software generates waterfall plots showing frequency decay, exposing modal ringing that reverb plugins can’t fix. The trade-off? Software relies on your audio interface’s quality and your computer’s stability. A glitch or clock drift can corrupt measurements, and your interface’s preamps color the signal path. For critical measurements, hardware remains the gold standard, but software excels for daily workflow integration.
The Truth About Smartphone Apps for Serious Monitoring
Let’s address the obvious question: can you just use that free decibel app? Smartphone microphones are MEMS (Micro-Electro-Mechanical Systems) devices designed for voice calls, not accuracy. Their frequency response varies wildly between phone models, often rolling off sharply below 100Hz and above 8kHz. They lack proper windscreens, making them vulnerable to breath and air movement. Most apps don’t implement true weighting filters correctly, instead applying crude EQ curves. While some premium apps allow external microphone input via the headphone jack or Lightning/USB-C port, you’re still limited by the phone’s preamp quality and analog-to-digital converter. For casual level checks or impressing friends, apps are fine. For setting monitor calibration levels, measuring treatment effectiveness, or ensuring legal compliance, they’re dangerously misleading. Think of them as toy telescopes—fun to play with, but you wouldn’t navigate a ship by what you see through them.
Reference Microphones: The Heart of Accurate Measurement
Your monitoring chain is only as good as the microphone capturing sound. Reference microphones are omnidirectional, have ruler-flat frequency responses (±1dB from 20Hz-20kHz), and are individually calibrated with a frequency response chart and correction file. Unlike studio condensers colored for musicality, these are scientific instruments. Pressure-field microphones measure sound at a boundary (like a wall), while free-field microphones measure sound arriving from a specific direction—choose based on your primary measurement position. Crucially, reference mics require phantom power and an interface with clean, transparent preamps. Any coloration in the signal chain pollutes your data. Some models include electronic calibration files that software uses to compensate for minor response deviations. This is essential: even the best mic has tiny imperfections, and correction files ensure you’re measuring reality, not the mic’s personality. Never use a directional vocal mic or a dynamic instrument mic for measurements; their frequency response graphs look like rollercoasters, and their polar patterns reject sound you’re trying to measure.
Room Acoustics: How Your Space Deceives Your Ears
Your room is the biggest liar in your signal chain. Standing waves create 20-30dB peaks and nulls at specific frequencies, making you cut or boost those frequencies in your mix, which then sounds wrong everywhere else. Early reflections arriving within 15ms of the direct sound smear transients and destroy stereo imaging, convincing you your panning is vague. Reverberation decay that’s too long masks low-level detail, while uneven decay across frequencies makes some instruments sound washed out and others dry. Monitoring reveals these deceptions. A waterfall plot shows frequency decay over time—look for frequencies that “hang” longer than 300ms; those need bass trapping. An RT60 measurement (reverb time) should be roughly 0.3-0.4 seconds for a home studio; longer times indicate too much reflective surface. Energy-time curves expose reflection points on your walls. Without these measurements, you’re treating blindly—hanging foam where it looks good instead of where science says it’s needed.
Strategic Microphone Placement for Reliable Measurements
Where you place your measurement mic determines your data’s usefulness. For monitor calibration, position the mic at your listening position, pointed at the ceiling, at ear height (typically 38-48 inches from the floor). This captures what your ears actually hear. For room analysis, create a measurement grid: take readings at your mix position, then 2 feet left, right, forward, and back. This reveals spatial inconsistencies. When measuring noise floor, place the mic at the quietest spot in the room—often away from windows and corners—to establish your baseline. For bass trapping analysis, position the mic in corners where low-frequency pressure builds; you’ll see 10-20dB higher SPL below 100Hz here. Always use a mic stand—handholding introduces handling noise and inconsistent positioning. Keep the mic at least 3 feet from any boundary to avoid boundary interference unless you’re specifically measuring boundary effects. And never, ever measure with the mic on your desk; that surface reflects sound and artificially boosts highs by 3-6dB.
Calibration: The Non-Negotiable Step for Trustworthy Data
An uncalibrated monitor is a random noise generator. Calibration aligns your system’s electrical and acoustic levels to a known reference. Start with electrical calibration: feed a -18dBFS (decibels relative to Full Scale) 1kHz tone from your DAW to your monitors. This should produce 73dB SPL at your listening position for a small room, or 85dB SPL for larger spaces—these are SMPTE and Dolby standards. Use your SPL meter in C-weighted, slow mode. Adjust your monitor gain until you hit the target. This ensures 0dBFS (digital maximum) equals a known, safe acoustic level. Next, acoustic calibration: use pink noise at -20dBFS and measure each frequency band. Your room’s response will show peaks and dips; these inform treatment decisions. Many engineers also calibrate to the K-System, developed by Bob Katz, which links monitor gain to metering scales (K-20 for cinema, K-14 for mainstream, K-12 for broadcast). The K-System prevents you from mixing too loud—a common mistake that causes ear fatigue and poor translation. Recalibrate monthly, as monitor components drift and room conditions change with humidity and temperature.
Industry Standards: ITU-R BS.1770, EBU R128, and ATSC A/85
If you’re delivering music to streaming platforms, these standards are your bible. ITU-R BS.1770 defines how loudness is measured using LUFS (Loudness Units relative to Full Scale). It uses a K-weighting filter that emphasizes dialogue frequencies and includes a gated measurement that ignores silence and quiet passages. EBU R128, used in Europe, specifies -23 LUFS for broadcast with ±1 LU tolerance. ATSC A/85, the US standard, uses -24 LUFS. Streaming services have adopted these: Spotify normalizes to -14 LUFS, YouTube to -13 LUFS, Apple Music to -16 LUFS. Monitoring integrated loudness ensures your track won’t be turned down (or up) by platform algorithms, preserving your dynamic range decisions. True-peak meters are also required—these detect inter-sample peaks that can clip after lossy encoding. A reading above -1dBTP (decibels True Peak) risks distortion on streaming services. Your monitoring setup must include a LUFS meter with true-peak detection; otherwise, you’re mastering for a world that no longer exists.
Reading Your Data: Interpreting SPL, Spectrum, and Spectrogram Displays
Raw numbers are meaningless without context. SPL readings tell you level, but not quality. A constant 70dB SPL from an air conditioner is background noise; 70dB SPL from a snare drum is a transient event. Look at LAF (Level, A-weighted, Fast) for peaky sounds and LAS (Level, A-weighted, Slow) for average pressure. Spectrum analyzers show frequency distribution. A bump at 60Hz suggests AC mains hum; a rise below 40Hz indicates wind or HVAC rumble; a shelf above 8kHz could be computer fan noise. Spectrograms add the time dimension: horizontal axis is time, vertical is frequency, color intensity is level. This reveals dynamic noise—like a car passing that only affects 100-200Hz for three seconds. For room analysis, waterfall plots are essential: they show how each frequency decays. A healthy room shows even decay across frequencies; a problematic room shows certain frequencies ringing 5-10 seconds longer. Learn to recognize these patterns, and you’ll diagnose issues in minutes that would take hours of guesswork.
The Monitoring Mistake Most Home Producers Make
Here’s the critical error: measuring at only one point in time. Your room’s noise floor varies dramatically throughout the day. That pristine 28dB SPL reading at 2 AM can jump to 45dB SPL during rush hour. Time-lapse monitoring is the solution. Set your SPL meter to log levels every 30 seconds for 24 hours. You’ll discover patterns: the 7-9 AM traffic spike, the 6 PM neighbor TV hour, the 11 PM HVAC shutdown. This data tells you when to schedule critical listening sessions and when to settle for editing work. Another fatal mistake: mixing at inconsistent levels. The ear’s frequency response changes with level (the Fletcher-Munson curves). Mixing at 85dB SPL one day and 65dB SPL the next means you’re making completely different EQ decisions. Use a monitor control system with preset levels, and always return to your calibrated reference. Finally, don’t measure in silence, then ignore measurements during full playback. The acoustic energy from your monitors excites room modes and raises the noise floor through sympathetic vibrations. Always measure both “silence” and “signal” conditions.
Budget Breakdown: From $0 to Professional-Grade Monitoring
You can start monitoring with zero budget, but each tier adds precision. Tier 0: Free smartphone apps—useful only for rough level checks and developing awareness. Tier 1: $50-150 buys a decent Class 2 SPL meter with A/C weighting and data logging. This is the minimum viable tool for setting monitor levels and tracking noise floor. Tier 2: $200-400 adds a measurement microphone (like a calibrated USB mic) and room analysis software. Now you can generate waterfall plots and RT60 data to guide acoustic treatment. Tier 3: $500-800 gets you a Class 1 SPL meter with octave band analysis and a professional reference mic with correction files. This level supports legal compliance and mastering-grade accuracy. Tier 4: $1000+ includes multi-channel hardware analyzers, calibrated monitor controllers with built-in metering, and calibrated measurement microphones for surround setups. The law of diminishing returns hits hard after Tier 3; only pursue Tier 4 if you’re running a commercial facility or immersive audio setup. Prioritize in this order: Class 2 SPL meter → measurement mic → analysis software → Class 1 upgrade. Skip the gimmicks like flashy spectrum displays that lack proper weighting or calibration.
Building Monitoring Into Your Daily Production Ritual
Monitoring shouldn’t be a separate task—it should be invisible. Start every session with a 30-second noise floor check: open your SPL meter and note the ambient level. If it’s above 35dB SPL, you know to expect noise in your recordings. During tracking, keep a real-time LUFS meter on your master bus; this prevents you from recording too hot and gives you a running loudness estimate. When mixing, reference your calibration tone every hour to ensure monitor levels haven’t drifted. At the end of each day, run a 5-minute room analysis: pink noise through your monitors, measurement mic at listening position, save the spectrum. Over weeks, you’ll build a database showing how humidity, temperature, and even furniture position affect your room. Before mastering, perform a 24-hour noise floor log to find the quietest time for critical listening. Create templates in your DAW with metering plugins already inserted and configured. The goal is to make data collection as automatic as breathing, so you’re always making decisions from a place of knowledge, not assumption.
Noise Pollution Laws and Home Studio Compliance
Your creative sanctuary can become a legal nightmare if you ignore local ordinances. Most municipalities define “quiet hours” (typically 10 PM to 7 AM) and set maximum permissible noise levels at property lines—often 55dB(A) during day, 45dB(A) at night. Measuring this requires a Class 1 SPL meter placed at your neighbor’s property line, not inside your room. The tricky part: structure-borne noise. Your subwoofer might measure 70dB SPL in your room, but the vibrations traveling through floor joists could be the real complaint trigger. Use a vibration sensor (accelerometer) on shared walls and floors to measure this. If you’re exceeding limits, solutions include: isolation pads (reduce transmitted vibration by 10-15dB), bass traps (reduce low-frequency buildup that escapes walls), and scheduling loud sessions during permitted hours. Document everything: keep logs of your SPL measurements, times of operation, and any treatment you’ve installed. This creates a good-faith record if complaints arise. Some cities require permits for home businesses producing noise; a proper monitoring setup demonstrates professionalism and may help secure approval. Ignorance isn’t a defense—know your local laws.
Future-Proofing: What to Upgrade First as You Grow
Your monitoring needs evolve with your studio. The first upgrade path is accuracy: move from a Class 2 to Class 1 SPL meter when you start mastering for clients or need legal compliance. Next, expand dimensionality: add a second measurement mic to compare nearfield and farfield responses, or upgrade to a binaural head for immersive audio monitoring. Then, increase automation: invest in a monitor controller that automatically recalls calibration levels and switches between measurement presets. Finally, consider multi-point monitoring: a distributed system with mics at the listening position, near the door, and outside the room, feeding a central logging system. This gives you real-time noise floor alerts and automatic session logging. The microphone is always the weakest link; upgrading from a budget measurement mic to a lab-calibrated reference mic yields more improvement than any software upgrade. And as you add gear, remember: every new piece of electronics adds noise. Re-measure your noise floor after installing that new rackmount interface or external clock. Future-proofing means building a system that scales from stereo to surround to Dolby Atmos without replacing your core monitoring tools.
Frequently Asked Questions
What’s the difference between SPL and dBFS, and why do I need both?
SPL (Sound Pressure Level) measures acoustic energy in the air—what your ears physically hear—while dBFS (decibels relative to Full Scale) measures digital signal level in your DAW. You need SPL to calibrate your monitors to a safe, consistent listening level and to measure your room’s noise floor. You need dBFS to ensure you’re not clipping your converters and to hit target loudness levels. The relationship between them is your calibration: for example, -18dBFS might equal 73dB SPL at your listening position. Monitoring both ensures your digital decisions translate accurately to the acoustic world.
Can I use my expensive studio condenser microphone for SPL measurements?
No, and here’s why: studio microphones are designed with intentional frequency coloration to flatter sources. Even “flat” mics have response variations of ±3dB and are directional, rejecting sound from the rear and sides. SPL measurement requires an omnidirectional microphone with a truly flat response (±1dB) and a known sensitivity rating. Using a vocal mic would be like trying to measure distance with a funhouse mirror—everything is distorted. Invest in a proper measurement microphone; it’s the only component that can’t be compromised.
What’s a healthy noise floor level for a home recording studio?
Aim for 25-30dB SPL (A-weighted) in a well-treated room. This is roughly the noise floor of a quiet recording studio and gives you enough headroom to record intimate sources like acoustic guitar or vocals without audible hiss. If you’re measuring 35-40dB SPL, you’re in the “acceptable but limited” range—fine for rock and electronic music, but challenging for classical or jazz. Above 45dB SPL, you’re fighting a losing battle; focus on noise reduction before any other upgrades. Remember, each 10dB increase represents a doubling of perceived loudness.
How often should I recalibrate my monitoring setup?
Recalibrate acoustically every month and electronically every time you change a component. Monitor drivers drift with temperature and humidity, and your ears’ sensitivity changes with age and exposure. If you move any furniture, recalibrate. If you add a new piece of outboard gear, recalibrate. If you notice your mixes suddenly translating poorly, recalibrate. Think of it like tuning a guitar: it’s not a one-time event. For professional work, some engineers calibrate weekly. At minimum, set a recurring calendar reminder for the first of every month.
Do I really need a Class 1 SPL meter, or will Class 2 suffice?
For 90% of home studio owners, Class 2 is sufficient. It provides ±2.5dB accuracy, which is enough for monitor calibration, room analysis, and general noise monitoring. Upgrade to Class 1 when you need legal compliance (measuring noise at property lines for neighbor disputes), when you’re mastering for commercial release and need absolute confidence in your levels, or when you’re charging clients and need to demonstrate professional standards. The accuracy difference is real but expensive—spend the money on acoustic treatment first.
What’s the ideal SPL level for mixing and mastering?
Follow the SMPTE standard: 73dB SPL for small rooms under 1,500 cubic feet, 85dB SPL for larger spaces. This is measured C-weighted, slow response, at your listening position with pink noise at -20dBFS. This level provides the most linear frequency perception and allows for hours of safe listening. Many engineers mix at lower levels (60-65dB SPL) for extended sessions, then check at the calibrated reference level periodically. Never mix above 85dB SPL for more than a few minutes; you’re not only risking hearing damage, but you’re also making poor EQ decisions due to the Fletcher-Munson effect.
How can I measure the effectiveness of my bass traps?
Measure before and after installation using RT60 decay time and waterfall plots. Place your measurement mic in the corner where the trap will go, play a full-range sine sweep or impulse response, and capture the data. After installing the trap, repeat the measurement. Effective bass trapping will reduce decay times in the 40-200Hz range by 30-50%. You should also see a reduction in the severity of peaks and nulls at your listening position. Don’t just trust your ears—low frequencies are notoriously difficult to evaluate subjectively, and the placebo effect is strong when you’ve just spent money on treatment.
Can proper monitoring actually prevent hearing damage?
Absolutely. The key is awareness. Most hearing loss in studios isn’t from one catastrophic event—it’s from chronic exposure to 80-90dB SPL over years. An SPL meter with a dose function calculates your daily noise exposure as a percentage of safe limits (OSHA sets 85dB for 8 hours as 100% dose). When you see you’ve hit 50% dose, you know to lower the level or take a break. Some monitor controllers can be set to automatically attenuate levels after a certain time. Monitoring turns hearing protection from guesswork into a data-driven health practice, like wearing a fitness tracker for your ears.
Why do my mixes sound great in my studio but muddy in my car?
This is the classic symptom of poor low-frequency monitoring. Your room is likely exaggerating certain bass frequencies (room modes) and canceling others. When you mix, you compensate for these inaccuracies—cutting frequencies that are artificially boosted in your room, boosting frequencies that are nulled. In a different environment (your car), those corrections create an unbalanced mix. Use room analysis to identify your room’s frequency response, then treat the problems with bass traps and proper speaker placement. Until your room is accurate, you’re mixing to your room’s flaws, not to the music.
Is acoustic treatment or monitoring equipment more important?
Acoustic treatment is the foundation; monitoring is the tool that tells you where to treat. You need both, but treatment comes first. A well-treated room with basic monitoring will yield better mixes than a poor room with the best meters in the world. However, treating without measuring is like performing surgery with your eyes closed—you might get lucky, but you’ll probably make things worse. The ideal sequence is: 1) Basic SPL meter, 2) Strategic treatment based on measurements, 3) Advanced monitoring tools to fine-tune. One without the other is incomplete.